Olympus E-PM1 E-PM1 Instruction Manual (English) - Page 12
Choosing a Shooting Mode - tips
 |
View all Olympus E-PM1 manuals
Add to My Manuals
Save this manual to your list of manuals |
Page 12 highlights
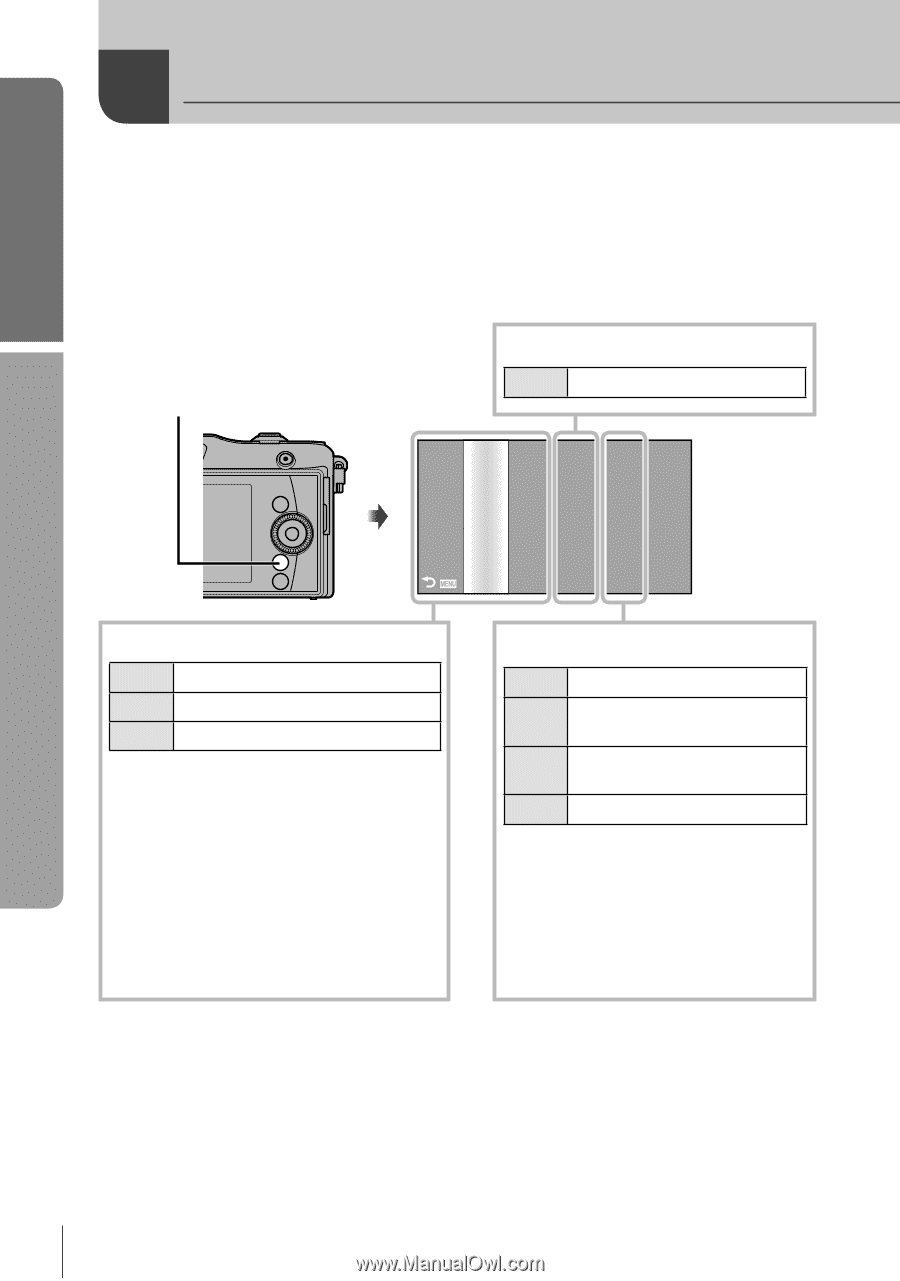
Choosing a Shooting Mode Basic guide Names of parts and functions Choose from a variety of shooting modes. After choosing the shooting mode, use the shutter button to take photographs and the R button to shoot movies. 1 Press the MENU button to display the top menu. 2 Use HI to select a shooting mode. • In the P/A/S/M column, use FG to highlight P, A, S, or M. MENU button ■ Movie mode n Movie (P. 61) ART A SCN n P A SETUP S M ■ Easy shooting modes A iAUTO (P. 20) ART Art filter (P. 18) SCN Scene (P. 19) • If A is selected, the camera automatically optimizes settings to suit the subject. • Select ART or SCN options according to your subject or creative intent. The camera optimizes settings automatically. • In these modes, default settings are restored if another shooting mode is selected or the camera is turned off. ■ Advanced shooting modes P Program shooting (P. 50) A Aperture priority shooting (P. 51) S Shutter priority shooting (P. 52) M Manual shooting (P. 53) • For more advanced shooting and greater creative control, you can set the aperture value and shutter speed. • The settings made in the advanced shooting modes are retained even if the camera is turned off. 3 Press Q. • In SCN and ART modes, a menu will be displayed. Use FG to highlight options and press Q to select. % Tips • Resetting camera settings: g "Restoring default or custom settings" (P. 35) 12 EN
-
 1
1 -
2
-
3
-
4
-
5
-
6
-
 7
7 -
 8
8 -
 9
9 -
 10
10 -
 11
11 -
 12
12 -
 13
13 -
 14
14 -
 15
15 -
 16
16 -
 17
17 -
18
-
19
-
20
-
21
-
22
-
23
-
24
-
25
-
26
-
27
-
28
-
29
-
30
-
31
-
32
-
33
-
34
-
35
-
36
-
37
-
38
-
39
-
40
-
41
-
42
-
43
-
44
-
45
-
46
-
47
-
48
-
49
-
50
-
51
-
52
-
53
-
54
-
55
-
56
-
57
-
58
-
59
-
60
-
61
-
62
-
63
-
64
-
65
-
66
-
67
-
68
-
69
-
70
-
71
-
72
-
73
-
74
-
75
-
76
-
77
-
78
-
79
-
80
-
81
-
82
-
83
-
84
-
85
-
86
-
87
-
88
-
89
-
90
-
91
-
92
-
93
-
94
-
95
-
96
-
97
-
98
-
99
-
100
-
101
-
102
-
103
-
104
-
105
-
106
-
107
-
108
-
109
-
110
-
111
-
112
-
113
-
114
-
115
-
116
-
117
-
118
-
119
-
120
-
121
-
122
-
123
-
124
-
125
-
126
-
127
-
128
-
129
 |
 |