Olympus E-PM1 E-PM1 Instruction Manual (English) - Page 54
Taking Panoramas, Taking pictures for a panorama
 |
View all Olympus E-PM1 manuals
Add to My Manuals
Save this manual to your list of manuals |
Page 54 highlights
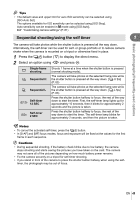
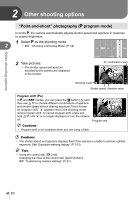
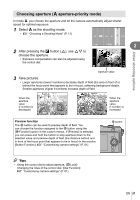
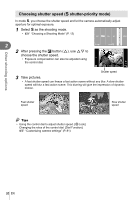
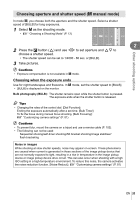
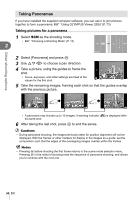
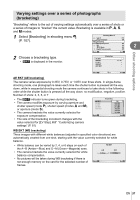
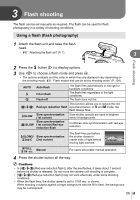
Other shooting options Taking Panoramas If you have installed the supplied computer software, you can use it to join pictures together to form a panorama. g "Using OLYMPUS Viewer 2/[ib]" (P. 73) Taking pictures for a panorama 1 Select SCN as the shooting mode. • g "Choosing a Shooting Mode" (P. 12) 2 ART A SCN n P A SETUP S M 2 Select [Panorama] and press Q. 3 Use FGHI to choose a pan direction. 4 Take a picture, using the guides to frame the ISO 200 shot. • Focus, exposure, and other settings are fixed at the M 250 F5.6 38 values for the first shot. 5 Take the remaining images, framing each shot so that the guides overlap with the previous picture. ISO 200 M 250 F5.6 38 [2] Exit [3] Exit • A panorama may include up to 10 images. A warning indicator (g) is displayed after the tenth shot. 6 After taking the last shot, press Q to end the series. # Cautions • During panorama shooting, the image previously taken for position alignment will not be displayed. With the frames or other markers for display in the images as a guide, set the composition such that the edges of the overlapping images overlap within the frames. $ Notes • Pressing Q before shooting the first frame returns to the scene mode selection menu. Pressing Q in the midst of shooting ends the sequence of panorama shooting, and allows you to continue with the next one. 54 EN
-
 1
1 -
2
-
3
-
4
-
5
-
6
-
7
-
8
-
9
-
10
-
11
-
12
-
13
-
14
-
15
-
16
-
17
-
18
-
19
-
20
-
21
-
22
-
23
-
24
-
25
-
26
-
27
-
28
-
29
-
30
-
31
-
32
-
33
-
34
-
35
-
36
-
37
-
38
-
39
-
40
-
41
-
42
-
43
-
44
-
45
-
46
-
47
-
48
-
 49
49 -
 50
50 -
 51
51 -
 52
52 -
 53
53 -
 54
54 -
 55
55 -
 56
56 -
 57
57 -
 58
58 -
 59
59 -
60
-
61
-
62
-
63
-
64
-
65
-
66
-
67
-
68
-
69
-
70
-
71
-
72
-
73
-
74
-
75
-
76
-
77
-
78
-
79
-
80
-
81
-
82
-
83
-
84
-
85
-
86
-
87
-
88
-
89
-
90
-
91
-
92
-
93
-
94
-
95
-
96
-
97
-
98
-
99
-
100
-
101
-
102
-
103
-
104
-
105
-
106
-
107
-
108
-
109
-
110
-
111
-
112
-
113
-
114
-
115
-
116
-
117
-
118
-
119
-
120
-
121
-
122
-
123
-
124
-
125
-
126
-
127
-
128
-
129
 |
 |
