Olympus E-PM1 E-PM1 Instruction Manual (English) - Page 75
Copying pictures to a computer without, OLYMPUS Viewer 2/[ib], Windows, Windows XP Home Edition
 |
View all Olympus E-PM1 manuals
Add to My Manuals
Save this manual to your list of manuals |
Page 75 highlights
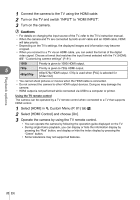
• Other languages can be selected from the language combo box. For information on using the software, see online help. • You can make user registration via "Registration" in OLYMPUS Viewer 2 "Help". # Cautions • AVCHD movie file format is not supported. Copying pictures to a computer without OLYMPUS Viewer 2/[ib] Your camera supports the USB Mass Storage Class. You can transfer images to a computer by connecting the camera to the computer with the supplied USB cable. The following operating systems are compatible with the USB connection: Windows: Macintosh: Windows XP Home Edition/ Windows XP Professional/ Windows Vista/Windows 7 Mac OS X version 10.3 or later 1 Turn the camera off and connect it to the computer. • The location of the USB port varies with the computer. For details, refer to your computer's manual. 2 Turn on the camera. USB 7 • The selection screen for the USB connection is displayed. 3 Press FG to select [Storage]. Press Q. Storage MTP Print Exit Set Using OLYMPUS Viewer 2/[ib] 4 The computer recognizes the camera as a new device. # Cautions • If your computer is running Windows Vista/Windows 7, select [MTP] in Step 3 to use Windows Photo Gallery. • Data transfer is not guaranteed in the following environments, even if your computer is equipped with a USB port. Computers with a USB port added by means of an extension card, etc. Computers without a factory-installed OS and home-built computers • Camera controls can not be used while the camera is connected to a computer. • If the dialog shown in Step 2 is not displayed when the camera is connected, select [Auto] for [USB Mode] in the camera custom menus. g "Customizing camera settings" (P. 81) EN 75
-
 1
1 -
2
-
3
-
4
-
5
-
6
-
7
-
8
-
9
-
10
-
11
-
12
-
13
-
14
-
15
-
16
-
17
-
18
-
19
-
20
-
21
-
22
-
23
-
24
-
25
-
26
-
27
-
28
-
29
-
30
-
31
-
32
-
33
-
34
-
35
-
36
-
37
-
38
-
39
-
40
-
41
-
42
-
43
-
44
-
45
-
46
-
47
-
48
-
49
-
50
-
51
-
52
-
53
-
54
-
55
-
56
-
57
-
58
-
59
-
60
-
61
-
62
-
63
-
64
-
65
-
66
-
67
-
68
-
69
-
 70
70 -
 71
71 -
 72
72 -
 73
73 -
 74
74 -
 75
75 -
 76
76 -
 77
77 -
 78
78 -
 79
79 -
 80
80 -
81
-
82
-
83
-
84
-
85
-
86
-
87
-
88
-
89
-
90
-
91
-
92
-
93
-
94
-
95
-
96
-
97
-
98
-
99
-
100
-
101
-
102
-
103
-
104
-
105
-
106
-
107
-
108
-
109
-
110
-
111
-
112
-
113
-
114
-
115
-
116
-
117
-
118
-
119
-
120
-
121
-
122
-
123
-
124
-
125
-
126
-
127
-
128
-
129
 |
 |
