Olympus E-PM1 E-PM1 Instruction Manual (English) - Page 51
Choosing aperture, aperture-priority mode, Preview function
 |
View all Olympus E-PM1 manuals
Add to My Manuals
Save this manual to your list of manuals |
Page 51 highlights
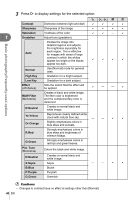
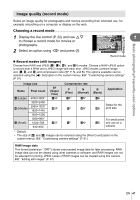
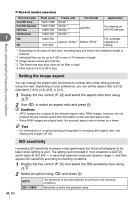
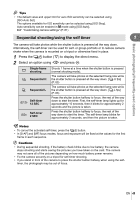
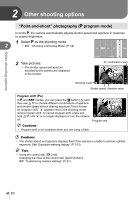
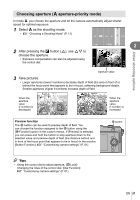
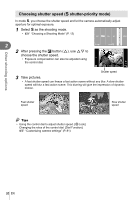
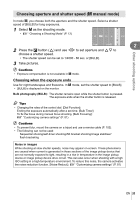
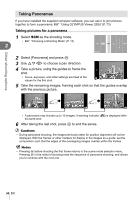
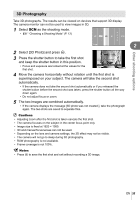
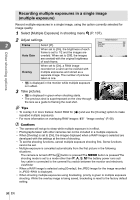
Choosing aperture (A aperture-priority mode) In mode A, you choose the aperture and let the camera automatically adjust shutter speed for optimal exposure. 1 Select A as the shooting mode. • g "Choosing a Shooting Mode" (P. 12) ART A SCN n P A SETUP S M 2 2 After pressing the F button (F), use FG to choose the aperture. ISO • Exposure compensation can also be adjusted using 400 the control dial. LN HD A 250 F5.6 +0.0 01:02:03 38 Aperture value 3 Take pictures. • Larger apertures (lower f-numbers) decrease depth of field (the area in front of or behind the focus point that appears to be in focus), softening background details. Smaller apertures (higher f-numbers) increase depth of field. Other shooting options When the aperture value (f-number) is decreased When the aperture value (f-number) is increased Preview function The R button can be used to preview depth of field. You can choose the function assigned to the R button using the [R Function] option in the custom menus. If [Preview] is selected, you can press and hold the button to stop aperture down to the selected value and preview depth of field (the distance behind and in front of the focus point that appears to be in focus) in the monitor. [Button Function]: g "Customizing camera settings" (P. 81) R button % Tips • Using the control dial to adjust aperture. [d Lock]: Changing the roles of the control dial. [Dial Function]: g "Customizing camera settings" (P. 81) EN 51
-
 1
1 -
2
-
3
-
4
-
5
-
6
-
7
-
8
-
9
-
10
-
11
-
12
-
13
-
14
-
15
-
16
-
17
-
18
-
19
-
20
-
21
-
22
-
23
-
24
-
25
-
26
-
27
-
28
-
29
-
30
-
31
-
32
-
33
-
34
-
35
-
36
-
37
-
38
-
39
-
40
-
41
-
42
-
43
-
44
-
45
-
 46
46 -
 47
47 -
 48
48 -
 49
49 -
 50
50 -
 51
51 -
 52
52 -
 53
53 -
 54
54 -
 55
55 -
 56
56 -
57
-
58
-
59
-
60
-
61
-
62
-
63
-
64
-
65
-
66
-
67
-
68
-
69
-
70
-
71
-
72
-
73
-
74
-
75
-
76
-
77
-
78
-
79
-
80
-
81
-
82
-
83
-
84
-
85
-
86
-
87
-
88
-
89
-
90
-
91
-
92
-
93
-
94
-
95
-
96
-
97
-
98
-
99
-
100
-
101
-
102
-
103
-
104
-
105
-
106
-
107
-
108
-
109
-
110
-
111
-
112
-
113
-
114
-
115
-
116
-
117
-
118
-
119
-
120
-
121
-
122
-
123
-
124
-
125
-
126
-
127
-
128
-
129
 |
 |
