Olympus E-PM1 E-PM1 Instruction Manual (English) - Page 21
buttons on the arrow pad to highlight, an item and press - custom settings
 |
View all Olympus E-PM1 manuals
Add to My Manuals
Save this manual to your list of manuals |
Page 21 highlights
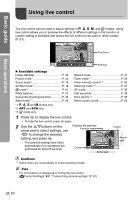
Basic guide Basic operations 1 Select A as the shooting mode. • g "Choosing a Shooting Mode" (P. 12) 2 After pressing Q to display the live guide, use the FG buttons on the arrow pad to highlight an item and press Q to select. Guide item Change Color Saturation Cancel 3 Use FG on the arrow pad to choose the level. • If [Shooting Tips] is selected, highlight an item and press Q to view a description. • Press the shutter button halfway to select. • The effect of the selected level is visible in the display. If [Blur Background] or [Express Motions] is selected, the display will return to normal, but the selected effect Cancel will be visible in the final photograph. Level bar Clear & Vivid 0 Flat & Muted Set 4 Shoot. • Press the shutter button to shoot. • To clear the live guide from the display, press the MENU button. # Cautions • If [RAW] is currently selected for image quality, image quality will automatically be set to [YN+RAW]. • Live guide settings are not applied to the RAW copy. • Pictures may appear grainy at some live guide setting levels. • Changes to live guide setting levels may not be visible in the monitor. • The flash can not be used with the live guide. • Changes to live guide options cancel previous changes. • Choosing live guide settings that exceed the limits of the camera exposure meters may result in pictures that are over- or under-exposed. • In P, A, S, and M modes, live guides can be displayed by pressing the R button. Pictures will be taken using live guide settings. [Button Function]: g "Customizing camera settings" (P. 81) EN 21
-
 1
1 -
2
-
3
-
4
-
5
-
6
-
7
-
8
-
9
-
10
-
11
-
12
-
13
-
14
-
15
-
 16
16 -
 17
17 -
 18
18 -
 19
19 -
 20
20 -
 21
21 -
 22
22 -
 23
23 -
 24
24 -
 25
25 -
 26
26 -
27
-
28
-
29
-
30
-
31
-
32
-
33
-
34
-
35
-
36
-
37
-
38
-
39
-
40
-
41
-
42
-
43
-
44
-
45
-
46
-
47
-
48
-
49
-
50
-
51
-
52
-
53
-
54
-
55
-
56
-
57
-
58
-
59
-
60
-
61
-
62
-
63
-
64
-
65
-
66
-
67
-
68
-
69
-
70
-
71
-
72
-
73
-
74
-
75
-
76
-
77
-
78
-
79
-
80
-
81
-
82
-
83
-
84
-
85
-
86
-
87
-
88
-
89
-
90
-
91
-
92
-
93
-
94
-
95
-
96
-
97
-
98
-
99
-
100
-
101
-
102
-
103
-
104
-
105
-
106
-
107
-
108
-
109
-
110
-
111
-
112
-
113
-
114
-
115
-
116
-
117
-
118
-
119
-
120
-
121
-
122
-
123
-
124
-
125
-
126
-
127
-
128
-
129
 |
 |
