Olympus E-PM1 E-PM1 Instruction Manual (English) - Page 44
White balance compensation, One-touch white balance
 |
View all Olympus E-PM1 manuals
Add to My Manuals
Save this manual to your list of manuals |
Page 44 highlights
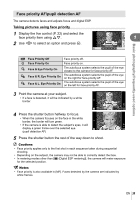
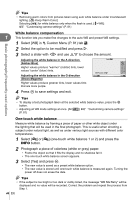
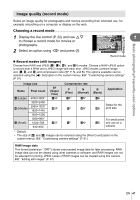
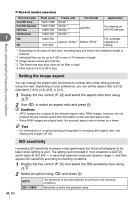
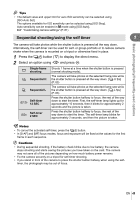
% Tips • Removing warm colors from pictures taken using auto white balance under incandescent lighting. [W Keep Warm Color]: Selecting [n] for white balance only when the flash is used. [#+WB]: g "Customizing camera settings" (P. 81) Basic photography/frequently-used options White balance compensation 1 This function lets you make fine changes to the auto WB and preset WB settings. 1 Select [WB] in c Custom Menu (P. 81) tab X. 2 Select the option to be modified and press I. 3 Select a slider with HI and use FG to choose the amount. Adjusting the white balance in the A direction (Amber-Blue) Auto AG +2 -5 Higher values produce "warmer" (redder) tints, lower values "cooler" (bluer) tints. WB Preview Adjusting the white balance in the G direction Back Set (Green-Magenta) Higher values produce greener tints, lower values tints that are more purple. 4 Press Q to save settings and exit. % Tips • To display a test photograph taken at the selected white balance value, press the R button. • Adjusting all WB mode settings at once. [All >]: g "Customizing camera settings" (P. 81) One-touch white balance Measure white balance by framing a piece of paper or other white object under the lighting that will be used in the final photograph. This is useful when shooting a subject under natural light, as well as under various light sources with different color temperatures. 1 Select [P] or [Q] (one-touch white balance 1 or 2) and press the INFO button. 2 Photograph a piece of colorless (white or gray) paper. • Frame the object so that it fills the display and no shadows fall it. • The one-touch white balance screen appears. 3 Select [Yes] and press Q. • The new value is saved as a preset white balance option. • The new value is stored until one-touch white balance is measured again. Turning the power off does not erase the data. % Tips • If the subject is too bright or too dark or visibly tinted, the message "WB NG Retry" will be displayed and no value will be recorded. Correct the problem and repeat the process from Step 1. 44 EN
-
 1
1 -
2
-
3
-
4
-
5
-
6
-
7
-
8
-
9
-
10
-
11
-
12
-
13
-
14
-
15
-
16
-
17
-
18
-
19
-
20
-
21
-
22
-
23
-
24
-
25
-
26
-
27
-
28
-
29
-
30
-
31
-
32
-
33
-
34
-
35
-
36
-
37
-
38
-
 39
39 -
 40
40 -
 41
41 -
 42
42 -
 43
43 -
 44
44 -
 45
45 -
 46
46 -
 47
47 -
 48
48 -
 49
49 -
50
-
51
-
52
-
53
-
54
-
55
-
56
-
57
-
58
-
59
-
60
-
61
-
62
-
63
-
64
-
65
-
66
-
67
-
68
-
69
-
70
-
71
-
72
-
73
-
74
-
75
-
76
-
77
-
78
-
79
-
80
-
81
-
82
-
83
-
84
-
85
-
86
-
87
-
88
-
89
-
90
-
91
-
92
-
93
-
94
-
95
-
96
-
97
-
98
-
99
-
100
-
101
-
102
-
103
-
104
-
105
-
106
-
107
-
108
-
109
-
110
-
111
-
112
-
113
-
114
-
115
-
116
-
117
-
118
-
119
-
120
-
121
-
122
-
123
-
124
-
125
-
126
-
127
-
128
-
129
 |
 |
