Olympus E-PM1 E-PM1 Instruction Manual (English) - Page 40
Controlling exposure exposure compensation, Changing the brightness of highlights and shadows
 |
View all Olympus E-PM1 manuals
Add to My Manuals
Save this manual to your list of manuals |
Page 40 highlights
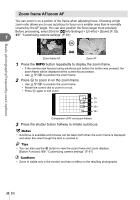
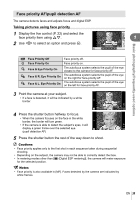
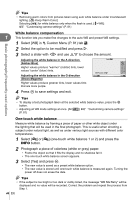
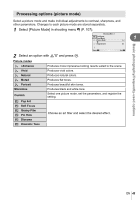
Basic photography/frequently-used options Controlling exposure (exposure compensation) Press the F button (F) and use HI to adjust exposure compensation. Choose positive ("+") values to make pictures brighter, negative ("-") values to make pictures darker. Exposure can be adjusted by ±3 EV. 1 Negative (-) No compensation (0) Positive (+) % Tips • To change the exposure adjustment interval. [EV Step]: g "Customizing camera settings" (P. 81) # Cautions • Exposure compensation is not available in A, M, or SCN modes. Previewing the effects of exposure compensation and white balance The effects of exposure compensation and white balance can be previewed in the 4-split screen. 1 Select [On] for [G/Info Settings] > [Multi View] in the c Custom menu (P. 81). 2 Press the INFO button repeatedly to display the multi view display. WB/ • This function is not available in A, ART, SCN or n mode. -0.3 0.0 +0.3 +0.7 Set 3 Use HI to select the desired value and press Q. • Use FG to toggle between the exposure compensation and white balance displays. Changing the brightness of highlights and shadows To display the tone control dialog, press the F button IS 1 (F) and press the INFO button. Use HI to choose a j tone level. Choose "low" to darken shadows or "high" to ISO 200 brighten highlights. LN INFO INFO 0 HD 0 INFO P 250 F5.6 +2.0 01:02:03 1234 Exposure compensation 0 +1 Tone level: low Tone level: high 40 EN
-
 1
1 -
2
-
3
-
4
-
5
-
6
-
7
-
8
-
9
-
10
-
11
-
12
-
13
-
14
-
15
-
16
-
17
-
18
-
19
-
20
-
21
-
22
-
23
-
24
-
25
-
26
-
27
-
28
-
29
-
30
-
31
-
32
-
33
-
34
-
 35
35 -
 36
36 -
 37
37 -
 38
38 -
 39
39 -
 40
40 -
 41
41 -
 42
42 -
 43
43 -
 44
44 -
 45
45 -
46
-
47
-
48
-
49
-
50
-
51
-
52
-
53
-
54
-
55
-
56
-
57
-
58
-
59
-
60
-
61
-
62
-
63
-
64
-
65
-
66
-
67
-
68
-
69
-
70
-
71
-
72
-
73
-
74
-
75
-
76
-
77
-
78
-
79
-
80
-
81
-
82
-
83
-
84
-
85
-
86
-
87
-
88
-
89
-
90
-
91
-
92
-
93
-
94
-
95
-
96
-
97
-
98
-
99
-
100
-
101
-
102
-
103
-
104
-
105
-
106
-
107
-
108
-
109
-
110
-
111
-
112
-
113
-
114
-
115
-
116
-
117
-
118
-
119
-
120
-
121
-
122
-
123
-
124
-
125
-
126
-
127
-
128
-
129
 |
 |
