Panasonic AG-HVX200PJ Operating Instructions - Page 62
Setting the time data continued, screen UB MODE, select USER.
 |
View all Panasonic AG-HVX200PJ manuals
Add to My Manuals
Save this manual to your list of manuals |
Page 62 highlights
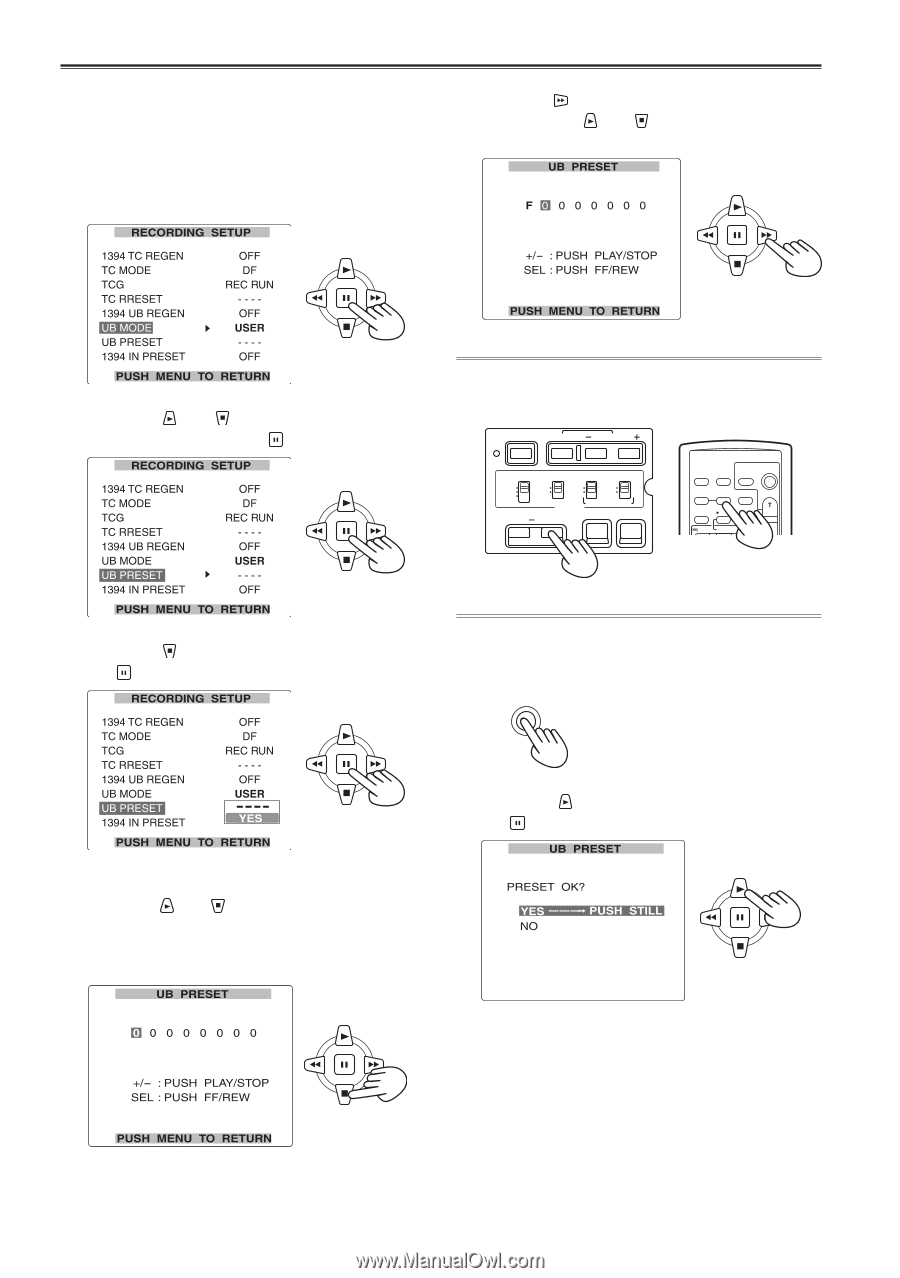
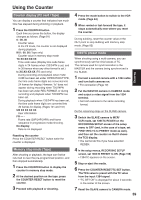
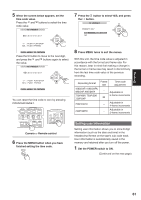
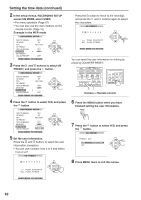
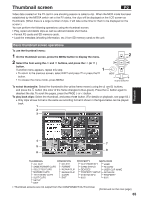
Setting the time data (continued) 2 In the setup menus, RECORDING SETUP screen UB MODE, select USER. • For menu operation (Page 97) • You can also use the menu buttons on the remote control. (Page 15) Example: In the MCR mode Press the button to move to the next digit, and press the and buttons again to select the characters. 3 Press the and buttons to select UB PRESET, and press the button. You can reset the user information to nothing by pressing COUNTER RESET. BARS RESET SHUTTER SPEED SEL CH 1 SELECT CH 2 SELECT INPUT 1 INPUT 2 INT(L) INPUT 1 INPUT 2 INT(R) INPUT 2 ON ON OFF OFF AUDIO MIC POWER +48V COUNTER RESET/TC SET ZEBRA OIS OSD START/ DATE/ PHOTO STOP TIME SHOT COUNTER RESET TITLE ZOOM MULTI/ P-IN-P REC A.DUB - VOL + /REW PLAY FF/ Camera or Remote control 4 Press the button to select YES, and press the button. 6 Press the MENU button when you have finished setting the user information. MENU 7 Press the button to select YES, and press the button. 5 Set the user information. Press the and buttons to select the user information characters. • You can use numbers from 0 to 9 and letters from A to F. 8 Press MENU twice to exit the menus. 62
-
 1
1 -
2
-
3
-
4
-
5
-
6
-
7
-
8
-
9
-
10
-
11
-
12
-
13
-
14
-
15
-
16
-
17
-
18
-
19
-
20
-
21
-
22
-
23
-
24
-
25
-
26
-
27
-
28
-
29
-
30
-
31
-
32
-
33
-
34
-
35
-
36
-
37
-
38
-
39
-
40
-
41
-
42
-
43
-
44
-
45
-
46
-
47
-
48
-
49
-
50
-
51
-
52
-
53
-
54
-
55
-
56
-
 57
57 -
 58
58 -
 59
59 -
 60
60 -
 61
61 -
 62
62 -
 63
63 -
 64
64 -
 65
65 -
 66
66 -
 67
67 -
68
-
69
-
70
-
71
-
72
-
73
-
74
-
75
-
76
-
77
-
78
-
79
-
80
-
81
-
82
-
83
-
84
-
85
-
86
-
87
-
88
-
89
-
90
-
91
-
92
-
93
-
94
-
95
-
96
-
97
-
98
-
99
-
100
-
101
-
102
-
103
-
104
-
105
-
106
-
107
-
108
-
109
-
110
-
111
-
112
-
113
-
114
-
115
-
116
-
117
-
118
-
119
-
120
-
121
-
122
-
123
-
124
-
125
-
126
-
127
-
128
-
129
-
130
-
131
-
132
-
133
-
134
-
135
-
136
-
137
-
138
 |
 |