Panasonic AG-HVX200PJ Operating Instructions - Page 88
Digital input/output (P2 card/Tape)
 |
View all Panasonic AG-HVX200PJ manuals
Add to My Manuals
Save this manual to your list of manuals |
Page 88 highlights
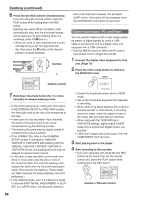
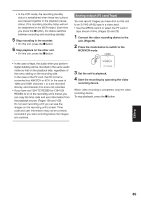
Dubbing (continued) 6 Press the two REC buttons simultaneously. If you are using the remote control, press the PLAY button while holding down the REC button. Dubbing now starts. When it finishes, it will automatically stop, and the thumbnail display will be restored. (To stop dubbing while it is underway, press the button.) • When you wish to start dubbing from a point mid-way along a clip, first play back the clip, then press the button at the desired position to pause playback. REC Camera COUNTER RESET TITLE ZOOM MULTI/ P-IN-P REC A.DUB /REW PLAY FF/ STILL ADV PAUSE STILL ADV INDEX STOP INDEX ÐVOL + or Remote control 7 Hold down the mode button (for 2 or more seconds) to release dubbing mode. • In the VCR setting menu, setting the TCG option in RECORDING SETUP to FREE RUN enables the timecode used by the clip to be transferred to the tape. • In the case of a clip recorded in four channels, the audio of channels 3 and 4 will not be transferred during the dubbing process. • The dubbing IN points may be slightly ahead of or behind their actual positions. • If the FORMAT SEL item on the DUBBING SETUP screen is changed to 1080i/24P, 720P/24P or 720P/24PN after dubbing with the 1080i/60i, 1080i/30P, 720P/60P, 720P/30P or 720P/30PN format, the dubbing IN point may be delayed for several dozen frames. • In the case of clips recorded continuously onto three or more cards, dub the clips on two of the cards first. After this, stop the dubbing, and replace the cards with the third and subsequent cards. Then resume the dubbing. (These steps are taken because hot swap playback cannot be performed.) • In the dubbing mode, even if an attempt is made to allocate SHOT MARK, INDEX/MEMO or SLOT SEL to a USER button, the allocated operation will not be executed. However, the allocated USER button information will be displayed when the DISP/MODE CHK button is held down. Digital input/output (P2 card/Tape) You can perform dubbing with a high image quality by means of digital signals by using a 1394 cable to connect this unit to a digital video unit equipped with a 1394 connector. • Use the MEDIA switch to select the P2 card or tape ahead of time. (Pages 25 and 29) 1 Connect the digital video equipment to this unit. (Page 79) 2 Press the unit's mode button to switch to the MCR/VCR mode. CAMERA MCR VCR PC DUB • Cancel the thumbnail screen when in MCR mode. • Set up the connected equipment for playback or recording. • When performing digital dubbing with a second camera-recorder or other device, a recording cannot be made unless the signal formats at the output side and input side are identical. • When using with the 720P/24PN and 720P/30PN settings, digital output in MCR mode only is performed. Digital input is not possible. • 1394 input images cannot be output from the COMPONENT OUT terminal. 3 Start playing back in the player. 4 Start recording in the recorder. • If you are using this unit, press the two REC buttons at the same time. On the remote control unit, press the PLAY button while holding down the REC button. REC COUNTER RESET TITLE ZOOM MULTI/ P-IN-P REC A.DUB ÐVOL + /REW PLAY FF/ STILL ADV PAUSE STILL ADV INDEX STOP INDEX Camera or Remote control 88
-
 1
1 -
2
-
3
-
4
-
5
-
6
-
7
-
8
-
9
-
10
-
11
-
12
-
13
-
14
-
15
-
16
-
17
-
18
-
19
-
20
-
21
-
22
-
23
-
24
-
25
-
26
-
27
-
28
-
29
-
30
-
31
-
32
-
33
-
34
-
35
-
36
-
37
-
38
-
39
-
40
-
41
-
42
-
43
-
44
-
45
-
46
-
47
-
48
-
49
-
50
-
51
-
52
-
53
-
54
-
55
-
56
-
57
-
58
-
59
-
60
-
61
-
62
-
63
-
64
-
65
-
66
-
67
-
68
-
69
-
70
-
71
-
72
-
73
-
74
-
75
-
76
-
77
-
78
-
79
-
80
-
81
-
82
-
 83
83 -
 84
84 -
 85
85 -
 86
86 -
 87
87 -
 88
88 -
 89
89 -
 90
90 -
 91
91 -
 92
92 -
 93
93 -
94
-
95
-
96
-
97
-
98
-
99
-
100
-
101
-
102
-
103
-
104
-
105
-
106
-
107
-
108
-
109
-
110
-
111
-
112
-
113
-
114
-
115
-
116
-
117
-
118
-
119
-
120
-
121
-
122
-
123
-
124
-
125
-
126
-
127
-
128
-
129
-
130
-
131
-
132
-
133
-
134
-
135
-
136
-
137
-
138
 |
 |