Panasonic AG-HVX200PJ Operating Instructions - Page 71
Checking the clip or card information (PROPERTY), CLIP PROPERTY
 |
View all Panasonic AG-HVX200PJ manuals
Add to My Manuals
Save this manual to your list of manuals |
Page 71 highlights
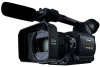
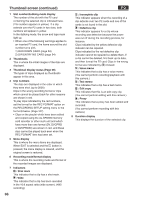
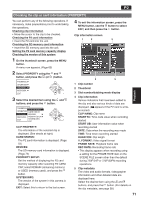
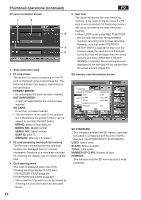
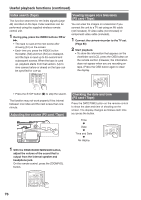
P2 Checking the clip or card information (PROPERTY) Playback You can perform any of the following operations. If necessary, make preparations prior to undertaking the operations. Checking clip information • Move the cursor to the clip to be checked. Checking the P2 card information • Insert the P2 card into the unit. Checking the SD memory card information • Insert the SD memory card into the unit. Setting the P2 card memory capacity display Checking the version of this system 1 On the thumbnail screen, press the MENU button. A menu now appears. (Page 65) 2 Select PROPERTY using the and button, and press the (or ) button. 3 Select the desired item using the and buttons, and press the button. CLIP PROPERTY: The information of the selected clip is displayed. (See details at right.) CARD STATUS: The P2 card information is displayed. (Page 72) DEVICES: The SD memory card information is displayed. (Page 72) PROPERTY SETUP: Set the method of displaying the P2 card memory capacity. After selecting P2 CARD CAP, select REMAIN (remaining memory) or USED (memory used), and press the button. SYSTEM INFO: The version of the system in this camera is displayed. EXIT: Select this to return to the last screen. 4 To exit the information screen, press the MENU button, use the button to select EXIT, and then press the button. Clip information screen 1 2 3 4 5 1 Clip number 2 Thumbnail 3 Slot number/dubbing mode display 4 Clip information Various indicators that have been added to the clip and also various kinds of data are displayed. ( appears if the P2 card is writeprotected) CLIP NAME: Clip name START TC: Time code value when recording started START UB: User information value when recording started DATE: Date when the recording was made TIME: Time when recording started DURATION: Clip length V_FORMAT: Video signal format FRAME RATE: Playback frame rate REC RATE: Recording frame rate • This display appears when recording using a setting for the FRAME RATE item on the SCENE FILE screen other than the default during 720P/24P or 720P/30PN recording operations. 5 Clip metadata The video and audio formats, videographer information and other detailed data are displayed here. Select the desired item using the and buttons, and press the button. (For details on the clip metadata, see page 58.) 71
-
 1
1 -
2
-
3
-
4
-
5
-
6
-
7
-
8
-
9
-
10
-
11
-
12
-
13
-
14
-
15
-
16
-
17
-
18
-
19
-
20
-
21
-
22
-
23
-
24
-
25
-
26
-
27
-
28
-
29
-
30
-
31
-
32
-
33
-
34
-
35
-
36
-
37
-
38
-
39
-
40
-
41
-
42
-
43
-
44
-
45
-
46
-
47
-
48
-
49
-
50
-
51
-
52
-
53
-
54
-
55
-
56
-
57
-
58
-
59
-
60
-
61
-
62
-
63
-
64
-
65
-
 66
66 -
 67
67 -
 68
68 -
 69
69 -
 70
70 -
 71
71 -
 72
72 -
 73
73 -
 74
74 -
 75
75 -
 76
76 -
77
-
78
-
79
-
80
-
81
-
82
-
83
-
84
-
85
-
86
-
87
-
88
-
89
-
90
-
91
-
92
-
93
-
94
-
95
-
96
-
97
-
98
-
99
-
100
-
101
-
102
-
103
-
104
-
105
-
106
-
107
-
108
-
109
-
110
-
111
-
112
-
113
-
114
-
115
-
116
-
117
-
118
-
119
-
120
-
121
-
122
-
123
-
124
-
125
-
126
-
127
-
128
-
129
-
130
-
131
-
132
-
133
-
134
-
135
-
136
-
137
-
138
 |
 |