Panasonic AG-HVX200PJ Operating Instructions - Page 87
Dubbing, Dubbing the contents of P2 cards onto a tape (dubbing mode)
 |
View all Panasonic AG-HVX200PJ manuals
Add to My Manuals
Save this manual to your list of manuals |
Page 87 highlights
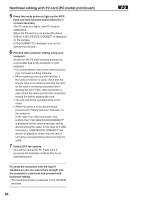
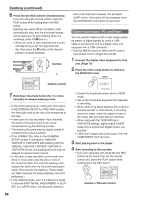
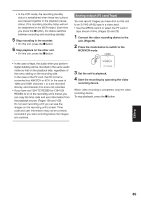
Dubbing Dubbing the contents of P2 cards onto a tape (dubbing mode) You can dub any clips from a P2 card to a tape that you have inserted into the unit. The recording formats of clips that can be dubbed are all of the 1080i and 720P formats. In all cases, the data is recorded in the DV format. • Check to see if the tape is in a write-protected state. (During the dubbing operation, an error message does not appear.) • Insert the P2 card and tape into the unit, and set the MEDIA switch to the TAPE position. (Pages 25 and 29) • When recording for the purpose of dubbing, it is recommended that a slightly higher setting (+5 or so) be used for the DETAIL LEVEL item on the SCENE FILE screen of the setting menu. 1 Set the unit's POWER switch to ON. 2 Press the mode button to light up the VCR lamp. 3 Move the tape forward to the position to start recording. • It is convenient to use the End Search (page 75) function. 4 Hold down the mode button (at least 2 seconds). The DUB lamp now lights, and dubbing mode is established. CAMERA MCR VCR PC DUB 3) Use the MENU button to close the menu, and press the THUMBNAIL button to return to the thumbnail display. Clips with formats that permit dubbing are indicated by black numbers; all other clips are indicated by the red numbers. (Clips indicated by the red numbers cannot be dubbed.) • To perform the pulldown setting when dubbing 720/24PA format clips 1) Press the THUMBNAIL button to close the thumbnail display, and use the MENU button to open the menu. 2) Select DUBBING SETUP and then PULLDOWN SEL. Select 24P or 24PA. 24P: 2:3 pulldown 24PA: 2:3:3:2 pulldown 3) Use the MENU button to close the menu, and press the THUMBNAIL button to return to the thumbnail display. 5 Select the first clip to be dubbed using the and buttons, and press the button. You can select multiple clips by repeating the above procedure. Upon completing the selection, switch to the SELECTED CLIPS display on the THUMBNAIL menu, and check that the cursor appears at the first clip on the thumbnail display. • To dub all the clips in the format selected in step 4 Position the cursor at the first valid clip (indicated by the black number) on the thumbnail display. The clips on the P2 card appear as thumbnails on the LCD screen. • To set the formats that permit dubbing 1) Press the THUMBNAIL button to close the thumbnail display, and use the MENU button to open the menu. 2) Select DUBBING SETUP and then FORMAT SEL to select the format. Select the same format as the recording format shown at the bottom left of the thumbnail display. (Since the format of clips for which standard recording was used at the variable frame rate is 720P/60P, select 720P/60P using FORMAT SEL.) • Dubbing will start from the clip where the cursor is positioned so check the position of the cursor before proceeding. • Dubbing will not start if the cursor is positioned on a clip indicated by a red number. (Continued on the next page) Editing 87
-
 1
1 -
2
-
3
-
4
-
5
-
6
-
7
-
8
-
9
-
10
-
11
-
12
-
13
-
14
-
15
-
16
-
17
-
18
-
19
-
20
-
21
-
22
-
23
-
24
-
25
-
26
-
27
-
28
-
29
-
30
-
31
-
32
-
33
-
34
-
35
-
36
-
37
-
38
-
39
-
40
-
41
-
42
-
43
-
44
-
45
-
46
-
47
-
48
-
49
-
50
-
51
-
52
-
53
-
54
-
55
-
56
-
57
-
58
-
59
-
60
-
61
-
62
-
63
-
64
-
65
-
66
-
67
-
68
-
69
-
70
-
71
-
72
-
73
-
74
-
75
-
76
-
77
-
78
-
79
-
80
-
81
-
 82
82 -
 83
83 -
 84
84 -
 85
85 -
 86
86 -
 87
87 -
 88
88 -
 89
89 -
 90
90 -
 91
91 -
 92
92 -
93
-
94
-
95
-
96
-
97
-
98
-
99
-
100
-
101
-
102
-
103
-
104
-
105
-
106
-
107
-
108
-
109
-
110
-
111
-
112
-
113
-
114
-
115
-
116
-
117
-
118
-
119
-
120
-
121
-
122
-
123
-
124
-
125
-
126
-
127
-
128
-
129
-
130
-
131
-
132
-
133
-
134
-
135
-
136
-
137
-
138
 |
 |