Panasonic AW-RP150GJ AW-RP150 Operation Manual - Operating Instructions - Page 23
Selecting a camera group, remote camera you want to control belongs.
 |
View all Panasonic AW-RP150GJ manuals
Add to My Manuals
Save this manual to your list of manuals |
Page 23 highlights
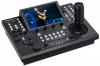
Selecting a camera group This unit allows you to register up to 200 remote cameras as control targets by configuring the connection settings for each of the camera numbers CAM1 to CAM200. To select a remote camera to control from these cameras, you need to select the camera group to which it belongs beforehand. Camera group 1 2 3 4 5 6 7 8 9 10 Camera numbers CAM1 to CAM10 CAM11 to CAM20 CAM21 to CAM30 CAM31 to CAM40 CAM41 to CAM50 CAM51 to CAM60 CAM61 to CAM70 CAM71 to CAM80 CAM81 to CAM90 CAM91 to CAM100 Camera group 11 12 13 14 15 16 17 18 19 20 Camera numbers CAM101 to CAM110 CAM111 to CAM120 CAM121 to CAM130 CAM131 to CAM140 CAM141 to CAM150 CAM151 to CAM160 CAM161 to CAM170 CAM171 to CAM180 CAM181 to CAM190 CAM191 to CAM200 Selecting a camera group 1. Press the mode selection button [SELECT] to turn on the button indicator. The camera selection buttons [CAMERA / GROUP SELECTION] light blue. Groups that can be selected light amber. 2. Press the camera selection button [CAMERA / GROUP SELECTION] to select the camera group to which the remote camera you want to control belongs. When the camera group is selected, the corresponding camera group indicator [CAMERA GROUP] lights, and the unit moves to the camera selection mode for the selected camera group. 1 2 3 4 5 6 7 8 9 10 CAMERA / GROUP SELECTION 1 2 3 4 5 11 12 13 14 15 6 7 8 9 10 11-20 16 17 18 19 20 SELECT CAMERA GROUP 2 1 Example: When camera group "10" is selected 23
-
 1
1 -
2
-
3
-
4
-
5
-
6
-
7
-
8
-
9
-
10
-
11
-
12
-
13
-
14
-
15
-
16
-
17
-
 18
18 -
 19
19 -
 20
20 -
 21
21 -
 22
22 -
 23
23 -
 24
24 -
 25
25 -
 26
26 -
 27
27 -
 28
28 -
29
-
30
-
31
-
32
-
33
-
34
-
35
-
36
-
37
-
38
-
39
-
40
-
41
-
42
-
43
-
44
-
45
-
46
-
47
-
48
-
49
-
50
-
51
-
52
-
53
-
54
-
55
-
56
-
57
-
58
-
59
-
60
-
61
-
62
-
63
-
64
-
65
-
66
-
67
-
68
-
69
-
70
-
71
-
72
-
73
-
74
-
75
-
76
-
77
-
78
-
79
-
80
-
81
-
82
-
83
-
84
-
85
-
86
-
87
-
88
-
89
-
90
-
91
-
92
-
93
-
94
-
95
-
96
-
97
-
98
 |
 |
