Panasonic KXFPC96 KXFPC95 User Guide - Page 88
TEL/FAX, DEFAULT, CONNECTING, ANSWER, ADVANCED, Display & Feature, Settings, How the unit operates
 |
View all Panasonic KXFPC96 manuals
Add to My Manuals
Save this manual to your list of manuals |
Page 88 highlights
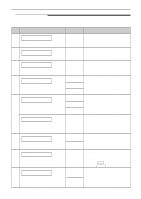
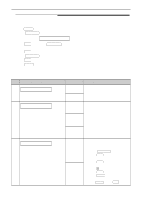
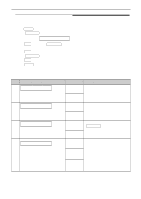
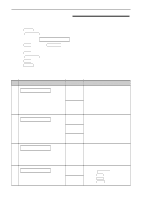
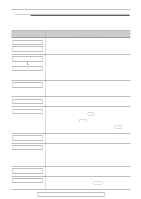
Features Summary Advanced features (cont.)! How to set menu options 1. Press MENU . 2. Rotate JOG DIAL until the following is displayed. Display: ADVANCED1MODE Press SET and rotate JOG DIAL until the desired feature is displayed. 3. Press SET . 4. Rotate JOG DIAL until the desired setting is displayed. 5. Press SET . 6. Press MENU . Note: q Step 4 may be slightly different depending on the feature. q See page 82 for more details. Programming table (cont.) Code Display & Feature Settings CONNECTING1TONE ON If you often have trouble when #76 sending a fax, this feature allows you to hear connecting tones; fax tone, ring back tone and busy tone. OFF AUTO1ANSWER To change the receive mode in the #77 AUTO ANSWER setting TAD/FAX FAX ONLY TEL/FAX TEL/FAX1RING #78 If you use an extension telephone in the TEL/FAX mode, select the desired number of rings to be generated before the unit answers. 1, 2, 3, 4 SET1DEFAULT YES #80 To reset the advanced features to their default settings NO How the unit operates You can confirm the status of the other party's machine. q If the ring back tone continues, the other party's machine may not be a facsimile or may have run out of paper. Check with the other party. q The connecting tone volume cannot be adjusted. "TAD/FAX": Telephone Answering Device/Facsimile mode (p. 68) "FAX ONLY": Facsimile only mode (p. 61) "TEL/FAX": Telephone/Facsimile mode (p. 62, 63) q If you select "TEL/FAX", the unit will print an information list. See pages 62 and 63 for details. 1. Follow steps 1-3 above. 2. Rotate JOG DIAL to select "YES". 3. Press SET . 4. Press SET again. 5. Press MENU . (The default setting is in bold type.) 88
-
 1
1 -
2
-
3
-
4
-
5
-
6
-
7
-
8
-
9
-
10
-
11
-
12
-
13
-
14
-
15
-
16
-
17
-
18
-
19
-
20
-
21
-
22
-
23
-
24
-
25
-
26
-
27
-
28
-
29
-
30
-
31
-
32
-
33
-
34
-
35
-
36
-
37
-
38
-
39
-
40
-
41
-
42
-
43
-
44
-
45
-
46
-
47
-
48
-
49
-
50
-
51
-
52
-
53
-
54
-
55
-
56
-
57
-
58
-
59
-
60
-
61
-
62
-
63
-
64
-
65
-
66
-
67
-
68
-
69
-
70
-
71
-
72
-
73
-
74
-
75
-
76
-
77
-
78
-
79
-
80
-
81
-
82
-
 83
83 -
 84
84 -
 85
85 -
 86
86 -
 87
87 -
 88
88 -
 89
89 -
 90
90 -
 91
91 -
 92
92 -
 93
93 -
94
-
95
-
96
-
97
-
98
-
99
-
100
-
101
-
102
-
103
-
104
-
105
-
106
-
107
-
108
-
109
-
110
-
111
-
112
 |
 |
