Panasonic PVDV953D Digital Video Camera - Page 23
Setting Date And Time, Internal Lithium Battery Recharge, Lp Mode, Audio Recording Mode
 |
View all Panasonic PVDV953D manuals
Add to My Manuals
Save this manual to your list of manuals |
Page 23 highlights
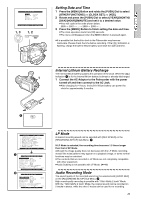
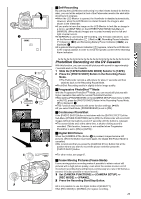
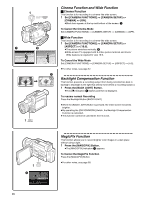
CLOCK SET YEAR :2003 MONTH :OCT DAY :20 HOUR : 8PM MINUTE:46 PUSH MENU TO RETURN 1, 3 MENU 1, 2 SHUTTER/IRIS/ VOL/JOG PUSH Setting Date and Time 1 Press the [MENU] Button and rotate the [PUSH] Dial to select [OTHER FUNCTIONS] >> [CLOCK SET] >> [YES]. 2 Rotate and press the [PUSH] Dial to select [YEAR]/[MONTH]/ [DAY]/[HOUR]/[MINUTE] and set it to a desired value. ≥Year will cycle in the order shown below. 2000 ) 2001 ) ... ) 2089 ) 2000 ) ... 3 Press the [MENU] Button to finish setting the date and time. ≥The clock operation starts from [00] seconds. ≥The menu will disappear when the [MENU] Button is pressed again. ≥It is possible that the built-in clock in the Palmcorder may become inaccurate. Please check the time before recording. If the [0] Indication is flashing, charge the built-in lithium battery and reset the date and time. Internal Lithium Battery Recharge The internal lithium battery sustains the operation of the clock. When the [0] 1 Indication 1 is lit, the internal lithium battery is almost or already discharged. 1 Connect the AC Adaptor to the Palmcorder with the power turned off and then connect to the AC Jack. ≥After charging for 4 hours, the built-in lithium battery can power the clock for approximately 3 months. 1 CAMERA FUNCTIONS 1.CAMERA SETUP 2.ADVANCED FUNCTIONS 3.DIGITAL EFFECT 4.CARD SETUP 5.MULTI-PICTURES 6.RECORDING SETUP 7.DISPLAY SETUP 8.OTHER FUNCTIONS 9.DEMO MODE PUSH MENU TO EXIT 1 2 RECORDING SETUP REC SPEED SP LP AUDIO REC 12bit SCENEINDEX 2HOUR WIND CUT OFF ZOOM MIC ON FLASH ON RED EYE REDUCTION OFF FLASH LEVEL NORMAL RETURN ---- YES PUSH MENU TO EXIT RECORDING SETUP REC SPEED SP AUDIO REC 12bit 16bit SCENEINDEX 2HOUR WIND CUT OFF ZOOM MIC ON FLASH ON RED EYE REDUCTION OFF FLASH LEVEL NORMAL RETURN ---- YES PUSH MENU TO EXIT LP Mode A desired recording speed can be selected with [REC SPEED] on the [RECORDING SETUP] Sub-Menu. 1 If LP Mode is selected, the recording time becomes 1.5 times longer than that of SP Mode. Although the image quality does not decrease with the LP Mode recording, mosaic-like noise patterns may appear on a playback image, or some normal functions may be restricted. ≥The contents that are recorded in LP Mode are not completely compatible with other equipment. ≥Audio Dubbing is not possible with LP Mode. (l 41) Audio Recording Mode The sound quality of the recorded sound can be selected with [AUDIO REC] on the [RECORDING SETUP] Sub-Menu. 2 High sound-quality recording is possible with "16bit 48kHz 2 track" Mode. With the "12bit 32kHz 4 track" Mode, the original sound can be recorded on 2 tracks in stereo, while the other 2 tracks can be used for re-recording. 23
-
 1
1 -
2
-
3
-
4
-
5
-
6
-
7
-
8
-
9
-
10
-
11
-
12
-
13
-
14
-
15
-
16
-
17
-
 18
18 -
 19
19 -
 20
20 -
 21
21 -
 22
22 -
 23
23 -
 24
24 -
 25
25 -
 26
26 -
 27
27 -
 28
28 -
29
-
30
-
31
-
32
-
33
-
34
-
35
-
36
-
37
-
38
-
39
-
40
-
41
-
42
-
43
-
44
-
45
-
46
-
47
-
48
-
49
-
50
-
51
-
52
-
53
-
54
-
55
-
56
-
57
-
58
-
59
-
60
-
61
-
62
-
63
-
64
-
65
-
66
-
67
-
68
-
69
-
70
-
71
-
72
-
73
-
74
-
75
-
76
-
77
-
78
-
79
-
80
-
81
-
82
-
83
-
84
-
85
-
86
-
87
-
88
-
89
-
90
-
91
-
92
 |
 |
