Panasonic PVDV953D Digital Video Camera - Page 47
Slide Show
 |
View all Panasonic PVDV953D manuals
Add to My Manuals
Save this manual to your list of manuals |
Page 47 highlights
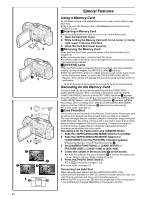
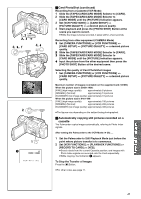
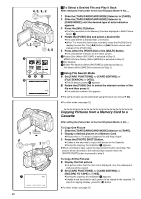
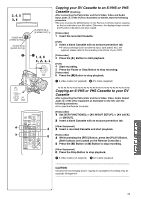
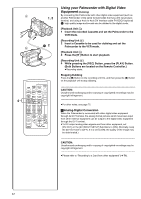
1, 2, 3, 4, 5, 6, 7 1, 2, 3 MENU SHUTTER/IRIS/ VOL/JOG PUSH 8 EDIT 3 No.5 9SEC PUSH MENU TO RETURN 1 2 4 M.SLIDE 5 SLIDE 6 SLIDE Slide Show The recorded still pictures in the Card can be played back like a Slide Show. You can set up a Slide Show or change the content. To Select Pictures to Play Back in Slide Show 1 Set [CARD FUNCTIONS] >> [CARD EDITING] >> [SLIDE SHOW] >> [YES]. ≥Slide Show editing screen appears. 2 Set [EDIT] >> [YES]. 3 Rotate the [PUSH] Dial to select playback order and then press the dial. 4 Rotate the [PUSH] Dial to adjust the playback time and then press the dial. ≥This step is skipped when there are no pictures set for the Slide Show. 5 Rotate the [PUSH] Dial to select playback order and then press the dial. ≥The Playback Order indication 1 and the Playback Time (Second) indication 2 appear. ≥The [¥] indication 3 is displayed below pictures that have been selected for the Slide Show. (l 65) ≥To select the next picture, repeat Steps 3 to 5 above. 6 Press the [MENU] Button to end the setup. 7 After setting [SLIDE SHOW] >> [PRESET], press the [MENU] Button. 8 Press the [1] Button. ≥The [M.SLIDE!] Indication is displayed. 4 To Play Back All the Pictures Continuously After setting the [SLIDE SHOW] to [ALL], press the [1] Button. ≥The [SLIDE!] Indication is displayed. 5 ≥All pictures are played back for approximately 5 seconds each, from the first to the last recorded picture, and playback then stops. To Pause the Slide Show Press the [;] Button. ≥The [(M.) SLIDE;] Indication is displayed. 6 To Stop the Slide Show Press the [∫] Button. To Verify the Selected Pictures Set [CARD FUNCTIONS] >> [CARD EDITING] >> [SLIDE SHOW] >> [YES] >> [VERIFY] >> [YES]. ≥Only the selected pictures are displayed in Multi-Picture Mode in the Playback order. To Delete the Selected Pictures 1 Set [CARD FUNCTIONS] >> [CARD EDITING] >> [SLIDE SHOW] >> [YES]. 2 Set [DELETE] >> [YES]. 3 Select the picture you want to delete and press the [PUSH] Dial. To Reset the Slide Show Setup Set [CARD FUNCTIONS] >> [CARD EDITING] >> [SLIDE SHOW] >> [YES] >> [RESET] >> [YES] >> [YES]. ≥Slide Show settings are reset. ≥For other notes, see page 72. 47
-
 1
1 -
2
-
3
-
4
-
5
-
6
-
7
-
8
-
9
-
10
-
11
-
12
-
13
-
14
-
15
-
16
-
17
-
18
-
19
-
20
-
21
-
22
-
23
-
24
-
25
-
26
-
27
-
28
-
29
-
30
-
31
-
32
-
33
-
34
-
35
-
36
-
37
-
38
-
39
-
40
-
41
-
 42
42 -
 43
43 -
 44
44 -
 45
45 -
 46
46 -
 47
47 -
 48
48 -
 49
49 -
 50
50 -
 51
51 -
 52
52 -
53
-
54
-
55
-
56
-
57
-
58
-
59
-
60
-
61
-
62
-
63
-
64
-
65
-
66
-
67
-
68
-
69
-
70
-
71
-
72
-
73
-
74
-
75
-
76
-
77
-
78
-
79
-
80
-
81
-
82
-
83
-
84
-
85
-
86
-
87
-
88
-
89
-
90
-
91
-
92
 |
 |
