Panasonic PVDV953D Digital Video Camera - Page 31
Recording In Natural Colors (white Balance), Adjusting White Balance Manually
 |
View all Panasonic PVDV953D manuals
Add to My Manuals
Save this manual to your list of manuals |
Page 31 highlights
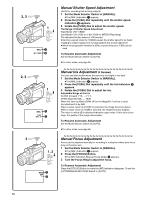
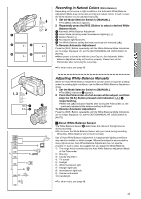
1 2 4 1 AUTO MANUAL AE LOCK FOCUS 2 W.B. 3 1 1 5 1 1 1, 2 AUTO MANUAL AE LOCK FOCUS W.B. MNL 1 12 3 10 000K 9 000K 8 000K 7 000K 6 000K 5 000K 1) 4 000K 4) 5) 6) 2) 3) 3 000K 7) 8) 2 000K 9) 10) 1 000K Recording in Natural Colors (White Balance) Depending on the scene or light conditions, the Automatic White Balance Adjustment Mode may not be able to bring out natural colors. In such a case, the white balance can be adjusted manually. 1 Set the Mode Selector Switch to [MANUAL]. ≥The [MNL] Indication appears. 2 Repeatedly press the [W.B.] Button to select a desired White Balance Mode. 1 Automatic White Balance Adjustment 2 Indoor Mode (shooting under incandescent lighting) [{] 3 Outdoor Mode [z] 4 Fluorescent light Mode [|] 5 The White Balance setting that was previously set manually [1] To Resume Automatic Adjustment Press the [W.B.] Button repeatedly until the White Balance Mode Indications are no longer displayed. Or, set the [AUTO/MANUAL/AE LOCK] Switch to [AUTO]. ≥When power is turned on with the Lens Cap on, the Automatic White Balance Adjustment may not function properly. Please turn on the Palmcorder after removing the Lens Cap. ≥For other notes, see page 68. Adjusting White Balance Manually When the Auto White Balance Adjustment function does not operate suitably under the existing light conditions, use the Manual White Balance Adjustment mode. 1 Set the Mode Selector Switch to [MANUAL]. ≥The [MNL] Indication 1 appears. 2 Point the Palmcorder at a full-screen white subject, and then keep the [W.B.] Button pressed until indication [1] 2 stops flashing. ≥When the [1] Indication flashes after turning the Palmcorder on, the previously adjusted white balance setting is still kept. To Resume Automatic Adjustment Press the [W.B.] Button repeatedly until the White Balance Mode Indications are no longer displayed. Or, set the [AUTO/MANUAL/AE LOCK] Switch to [AUTO]. ª About White Balance Sensor The White Balance Sensor 3 determines the nature of the light source during recording. ≥Do not cover the White Balance Sensor with your hand during recording. Otherwise, White Balance will not work normally. Use of Auto White Balance Adjustment in inappropriate lighting conditions may result in reddish or bluish images. Where the subject is surrounded by many light-sources, Auto White Balance Adjustment may not operate properly. In such a case, we suggest that you adjust the White Balance. 1) The range that is controlled by the Auto White Balance Adjustment Mode of this Palmcorder 2) Blue sky 3) Cloudy sky (Rain) 4) TV screen 5) Sunlight 6) White fluorescent light 7) Halogen light bulb 8) Incandescent light bulb 9) Sunrise and sunset 10) Candlelight ≥For other notes, see page 68. 31
-
 1
1 -
2
-
3
-
4
-
5
-
6
-
7
-
8
-
9
-
10
-
11
-
12
-
13
-
14
-
15
-
16
-
17
-
18
-
19
-
20
-
21
-
22
-
23
-
24
-
25
-
 26
26 -
 27
27 -
 28
28 -
 29
29 -
 30
30 -
 31
31 -
 32
32 -
 33
33 -
 34
34 -
 35
35 -
 36
36 -
37
-
38
-
39
-
40
-
41
-
42
-
43
-
44
-
45
-
46
-
47
-
48
-
49
-
50
-
51
-
52
-
53
-
54
-
55
-
56
-
57
-
58
-
59
-
60
-
61
-
62
-
63
-
64
-
65
-
66
-
67
-
68
-
69
-
70
-
71
-
72
-
73
-
74
-
75
-
76
-
77
-
78
-
79
-
80
-
81
-
82
-
83
-
84
-
85
-
86
-
87
-
88
-
89
-
90
-
91
-
92
 |
 |
