Pfaff creative 7570 Owner's Manual - Page 29
Placing, bobbin, Preparing, machine, winding - bobbin winding
 |
View all Pfaff creative 7570 manuals
Add to My Manuals
Save this manual to your list of manuals |
Page 29 highlights
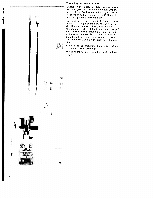
Preparing the machine for bobbin winding TwrHehiolneelddanisnetehgeeddplihesrkoawnc(ied4ldlw3un)hroeeitn.emlth(o4ev2ed)idrfeiurcrmtiinloygnatohnfde tbthueornbabrtrhionew. - fl4ui al tdI - Zn, 'I,' Placing the bobbin Switch off bobbin so (41) snaps the that into master switch. Place the empty the black pin of the bobbin winder the slot of the bobbin. Push the bobbin to the right. Note: The bobbin can to the right. only be wound if it is moved fully 25
-
 1
1 -
2
-
3
-
4
-
5
-
6
-
7
-
8
-
9
-
10
-
11
-
12
-
13
-
14
-
15
-
16
-
17
-
18
-
19
-
20
-
21
-
22
-
23
-
 24
24 -
 25
25 -
 26
26 -
 27
27 -
 28
28 -
 29
29 -
 30
30 -
 31
31 -
 32
32 -
 33
33 -
 34
34 -
35
-
36
-
37
-
38
-
39
-
40
-
41
-
42
-
43
-
44
-
45
-
46
-
47
-
48
-
49
-
50
-
51
-
52
-
53
-
54
-
55
-
56
-
57
-
58
-
59
-
60
-
61
-
62
-
63
-
64
-
65
-
66
-
67
-
68
-
69
-
70
-
71
-
72
-
73
-
74
-
75
-
76
-
77
-
78
-
79
-
80
-
81
-
82
-
83
-
84
-
85
-
86
-
87
-
88
-
89
-
90
-
91
-
92
-
93
-
94
-
95
-
96
-
97
-
98
-
99
-
100
-
101
-
102
-
103
-
104
-
105
-
106
-
107
-
108
-
109
-
110
-
111
-
112
-
113
-
114
-
115
-
116
-
117
-
118
-
119
-
120
-
121
-
122
-
123
-
124
-
125
-
126
-
127
-
128
-
129
-
130
-
131
-
132
-
133
-
134
-
135
-
136
-
137
-
138
-
139
-
140
-
141
-
142
-
143
-
144
-
145
-
146
-
147
-
148
-
149
-
150
-
151
-
152
-
153
-
154
-
155
-
156
-
157
-
158
-
159
-
160
-
161
-
162
-
163
-
164
-
165
-
166
-
167
-
168
-
169
-
170
-
171
-
172
-
173
-
174
-
175
-
176
-
177
-
178
-
179
-
180
-
181
-
182
-
183
-
184
-
185
-
186
-
187
-
188
-
189
-
190
-
191
-
192
-
193
-
194
-
195
-
196
-
197
-
198
-
199
-
200
-
201
-
202
-
203
-
204
-
205
-
206
-
207
-
208
-
209
-
210
-
211
-
212
-
213
-
214
-
215
-
216
-
217
-
218
-
219
-
220
-
221
-
222
-
223
-
224
-
225
-
226
-
227
-
228
-
229
-
230
-
231
-
232
-
233
-
234
-
235
-
236
-
237
-
238
-
239
-
240
-
241
-
242
-
243
-
244
-
245
-
246
-
247
-
248
-
249
-
250
-
251
-
252
-
253
-
254
-
255
-
256
-
257
-
258
-
259
-
260
-
261
-
262
-
263
-
264
-
265
-
266
-
267
-
268
-
269
-
270
-
271
-
272
-
273
-
274
-
275
-
276
-
277
-
278
-
279
-
280
-
281
-
282
-
283
-
284
-
285
-
286
-
287
-
288
-
289
-
290
-
291
-
292
-
293
 |
 |

-
fl4ui
al
tdI
-
Placing
the
bobbin
Switch
off
the
master
switch.
Place
the
empty
bobbin
so
that
the
black
pin
of
the
bobbin
winder
(41)
snaps
into
the
slot
of
the
bobbin.
Push
the
bobbin
to
the
right.
Note:
The
bobbin
can
only
be
wound
if
it
is
moved
fully
to
the
right.
Preparing
the
machine
for
bobbin
winding
Hold
the
handwheel
(42)
firmly
and
turn
the
release
disk
(43)
in
the
direction
of
the
arrow.
The
needle
will
not
move
during
the
bobbin
winding
procedure.
‘I,’
Zn,
25