Philips DVDR75 User manual - Page 28
Clock Setting
 |
View all Philips DVDR75 manuals
Add to My Manuals
Save this manual to your list of manuals |
Page 28 highlights
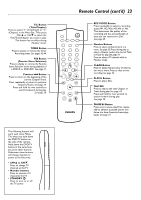
28 Clock Setting Time/Date Automatic The Recorder can set the time and date automatically by referring to a PBS station. If the Recorder chooses an incorrect PBS channel or sets the time/date incorrectly, set the clock manually. See page 29. Before you begin, make sure TV channels are set. See page 26. 1 Press SYSTEM MENU. Press ; to select in the top left corner of the menu bar at the top of the TV screen. 2 Press CH-9 repeatedly to select at the end of the next menu, then press : to enter the Installation menu. 3 Press CH-9 repeatedly to select Time/Date, then press :. 4 Automatic will be selected. Press :. 5 With PBS Channel selected, press ; or : to choose the channel number of your PBS station, then press OK. The menu will pause while storing the setting. If you do not know your PBS channel number, choose Auto.The Recorder will choose a PBS station for you and set the time. If you want to set the clock manually, choose Off.The Recorder will not update the time automatically according to a PBS station. Time/date Automatic K u PBS Channel L Daylight Saving Time Zone s 010 B Off Auto. To store Press OK 6 Press CH-9 to choose Daylight Saving. Press ; or : to choose On, Off, or Auto, then press OK. The menu will pause while storing the setting. Choose Auto if you want the clock set according to the PBS station's Daylight Savings Time schedule. Time/date Automatic K PBS Channel u Daylight Saving L Time Zone 010 s Off B Auto. To store Press OK 7 Press CH-9 to choose Time Zone. Press ; or : repeatedly to choose your time zone, then press OK. The menu will pause while storing the setting. If you want the Recorder to use the time zone from which your PBS station broadcasts, choose Auto. If your PBS station broadcasts from a different time zone than the one in which you live, be sure to select your time zone. Time/date Automatic PBS Channel K Daylight Saving u Time Zone L 010 Off s Auto. B To store Press OK 8 Press SYSTEM MENU repeatedly to remove the menus. Press STANDBY y to turn off the Recorder. In a few minutes, the time will appear on the display panel on the front of the Recorder. If the Recorder cannot find the time, you may see an error message when you turn on the Recorder. Check the PBS channel and try again. Or, set the clock manually. See page 29. MONITOR STANDBY TV / DVD T / C PLAY MODE REC. MODE 8 123 456 7 DISC SELECT 8 0 MENU CH 9 SYSTEM OK CH TIMER 1,8 1-7 FSS TV VOLUME RETURN CLEAR PLAY I I STOP AUDIO REC/OTR PAUSE Helpful Hints • The Recorder may set the clock when you complete Initial Setup. If the correct time appears on the display, you do not need to set the clock. • The factory default setting of Daylight Saving is On. • The Recorder can use the PBS channel to set the clock only if the PBS channel is a memorized channel.To set up channels, see page 26.
-
 1
1 -
2
-
3
-
4
-
5
-
6
-
7
-
8
-
9
-
10
-
11
-
12
-
13
-
14
-
15
-
16
-
17
-
18
-
19
-
20
-
21
-
22
-
 23
23 -
 24
24 -
 25
25 -
 26
26 -
 27
27 -
 28
28 -
 29
29 -
 30
30 -
 31
31 -
 32
32 -
 33
33 -
34
-
35
-
36
-
37
-
38
-
39
-
40
-
41
-
42
-
43
-
44
-
45
-
46
-
47
-
48
-
49
-
50
-
51
-
52
-
53
-
54
-
55
-
56
-
57
-
58
-
59
-
60
-
61
-
62
-
63
-
64
-
65
-
66
-
67
-
68
-
69
-
70
-
71
-
72
 |
 |
