Philips DVDR75 User manual - Page 59
DVD Recorder Features Menu
 |
View all Philips DVDR75 manuals
Add to My Manuals
Save this manual to your list of manuals |
Page 59 highlights
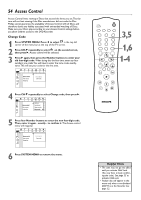
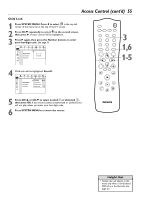
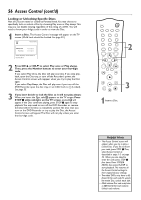
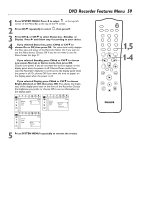
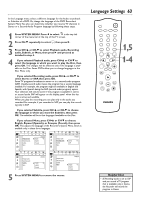
DVD Recorder Features Menu 59 1 Press SYSTEM MENU. Press ; to select in the top left corner of the Menu Bar at the top of the TV screen. 2 Press CH-9 repeatedly to select , then press :. 3 Press CH+8 or CH-9 to select Status box, Standby, or Display. Press : and follow step 4 according to your choice. 4 q If you selected Status box, press CH+8 or CH-9 to choose On or Off, then press OK. The status box briefly displays the Disc type and status of the Recorder. Select On if you want to see the Status boxes. Choose Off if you do not want to see the Status boxes. See page 31. q If you selected Standby, press CH+8 or CH-9 to choose Low power, Normal, or Demo mode, then press OK. Choose Low power if you do not want the clock to appear on the display panel when the power is off. Choose Demo mode if you want the Recorder's features to scroll across the display panel when the power is off. Or, choose Off if you want the time to appear on the display panel when the power is off. q If you selected Display, press CH+8 or CH-9 to choose Bright, Dimmed, or Off, then press OK. This adjusts the brightness of the display panel text on the front of the Recorder. Choose the brightness you prefer, or choose Off to see no information on the display panel. W X YZ a W X YZ a ~ 1 2 1en off no off ~ 1 2 1en off no off Status box G Standby r Display s On Off Features L G r Status box Standby Display Features s Low power L Normal Demo mode W X YZ a ~ 1 2 1en off no off Status box G Standby r Display Features s Bright L Dimmed Off 5 Press SYSTEM MENU repeatedly to remove the menus. MONITOR STANDBY TV / DVD T / C PLAY MODE REC. MODE 123 456 789 DISC SELECT 0 MENU CH SYSTEM OK 1,5 1-4 CH TIMER FSS TV VOLUME RETURN CLEAR PLAY I I STOP AUDIO REC/OTR PAUSE
-
 1
1 -
2
-
3
-
4
-
5
-
6
-
7
-
8
-
9
-
10
-
11
-
12
-
13
-
14
-
15
-
16
-
17
-
18
-
19
-
20
-
21
-
22
-
23
-
24
-
25
-
26
-
27
-
28
-
29
-
30
-
31
-
32
-
33
-
34
-
35
-
36
-
37
-
38
-
39
-
40
-
41
-
42
-
43
-
44
-
45
-
46
-
47
-
48
-
49
-
50
-
51
-
52
-
53
-
 54
54 -
 55
55 -
 56
56 -
 57
57 -
 58
58 -
 59
59 -
 60
60 -
 61
61 -
 62
62 -
 63
63 -
 64
64 -
65
-
66
-
67
-
68
-
69
-
70
-
71
-
72
 |
 |
