Philips DVDR75 User manual - Page 37
Still Picture/Frame-by-Frame Play, Sound
 |
View all Philips DVDR75 manuals
Add to My Manuals
Save this manual to your list of manuals |
Page 37 highlights
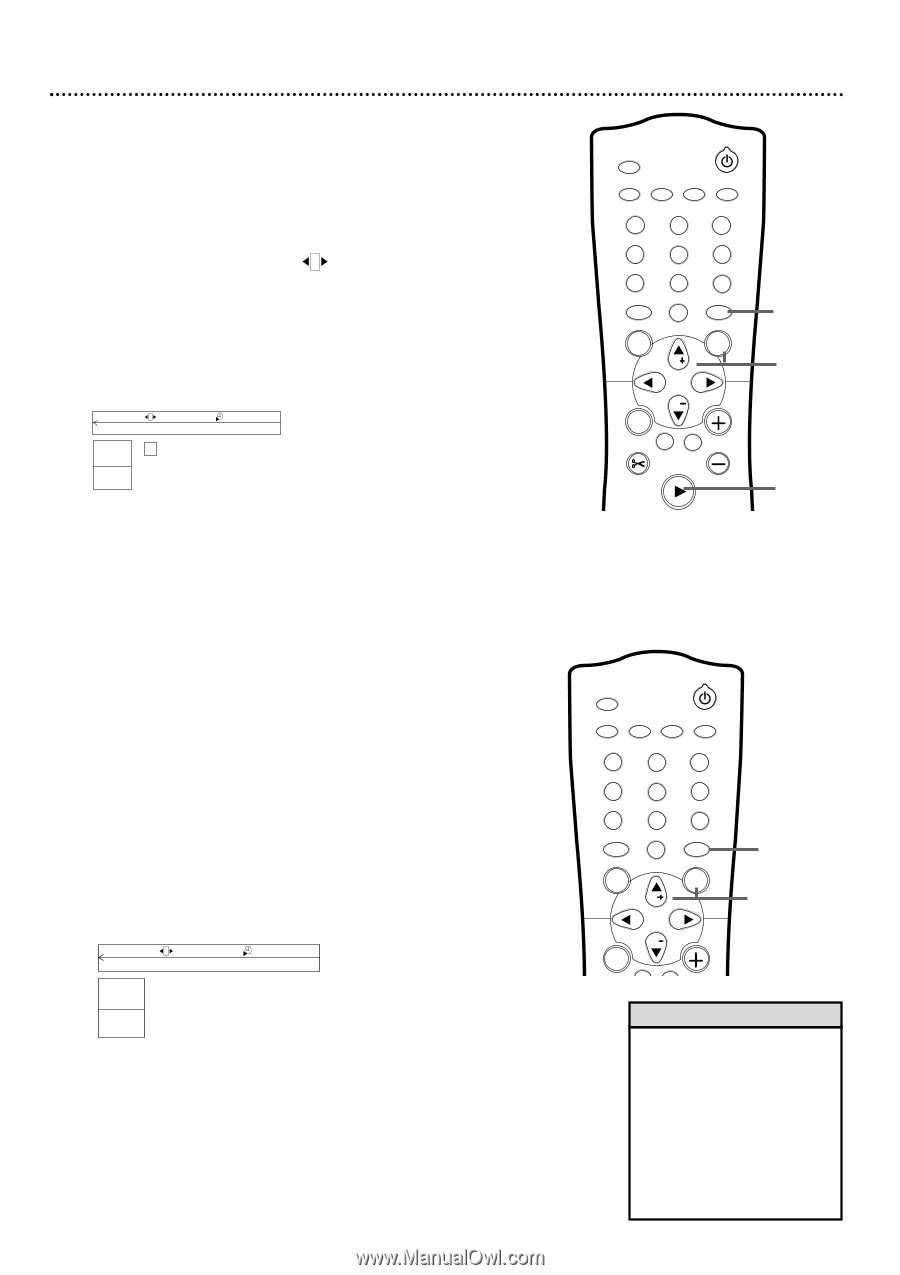
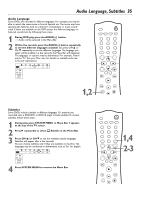
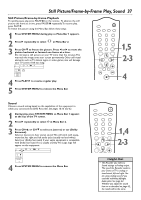
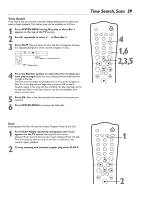
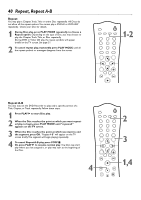
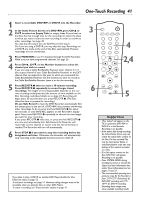
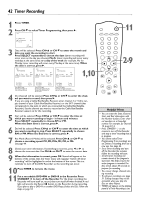
Still Picture/Frame-by-Frame Play, Sound 37 Still Picture/Frame-by-frame Playback To quickly pause play, press PAUSE k on the remote. To advance the still picture one frame at a time, press PAUSE k repeatedly.To resume play, press PLAY :. To freeze the picture using the Menu Bar, follow these steps. 1 Press SYSTEM MENU during play so Menu Bar 1 appears. 2 Press : repeatedly to select in Menu Bar 2. 3 Press CH-9 to freeze the picture. Press ; or : to move the picture backward or forward one frame at a time. Do not leave a still picture on your TV more than five minutes.This may etch the image onto your screen permanently. Other still visual elements, such as TV station logos or video games, also will damage your TV screen if left too long. d HE st LB o e DVD pause 0:29:40 0:00:07 4 Press PLAY : to resume regular play. 5 Press SYSTEM MENU to remove the Menu Bar. MONITOR STANDBY TV / DVD T / C PLAY MODE REC. MODE 123 456 789 DISC SELECT 0 MENU CH SYSTEM OK CH TIMER FSS TV VOLUME RETURN CLEAR PLAY 1,5 2-3 4 Sound Choose a sound setting based on the capabilities of the equipment to which you connected the DVD Recorder. See pages 10-16 and 62. 1 During play, press SYSTEM MENU so Menu Bar 1 appears at the top of the TV screen. 2 Press : repeatedly to select d in Menu Bar 2. 3 Press CH+8 or CH-9 to select st (stereo) or sur (Dolby Surround). Select st (stereo) to hear stereo sound.This will work with equipment that has right and left audio jacks (usually red and white). Select sur (Dolby Surround) if your audio equipment is compatible with Dolby Surround. If it is, usually a Dolby Pro Logic logo will appear on the equipment. d sB st K L LF DVD play 1 :2 3 :45 5 HE 4 Press SYSTEM MENU to remove the Menu Bar. MONITOR STANDBY TV / DVD T / C PLAY MODE REC. MODE 123 456 789 DISC SELECT 0 MENU CH SYSTEM OK CH TIMER 1,4 2-3 Helpful Hint • The Recorder also refers to Sound settings as Analog output. The sound the Recorder sends to your Stereo or TV is analog, or two-channel, left and right. You are using analog sound if you used the red/white, left/right, Audio jacks. See page 62. Whether you adjust the sound here or as described on page 62, the results will be the same.
-
 1
1 -
2
-
3
-
4
-
5
-
6
-
7
-
8
-
9
-
10
-
11
-
12
-
13
-
14
-
15
-
16
-
17
-
18
-
19
-
20
-
21
-
22
-
23
-
24
-
25
-
26
-
27
-
28
-
29
-
30
-
31
-
 32
32 -
 33
33 -
 34
34 -
 35
35 -
 36
36 -
 37
37 -
 38
38 -
 39
39 -
 40
40 -
 41
41 -
 42
42 -
43
-
44
-
45
-
46
-
47
-
48
-
49
-
50
-
51
-
52
-
53
-
54
-
55
-
56
-
57
-
58
-
59
-
60
-
61
-
62
-
63
-
64
-
65
-
66
-
67
-
68
-
69
-
70
-
71
-
72
 |
 |