Pioneer P4000 Owner's Manual - Page 43
Setting the clock, Setting for rear view camera, back up camera, Switching the iPod charge setting
 |
UPC - 012562547978
View all Pioneer P4000 manuals
Add to My Manuals
Save this manual to your list of manuals |
Page 43 highlights
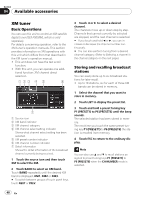
Operating this unit Section 03 Operating this unit Setting the clock Use these instructions to set the clock. 1 Touch CLOCK ADJ on the system menu. 2 Touch ON/OFF to turn the clock display on. # To turn the clock display off, touch ON/OFF again. 3 Touch c or d to select the segment of the clock display you wish to set. Each time you touch c or d it will select one segment of the clock display: Hour-Minute As you select segments of the clock display the segment selected will be highlighted. 4 Touch a or b to put a clock right. Notes ! You can match the clock to a time signal by touching JUST. - If 00 to 29, the minutes are rounded down. (e.g., 10:18 becomes 10:00.) - If 30 to 59, the minutes are rounded up. (e.g., 10:36 becomes 11:00.) ! Even when the sources are off, the clock display appears on the display. Setting for rear view camera (back up camera) CAUTION Pioneer recommends the use of a camera which outputs mirror reversed images, otherwise screen image may appear reversed. This unit features a function that automatically switches to the rear view camera video (REAR CAMERA IN jack) when a rear view camera is installed on your vehicle. When the gear shift is in REVERSE (R) position, the video automatically switches to a rear view camera video. (For more details, consult your dealer.) ! After you set up the rear view camera set- ting, move the gear shift in REVERSE (R) and confirm if a rear view camera video can be shown on the display. ! If the display should be switched to a rear view camera video by error while you are driving forward, change the rear view camera setting. ! To end watching a rear view camera video and return to the source display, press and hold VOLUME/MUTE. ! Even while driving, rear view camera image can be displayed. To do this, touch REARVIEW source icon. In this case, touch REARVIEW again to turn off the rear view camera. For details, refer to Selecting a source on page 16. % Touch CAMERA POLARITY on the system menu to select an appropriate setting. ! BATTERY - When the polarity of the connected lead is positive while the gear shift is in REVERSE (R) position ! GROUND - When the polarity of the connected lead is negative while the gear shift is in REVERSE (R) position ! OFF - When a rear view camera is not connected to this unit Switching the iPod charge setting You can turn the iPod charge setting on or off while listening to an iPod. ! Listening AM radio while an iPod is charged from this unit may generate noise. In this case, turn the iPod charge setting off and noise is disappeared. ! Initially, this function is set to on. 1 Touch NEXT on the system menu. 2 Touch iPod CHARGE to turn the iPod charge setting on. # To turn the iPod charge setting off, touch iPod CHARGE again. Note For maximum performance, we recommend that you use the latest version of the iPod software. En 43
-
 1
1 -
2
-
3
-
4
-
5
-
6
-
7
-
8
-
9
-
10
-
11
-
12
-
13
-
14
-
15
-
16
-
17
-
18
-
19
-
20
-
21
-
22
-
23
-
24
-
25
-
26
-
27
-
28
-
29
-
30
-
31
-
32
-
33
-
34
-
35
-
36
-
37
-
 38
38 -
 39
39 -
 40
40 -
 41
41 -
 42
42 -
 43
43 -
 44
44 -
 45
45 -
 46
46 -
 47
47 -
 48
48 -
49
-
50
-
51
-
52
-
53
-
54
-
55
-
56
-
57
-
58
-
59
-
60
-
61
-
62
-
63
-
64
-
65
-
66
-
67
-
68
-
69
-
70
-
71
-
72
-
73
-
74
-
75
-
76
-
77
-
78
-
79
-
80
-
81
-
82
-
83
-
84
-
85
-
86
-
87
-
88
-
89
-
90
-
91
-
92
-
93
-
94
-
95
-
96
-
97
-
98
-
99
 |
 |