Samsung CLX-4195FW User Manual Ver.1.0 (English) - Page 244
Auto Tone Adjustment, Auto Color Reg.
 |
View all Samsung CLX-4195FW manuals
Add to My Manuals
Save this manual to your list of manuals |
Page 244 highlights
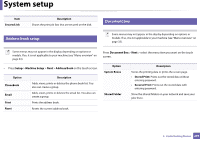
System setup Item Description Turns power off automatically when the machine has been in power save mode for the length of time set in Auto Power Off > On > Timeout. Auto Power Off • To turn the machine on again, press the (Power/Wakeup) button on the control panel (make sure the main power switch is on). • If you run the printer driver or Samsung Easy Printer Manager, the time automatically extends. • While the machine is connected to the network or working on a print job, Auto Power Off feature doesn't work. • Image Management • Image Mar. Custom Color Allows you to adjust the color setting such as color registration, color density, etc. This menu allows you to adjust contrast, color by color. • Default: Optimizes colors automatically. • Print Density: Allows you to manually adjust the color density for print. Adjust the print density. It is recommended to use the Default setting for best color quality. Item • Auto Color Reg. • Auto Color Registration Description The machine virtually prints certain patterned image to calibrate the color printing position. This feature enhances the colored image sharper and clearer, which means the machine prints the colored image on the paper more like the one in the monitor. If you have moved the machine, it is strongly recommended to operate this menu manually. Tone Adjustment • Default: The machine automatically calibrate the toner density of machine for the best possible color print quality. If you select Off, the machine is calibrated by the factory default toner density. • Auto Tone Adjustment (Auto Tone Adj.): Allows you to automatically adjust tone for the best possible print quality. • Calibration ID Sensor (Cal. ID Sensor): Automatically calculates the reduced or worn out supplies like toner or machine parts and uses this information to adjust the color density. For example, if the yellow toner is running out, the machine calculates the amount of remaining yellow toner and adjusts color density so the printouts are fine. 3. Useful Setting Menus 244
-
 1
1 -
2
-
3
-
4
-
5
-
6
-
7
-
8
-
9
-
10
-
11
-
12
-
13
-
14
-
15
-
16
-
17
-
18
-
19
-
20
-
21
-
22
-
23
-
24
-
25
-
26
-
27
-
28
-
29
-
30
-
31
-
32
-
33
-
34
-
35
-
36
-
37
-
38
-
39
-
40
-
41
-
42
-
43
-
44
-
45
-
46
-
47
-
48
-
49
-
50
-
51
-
52
-
53
-
54
-
55
-
56
-
57
-
58
-
59
-
60
-
61
-
62
-
63
-
64
-
65
-
66
-
67
-
68
-
69
-
70
-
71
-
72
-
73
-
74
-
75
-
76
-
77
-
78
-
79
-
80
-
81
-
82
-
83
-
84
-
85
-
86
-
87
-
88
-
89
-
90
-
91
-
92
-
93
-
94
-
95
-
96
-
97
-
98
-
99
-
100
-
101
-
102
-
103
-
104
-
105
-
106
-
107
-
108
-
109
-
110
-
111
-
112
-
113
-
114
-
115
-
116
-
117
-
118
-
119
-
120
-
121
-
122
-
123
-
124
-
125
-
126
-
127
-
128
-
129
-
130
-
131
-
132
-
133
-
134
-
135
-
136
-
137
-
138
-
139
-
140
-
141
-
142
-
143
-
144
-
145
-
146
-
147
-
148
-
149
-
150
-
151
-
152
-
153
-
154
-
155
-
156
-
157
-
158
-
159
-
160
-
161
-
162
-
163
-
164
-
165
-
166
-
167
-
168
-
169
-
170
-
171
-
172
-
173
-
174
-
175
-
176
-
177
-
178
-
179
-
180
-
181
-
182
-
183
-
184
-
185
-
186
-
187
-
188
-
189
-
190
-
191
-
192
-
193
-
194
-
195
-
196
-
197
-
198
-
199
-
200
-
201
-
202
-
203
-
204
-
205
-
206
-
207
-
208
-
209
-
210
-
211
-
212
-
213
-
214
-
215
-
216
-
217
-
218
-
219
-
220
-
221
-
222
-
223
-
224
-
225
-
226
-
227
-
228
-
229
-
230
-
231
-
232
-
233
-
234
-
235
-
236
-
237
-
238
-
 239
239 -
 240
240 -
 241
241 -
 242
242 -
 243
243 -
 244
244 -
 245
245 -
 246
246 -
 247
247 -
 248
248 -
 249
249 -
250
-
251
-
252
-
253
-
254
-
255
-
256
-
257
-
258
-
259
-
260
-
261
-
262
-
263
-
264
-
265
-
266
-
267
-
268
-
269
-
270
-
271
-
272
-
273
-
274
-
275
-
276
-
277
-
278
-
279
-
280
-
281
-
282
-
283
-
284
-
285
-
286
-
287
-
288
-
289
-
290
-
291
-
292
-
293
-
294
-
295
-
296
-
297
-
298
-
299
-
300
-
301
-
302
-
303
-
304
-
305
-
306
-
307
-
308
-
309
-
310
-
311
-
312
-
313
-
314
-
315
-
316
-
317
-
318
-
319
-
320
-
321
-
322
-
323
-
324
-
325
-
326
-
327
-
328
-
329
-
330
-
331
-
332
-
333
-
334
-
335
-
336
-
337
-
338
-
339
-
340
-
341
-
342
-
343
-
344
-
345
-
346
-
347
-
348
-
349
-
350
-
351
-
352
-
353
-
354
-
355
-
356
-
357
-
358
-
359
-
360
-
361
-
362
-
363
-
364
-
365
-
366
-
367
-
368
 |
 |
