Samsung SM-T210R User Manual Generic Sm-t210r Galaxy Tab 3 Jb English User Man - Page 80
Using the Image Viewer, Settings, Image Viewer
 |
View all Samsung SM-T210R manuals
Add to My Manuals
Save this manual to your list of manuals |
Page 80 highlights
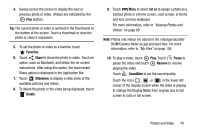
Configuring Camcorder Settings To configure Camcorder settings: Ⅲ While in Camcorder mode, touch a settings shortcut or touch Settings to configure the following Camcorder settings: • Edit shortcuts: Customize your settings shortcuts. For more information, refer to "Editing Camera Settings Shortcuts" on page 71. • Self-recording: Touch to switch to the front-facing camera lens and record a video of yourself. • Recording mode: Set a recording mode. Options are: Normal and Limit for email, which limits the size of the video to 50 megabytes. • Effects: Apply an effect to videos. • Brightness: Use the slider to set the brightness value. • Timer: Set a delay to wait between touching Record and starting recording. • Resolution: Set a size for the video. • White balance: Set the light source. • Guidelines: Enable or disable an on-screen grid to aid in video composition. • Video quality: Choose a quality setting for videos. • Storage: Set whether to store your videos on your device or on your memory card. • Reset: Set all Camera settings to the defaults. Using the Image Viewer After taking a photo or recording a video, use the Image Viewer to view or play, share, delete, or edit your photos and videos. 1. Touch Image Viewer to view the photo and videos. 2. Touch the screen to show or hide Image Viewer options. 3. For photos, touch the screen with two fingers or double-tap on the screen to zoom all the way in or out. For more information, refer to "Pinch" on page 24. 75
-
 1
1 -
2
-
3
-
4
-
5
-
6
-
7
-
8
-
9
-
10
-
11
-
12
-
13
-
14
-
15
-
16
-
17
-
18
-
19
-
20
-
21
-
22
-
23
-
24
-
25
-
26
-
27
-
28
-
29
-
30
-
31
-
32
-
33
-
34
-
35
-
36
-
37
-
38
-
39
-
40
-
41
-
42
-
43
-
44
-
45
-
46
-
47
-
48
-
49
-
50
-
51
-
52
-
53
-
54
-
55
-
56
-
57
-
58
-
59
-
60
-
61
-
62
-
63
-
64
-
65
-
66
-
67
-
68
-
69
-
70
-
71
-
72
-
73
-
74
-
 75
75 -
 76
76 -
 77
77 -
 78
78 -
 79
79 -
 80
80 -
 81
81 -
 82
82 -
 83
83 -
 84
84 -
 85
85 -
86
-
87
-
88
-
89
-
90
-
91
-
92
-
93
-
94
-
95
-
96
-
97
-
98
-
99
-
100
-
101
-
102
-
103
-
104
-
105
-
106
-
107
-
108
-
109
-
110
-
111
-
112
-
113
-
114
-
115
-
116
-
117
-
118
-
119
-
120
-
121
-
122
-
123
-
124
-
125
-
126
-
127
-
128
-
129
-
130
-
131
-
132
-
133
-
134
-
135
-
136
-
137
-
138
-
139
-
140
-
141
-
142
-
143
-
144
-
145
-
146
-
147
-
148
-
149
-
150
-
151
-
152
-
153
-
154
-
155
-
156
-
157
-
158
-
159
-
160
-
161
-
162
-
163
-
164
-
165
-
166
-
167
-
168
-
169
-
170
-
171
-
172
-
173
-
174
-
175
-
176
-
177
-
178
-
179
-
180
-
181
-
182
-
183
-
184
-
185
-
186
-
187
-
188
-
189
-
190
-
191
-
192
-
193
-
194
-
195
-
196
-
197
-
198
-
199
-
200
-
201
-
202
-
203
-
204
-
205
-
206
 |
 |
