Samsung SPH700AE User Manual (ENGLISH) - Page 24
Flipping/Reversing the Projected Image, Light Setting
 |
UPC - 036725240216
View all Samsung SPH700AE manuals
Add to My Manuals
Save this manual to your list of manuals |
Page 24 highlights
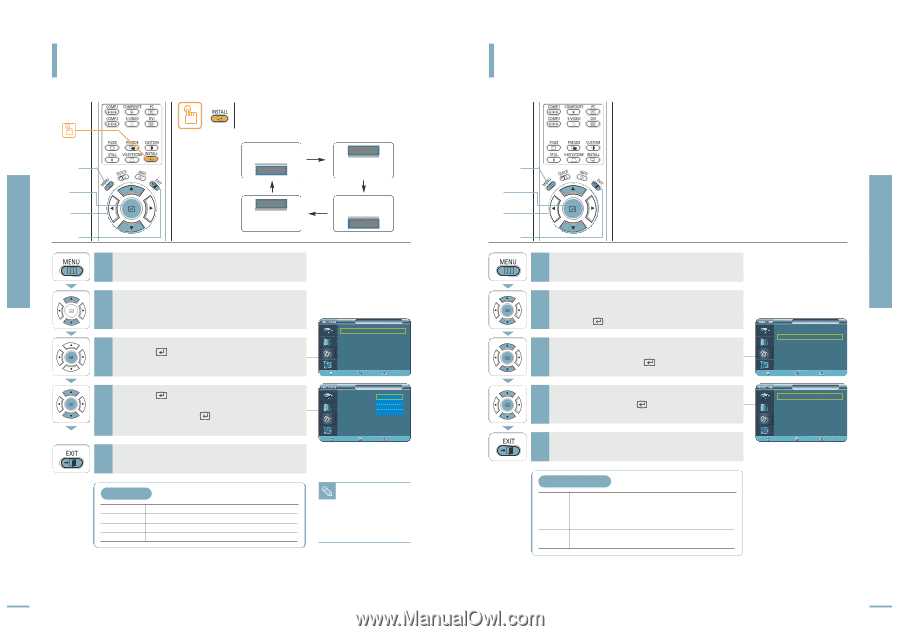
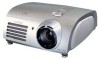
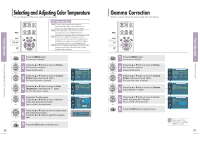
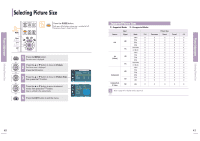
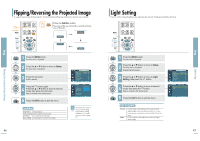
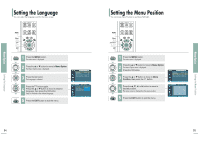
Flipping/Reversing the Projected Image Setup Flipping/Reversing the Projected Image To support positioning of the projector, horizontal/vertical flipping and picture reversal are available. One Touch MENU 1 Select 3, 4 .../† 2, 4 EXIT 5 Press the INSTALL button. The screen will flip over horizontally or vertically with each press of the button. Front-Floor Rear-Ceiling Rear-Floor Front-Ceiling 1 Press the MENU button. The main menu is displayed. 2 Press the L or M button to move to Setup. The Setup menu is displayed. 3 Press the button. Install is selected. Press the button again. 4 Press the L or M button to move to desired mode, then press the button. Setup is switched to the selected mode. 5 Press the EXIT button to exit the menu. Setup Install Light Setting V-Keystone Test Pattern PC Factory Default Information : Front-Floor √ : Theater √ Move Enter Return Setup Install Light Setting V-Keystone Test Pattern PC Factory Default Information : FroFnrot-nFtl-oFoloror : ThFeroantet-rCeiling Rear-Floor Rear-Ceiling Move Enter Return Install Menu Front-Floor Normal Image Front-Ceiling Horizontally Reversed Image Rear-Floor Vertically Reversed Image Rear-Ceiling Horizontal/Vertical Reversed Image This function is used to set up reversed image NOTE projection for ceiling installation. To install projector, refer to page 18. 46 Light Setting Used to set the image brightness by adjusting the amount of light generated by the lamp. MENU 1 Select 2, 3, 4 .../† 2, 3, 4 EXIT 5 1 Press the MENU button. The main menu is displayed. 2 Press the L or M button to move to Setup. The Setup menu is displayed. Press the button. 3 Press the L or M button to move to Light Setting, then press the button. 4 Press the L or M button to move to desired mode, then press the button. Setup is switched to the selected mode. 5 Press the EXIT button to exit the menu. Light Setting Mode Theater Bright Used to reduce the brightness of the lamp in dark ambient light to prevent reflection in the eye. It also lowers power consumption and extends the life of the lamp. Used to enhance the brightness in relatively bright ambient light. Setup Install Light Setting V-Keystone Test Pattern PC Factory Default Information : Front-Floor √ : Theater √ Move Enter Return Theater Bright Light Setting √ √ Move Enter Return 47 Light Setting Setup
-
 1
1 -
2
-
3
-
4
-
5
-
6
-
7
-
8
-
9
-
10
-
11
-
12
-
13
-
14
-
15
-
16
-
17
-
18
-
 19
19 -
 20
20 -
 21
21 -
 22
22 -
 23
23 -
 24
24 -
 25
25 -
 26
26 -
 27
27 -
 28
28 -
 29
29 -
30
-
31
-
32
-
33
-
34
-
35
-
36
-
37
-
38
-
39
-
40
-
41
-
42
 |
 |