Sony DSR 45A Operating Instructions - Page 15
When the DISPLAY SELECT selector, monitor by pressing these buttons. During
 |
UPC - 027242689602
View all Sony DSR 45A manuals
Add to My Manuals
Save this manual to your list of manuals |
Page 15 highlights
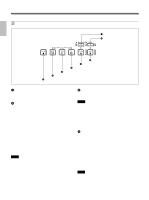
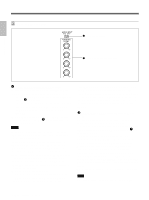
Chapter 1 Overview Notes • To choose whether or not the tape label, title, or data codes are displayed, use the menu items. Also, you can select the data code items to be displayed by pressing the DATA CODE button on the Remote Commander. • To adjust the menu items, set the LCD monitor or a monitor connected to the MONITOR VIDEO jack to display the menu. When neither of the monitors is set, you cannot adjust the menu items. 3 DISPLAY SELECT selector Selects the data items displayed on the LCD monitor or a monitor connected to the MONITOR VIDEO jack. MENU: displays the menu. DATA: displays time code, remaining tape time, type of input signal selected, audio mode, presence or absence of cassette memory, tape label, title, etc. AUDIO: displays audio levels. Notes • You can use the Remote Control Unit (DSRM-20, not supplied) or the supplied Remote Commander to search for a scene using search signals on the tape. In this case, you can search for the scene regardless of this selector setting. To display the "-/+" which indicates the direction to search, set this selector to DATA. • If you change the selector setting during a search with the cassette memory, the search aborts. 5 J / j buttons When the DISPLAY SELECT selector 3 is set to MENU, you can select a menu item by pressing these buttons. For details on the menu, see "Operating the Menus" on page 76 (GB). When the DISPLAY SELECT selector 3 is set to DATA, you can adjust the brightness of the LCD monitor by pressing these buttons. During the adjustment, the brightness level is displayed as illustrated below. It disappears one second after you have adjusted the brightness. BRT 4 EXEC (execute) or FINE (AUDIO) (fine audio levels) button When the DISPLAY SELECT selector 3 is set to MENU, the button functions as the EXEC (execute) button. Press this button to change the setting on the menu items. For details on the menu, see "Operating the Menus" on page 76 (GB). When the DISPLAY SELECT selector 3 is set to AUDIO, the button functions as the FINE (fine audio levels) button. While you are holding this button down, the enlarged audio levels meters are displayed. You can confirm or adjust audio levels precisely on these enlarged audio levels meters. To select an enlarged portion, use REF LEVEL on the AUDIO SET menu. For details on fine audio levels screen, see "Fine audio levels screen" on page 29 (GB). For details on the AUDIO SET menu, see "AUDIO SET menu" on page 88 (GB). 15 Chapter 1 Overview (GB)
-
 1
1 -
2
-
3
-
4
-
5
-
6
-
7
-
8
-
9
-
 10
10 -
 11
11 -
 12
12 -
 13
13 -
 14
14 -
 15
15 -
 16
16 -
 17
17 -
 18
18 -
 19
19 -
 20
20 -
21
-
22
-
23
-
24
-
25
-
26
-
27
-
28
-
29
-
30
-
31
-
32
-
33
-
34
-
35
-
36
-
37
-
38
-
39
-
40
-
41
-
42
-
43
-
44
-
45
-
46
-
47
-
48
-
49
-
50
-
51
-
52
-
53
-
54
-
55
-
56
-
57
-
58
-
59
-
60
-
61
-
62
-
63
-
64
-
65
-
66
-
67
-
68
-
69
-
70
-
71
-
72
-
73
-
74
-
75
-
76
-
77
-
78
-
79
-
80
-
81
-
82
-
83
-
84
-
85
-
86
-
87
-
88
-
89
-
90
-
91
-
92
-
93
-
94
-
95
-
96
-
97
-
98
-
99
-
100
-
101
-
102
-
103
-
104
-
105
-
106
-
107
-
108
-
109
-
110
-
111
-
112
-
113
-
114
-
115
-
116
-
117
-
118
-
119
-
120
-
121
-
122
-
123
-
124
-
125
-
126
-
127
-
128
-
129
-
130
-
131
-
132
-
133
-
134
-
135
-
136
-
137
-
138
-
139
-
140
-
141
-
142
-
143
-
144
-
145
-
146
-
147
-
148
-
149
-
150
-
151
-
152
-
153
-
154
-
155
-
156
-
157
-
158
-
159
-
160
-
161
-
162
-
163
-
164
-
165
-
166
-
167
-
168
-
169
-
170
-
171
-
172
-
173
-
174
-
175
-
176
-
177
-
178
-
179
-
180
-
181
-
182
-
183
-
184
-
185
-
186
-
187
-
188
-
189
-
190
-
191
-
192
-
193
-
194
-
195
-
196
-
197
-
198
-
199
-
200
-
201
-
202
-
203
-
204
-
205
-
206
-
207
-
208
-
209
-
210
-
211
-
212
-
213
-
214
-
215
-
216
-
217
-
218
-
219
-
220
 |
 |
