Sony DSR 45A Operating Instructions - Page 18
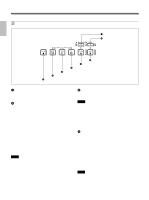
Audio control AUDIO INPUT AUTO/MANU switch, AUDIO REC LEVEL control knobs CH-1
 |
UPC - 027242689602
View all Sony DSR 45A manuals
Add to My Manuals
Save this manual to your list of manuals |
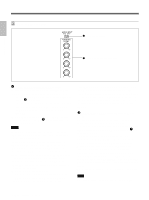
Page 18 highlights
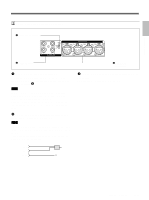
Chapter 1 Overview Location and Function of Parts 3 Audio control section 1 AUDIO INPUT switch CH-1 CH-2 2 AUDIO REC LEVEL control knobs CH-3 CH-4 1 AUDIO INPUT (AUTO/MANU) switch Switches the audio recording level adjustment mode. AUTO: Adjusts the recording level automatically. The AUDIO REC LEVEL control knobs (CH-1 to CH-4) 2 are disabled. To link the AGC (Auto Gain Control) of the audio channels (CH-1/2 or CH-3/4), set AGC CH1,2 (AGC CH3,4) on the AUDIO SET menu to LINKED. MANU: Enables the AUDIO REC LEVEL control knobs (CH-1 to CH-4) 2 to manually adjust the recording level. Notes • When DV signals are input to the unit, the sound recorded retains the signal level input, regardless of the setting of this switch. • If the sound is louder than the input amplifier's dynamic range, the AUTO setting is ineffective. • Even if you set this switch to AUTO, unless the setting of the INPUT LEVEL selector on the rear panel is appropriate, there may be clipping and noise. • The audio level is automatically adjusted to an appropriate level when you select AUTO. It takes about 20 seconds for the audio level to be stabilized in the following cases. - immediately after powering on - immediately after stopping a playback operation - immediately after switching the audio mode in AUDIO MODE on the AUDIO SET menu • If LIMITER on the AUDIO SET menu has been set to ON while you are manually adjusting the audio level, you can record the sound without clipping even if the audio input level is high as long as the level is within the amplifier's dynamic range. The LIMITER setting is available only when this switch is set to MANU. 2 AUDIO REC LEVEL control knobs (CH-1 to CH-4) By turning these knobs, you can adjust the analog audio input signal levels for CH-1 to CH-4 respectively. You can adjust the audio signal level only if the AUDIO INPUT (AUTO/MANU) switch 1 has been set to MANU. To display the audio levels meters on the LCD monitor, set the DISPLAY SELECT selector on the monitor display section to AUDIO (audio screen). While you are holding down the FINE (fine audio levels) button when the audio levels meters are displayed, a part of the audio levels meters will be enlarged (Fine audio levels screen). To select the enlarged portion, use REF LEVEL on the AUDIO SET menu. You can adjust the audio levels precisely on this screen. For details on the audio screen, see "Audio screen" on page 28 (GB). Note You cannot adjust the audio level of the DV signal. 18 (GB) Chapter 1 Overview
-
 1
1 -
2
-
3
-
4
-
5
-
6
-
7
-
8
-
9
-
10
-
11
-
12
-
 13
13 -
 14
14 -
 15
15 -
 16
16 -
 17
17 -
 18
18 -
 19
19 -
 20
20 -
 21
21 -
 22
22 -
 23
23 -
24
-
25
-
26
-
27
-
28
-
29
-
30
-
31
-
32
-
33
-
34
-
35
-
36
-
37
-
38
-
39
-
40
-
41
-
42
-
43
-
44
-
45
-
46
-
47
-
48
-
49
-
50
-
51
-
52
-
53
-
54
-
55
-
56
-
57
-
58
-
59
-
60
-
61
-
62
-
63
-
64
-
65
-
66
-
67
-
68
-
69
-
70
-
71
-
72
-
73
-
74
-
75
-
76
-
77
-
78
-
79
-
80
-
81
-
82
-
83
-
84
-
85
-
86
-
87
-
88
-
89
-
90
-
91
-
92
-
93
-
94
-
95
-
96
-
97
-
98
-
99
-
100
-
101
-
102
-
103
-
104
-
105
-
106
-
107
-
108
-
109
-
110
-
111
-
112
-
113
-
114
-
115
-
116
-
117
-
118
-
119
-
120
-
121
-
122
-
123
-
124
-
125
-
126
-
127
-
128
-
129
-
130
-
131
-
132
-
133
-
134
-
135
-
136
-
137
-
138
-
139
-
140
-
141
-
142
-
143
-
144
-
145
-
146
-
147
-
148
-
149
-
150
-
151
-
152
-
153
-
154
-
155
-
156
-
157
-
158
-
159
-
160
-
161
-
162
-
163
-
164
-
165
-
166
-
167
-
168
-
169
-
170
-
171
-
172
-
173
-
174
-
175
-
176
-
177
-
178
-
179
-
180
-
181
-
182
-
183
-
184
-
185
-
186
-
187
-
188
-
189
-
190
-
191
-
192
-
193
-
194
-
195
-
196
-
197
-
198
-
199
-
200
-
201
-
202
-
203
-
204
-
205
-
206
-
207
-
208
-
209
-
210
-
211
-
212
-
213
-
214
-
215
-
216
-
217
-
218
-
219
-
220
 |
 |
