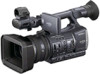
Sony HDR-AX2000 Operating Guide (Large File - 11.29 MB) - Page 22
Step 6: Setting the date and time - case
 |
UPC - 027242781733
View all Sony HDR-AX2000 manuals
Add to My Manuals
Save this manual to your list of manuals |
Page 22 highlights
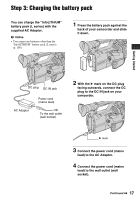
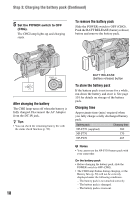
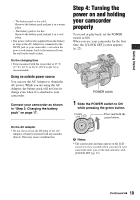
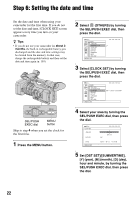
Step 6: Setting the date and time Set the date and time when using your camcorder for the first time. If you do not set the date and time, [CLOCK SET] screen appears every time you turn on your camcorder. z Tips • If you do not use your camcorder for about 3 months, the built-in rechargeable battery gets discharged and the date and time settings may be cleared from the memory. In that case, charge the rechargeable battery and then set the date and time again (p. 103). 2 Select (OTHERS) by turning the SEL/PUSH EXEC dial, then press the dial. 3 Select [CLOCK SET] by turning the SEL/PUSH EXEC dial, then press the dial. SEL/PUSH EXEC dial MENU button Skip to step 4 when you set the clock for the first time. 1 Press the MENU button. 4 Select your area by turning the SEL/PUSH EXEC dial, then press the dial. 5 Set [DST SET]/[SUMMERTIME], [Y] (year), [M] (month), [D] (day), hour and minute, by turning the SEL/PUSH EXEC dial, then press the dial. 22
-
 1
1 -
2
-
3
-
4
-
5
-
6
-
7
-
8
-
9
-
10
-
11
-
12
-
13
-
14
-
15
-
16
-
 17
17 -
 18
18 -
 19
19 -
 20
20 -
 21
21 -
 22
22 -
 23
23 -
 24
24 -
 25
25 -
 26
26 -
 27
27 -
28
-
29
-
30
-
31
-
32
-
33
-
34
-
35
-
36
-
37
-
38
-
39
-
40
-
41
-
42
-
43
-
44
-
45
-
46
-
47
-
48
-
49
-
50
-
51
-
52
-
53
-
54
-
55
-
56
-
57
-
58
-
59
-
60
-
61
-
62
-
63
-
64
-
65
-
66
-
67
-
68
-
69
-
70
-
71
-
72
-
73
-
74
-
75
-
76
-
77
-
78
-
79
-
80
-
81
-
82
-
83
-
84
-
85
-
86
-
87
-
88
-
89
-
90
-
91
-
92
-
93
-
94
-
95
-
96
-
97
-
98
-
99
-
100
-
101
-
102
-
103
-
104
-
105
-
106
-
107
-
108
-
109
-
110
-
111
-
112
-
113
-
114
-
115
-
116
-
117
-
118
-
119
-
120
-
121
-
122
-
123
-
124
-
125
-
126
-
127
-
128
-
129
-
130
-
131
-
132
 |
 |
