Sony HDR-AX2000 Operating Guide (Large File - 11.29 MB) - Page 25
Recording/Playback, Recording - h high definition
 |
UPC - 027242781733
View all Sony HDR-AX2000 manuals
Add to My Manuals
Save this manual to your list of manuals |
Page 25 highlights
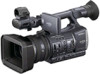
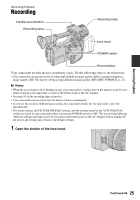
Recording/Playback Recording Handle record button Recording lamp Recording lamp Lens hood POWER switch Record button Your camcorder records movies on memory cards. Do the following steps to record movies. • This camcorder can record movies in either high definition image quality (HD) or standard definition image quality (SD). The factory setting is high definition image quality (HD) ([REC FORMAT], p. 27). b Notes • When the access lamp is lit or flashing in red, your camcorder is writing data on the memory card. Do not shake or knock your camcorder, or remove the battery pack or the AC Adaptor. • See page 95 on the recording time of movies. • Your camcorder can record movies for about 13 hours continuously. • If a movie file exceeds 2 GB during recording, the camcorder divides the file and create a new file automatically. • The menu settings, the PICTURE PROFILE settings, and the settings made by the AUTO/MANUAL switch are stored in your camcorder when you turn the POWER switch to OFF. The access lamp lights up while the settings are being stored. If you remove the battery pack or the AC Adaptor before turning off the power, the settings may return to the default settings. 1 Open the shutter of the lens hood. Recording/Playback Continued , 25
-
 1
1 -
2
-
3
-
4
-
5
-
6
-
7
-
8
-
9
-
10
-
11
-
12
-
13
-
14
-
15
-
16
-
17
-
18
-
19
-
 20
20 -
 21
21 -
 22
22 -
 23
23 -
 24
24 -
 25
25 -
 26
26 -
 27
27 -
 28
28 -
 29
29 -
 30
30 -
31
-
32
-
33
-
34
-
35
-
36
-
37
-
38
-
39
-
40
-
41
-
42
-
43
-
44
-
45
-
46
-
47
-
48
-
49
-
50
-
51
-
52
-
53
-
54
-
55
-
56
-
57
-
58
-
59
-
60
-
61
-
62
-
63
-
64
-
65
-
66
-
67
-
68
-
69
-
70
-
71
-
72
-
73
-
74
-
75
-
76
-
77
-
78
-
79
-
80
-
81
-
82
-
83
-
84
-
85
-
86
-
87
-
88
-
89
-
90
-
91
-
92
-
93
-
94
-
95
-
96
-
97
-
98
-
99
-
100
-
101
-
102
-
103
-
104
-
105
-
106
-
107
-
108
-
109
-
110
-
111
-
112
-
113
-
114
-
115
-
116
-
117
-
118
-
119
-
120
-
121
-
122
-
123
-
124
-
125
-
126
-
127
-
128
-
129
-
130
-
131
-
132
 |
 |
