Sony HXRNX80 Operating Instructions - Page 51
Recording sound from a Multi Interface Shoe compatible microphone (sold separately)
 |
View all Sony HXRNX80 manuals
Add to My Manuals
Save this manual to your list of manuals |
Page 51 highlights
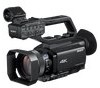
L: AUDIO LEVEL (CH2) dial Wind noise reduction switches G: LOW CUT (INPUT1) switch M: LOW CUT (INPUT2) switch When using a microphone with XLR-type connector (sold separately) or external audio device (such as a mixer), configure the settings as described below. 1 Select the audio input source. • Set the INPUT1/INPUT2 (LINE/MIC/ MIC+48V) switch (D or F) based on the device connected to INPUT1 jack A/INPUT2 jack B. Connected device External audio device (such as mixer) Dynamic microphone or microphone with built-in battery +48V powered (phantom power) microphone Switch position LINE MIC MIC+48V b Notes • If the switch is set to MIC+48V and you connect a device that is not compatible with +48V power, it may damage the connected device. Check the switch before connecting the device. • To prevent unwanted noise when no audio device is connected to the INPUT1 or INPUT2 jack, set the INPUT1/INPUT2 (LINE/MIC/ MIC+48V) switch (D or F) to LINE. 2 Set the microphone input level. When the INPUT1/INPUT2 (LINE/ MIC/MIC+48V) switch (D or F) is set to MIC or MIC+48V, the input level can be set using the ATT (INPUT1/ INPUT2) switch (C or E). Adjust the setting based on the sensitivity of the microphone. ATT 0dB: -60dBu ATT 10dB: -50dBu ATT 20dB: -40dBu b Note • The input level is fixed to +4dBu when the INPUT1/INPUT2 (LINE/MIC/MIC+48V) switch (D or F) is set to LINE. The input level does not change, even if you change the ATT switch setting. 3 Select the channel to record. With the REC CH SELECT (INPUT1) switch H, select the channel to record. REC CH SELECT (INPUT1) switch setting Sound recorded to CH1 and CH2 INPUT1 CH1 CH1•CH2 CH2 INPUT1 CH1 CH1 INPUT2 CH2 z Tip • When using a stereo microphone with two XLR (3-pin) plugs, connect the INPUT1 jack A to the left channel, connect the INPUT2 jack B to the right channel, and set the REC CH SELECT (INPUT1) switch H to CH1. Recording sound from a Multi Interface Shoe compatible microphone (sold separately) You can record audio with a Multi Interface Shoe-compatible microphone. 1 Connect the Multi Interface Shoe compatible microphone (sold separately) to the Multi Interface Shoe. Continued , 51 Recording
-
 1
1 -
2
-
3
-
4
-
5
-
6
-
7
-
8
-
9
-
10
-
11
-
12
-
13
-
14
-
15
-
16
-
17
-
18
-
19
-
20
-
21
-
22
-
23
-
24
-
25
-
26
-
27
-
28
-
29
-
30
-
31
-
32
-
33
-
34
-
35
-
36
-
37
-
38
-
39
-
40
-
41
-
42
-
43
-
44
-
45
-
 46
46 -
 47
47 -
 48
48 -
 49
49 -
 50
50 -
 51
51 -
 52
52 -
 53
53 -
 54
54 -
 55
55 -
 56
56 -
57
-
58
-
59
-
60
-
61
-
62
-
63
-
64
-
65
-
66
-
67
-
68
-
69
-
70
-
71
-
72
-
73
-
74
-
75
-
76
-
77
-
78
-
79
-
80
-
81
-
82
-
83
-
84
-
85
-
86
-
87
-
88
-
89
-
90
-
91
-
92
-
93
-
94
-
95
-
96
-
97
-
98
-
99
-
100
-
101
-
102
-
103
-
104
-
105
-
106
-
107
-
108
-
109
-
110
-
111
-
112
-
113
-
114
-
115
-
116
-
117
-
118
-
119
-
120
-
121
-
122
-
123
-
124
-
125
-
126
-
127
-
128
-
129
-
130
-
131
-
132
-
133
-
134
-
135
-
136
-
137
-
138
-
139
-
140
-
141
-
142
-
143
-
144
-
145
-
146
-
147
-
148
-
149
-
150
-
151
-
152
-
153
-
154
-
155
-
156
-
157
-
158
-
159
-
160
-
161
-
162
-
163
-
164
-
165
-
166
-
167
-
168
-
169
-
170
-
171
 |
 |
