Sony SDM-X82 Operating Instructions - Page 5
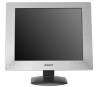
Identifying parts and controls, Front of the LCD display, Side view of the LCD display - menu lock
 |
View all Sony SDM-X82 manuals
Add to My Manuals
Save this manual to your list of manuals |
Page 5 highlights
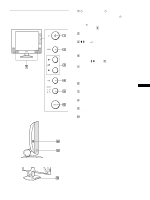
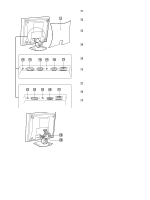
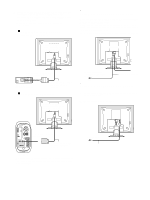
Identifying parts and controls See the pages in parentheses for further details. Front of the LCD display Side view of the LCD display 1 1 (Power) switch and 1 (power) indicator (pages 9, 17, 22) This switch turns the monitor on when the 1 (power) indicator lights up in red. To turn the monitor off, press this switch again. If the 1 (power) indicator does not light up, press the MAIN POWER switch (8). 2 MENU button (page 12) This button turns the menu screen on and off. 3 M/m and 2 (volume) buttons (page 12, 17) These buttons are used to select the menu items and make adjustments, and also display the VOLUME menu to control the volume. 4 OK button (page 12) This button activates the selected menu item and adjustments using with M/m buttons (3). 5 INPUT button and INPUT1/INPUT2 indicator (page 11) This button selects the connected computer for switching the video input signals, and the corresponding indicator, (INPUT1 or INPUT2) lights up. 6 ECO button (page 18) This button is used to reduce the power consumption. US 7 Stereo speakers (page 17) These output the audio signals as sound. 8 MAIN POWER switch (page 9) This switch turns the monitor's main power on and off. 9 Headphones jack (page 17) This jack outputs audio signals to the headphones. 0 Security Lock Hole The security lock hole should be applied with the Kensington Micro Saver Security System. Micro Saver Security System is a trademark of Kensington. Rear of the display stand (continued) 5
-
 1
1 -
 2
2 -
 3
3 -
 4
4 -
 5
5 -
 6
6 -
 7
7 -
 8
8 -
 9
9 -
 10
10 -
 11
11 -
12
-
13
-
14
-
15
-
16
-
17
-
18
-
19
-
20
-
21
-
22
-
23
-
24
-
25
-
26
-
27
-
28
-
29
-
30
-
31
-
32
-
33
-
34
-
35
-
36
-
37
-
38
-
39
-
40
-
41
-
42
-
43
-
44
-
45
-
46
-
47
-
48
-
49
-
50
-
51
-
52
-
53
-
54
-
55
-
56
-
57
-
58
-
59
-
60
-
61
-
62
-
63
-
64
-
65
-
66
-
67
-
68
-
69
-
70
-
71
-
72
 |
 |
