Sony STRDG920 Operating Instructions
Sony STRDG920 - STR AV Receiver Manual
 |
UPC - 027242729896
View all Sony STRDG920 manuals
Add to My Manuals
Save this manual to your list of manuals |
Sony STRDG920 manual content summary:
- Sony STRDG920 | Operating Instructions - Page 1
3-289-200-11(1) Multi Channel AV Receiver Operating Instructions STR-DG920 ©2008 Sony Corporation - Sony STRDG920 | Operating Instructions - Page 2
upon your Sony dealer user to the presence of important operating and maintenance (servicing) instructions receiver is connected. - Consult the dealer or an experienced radio/TV technician for help. CAUTION You are cautioned that any changes or modification not expressly approved in this manual - Sony STRDG920 | Operating Instructions - Page 3
Manual • The instructions in this manual are for model STR-DG920. Check your model number by looking at the lower right corner of the front panel. In this manual, models of area code Neural Audio Corporation and THX Ltd. Sony Corporation hereby grants the user a non-exclusive, non-transferable, - Sony STRDG920 | Operating Instructions - Page 4
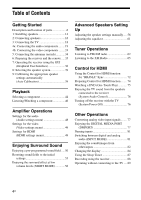
the antennas (aerials 34 6: Preparing the receiver and the remote .....35 7: Operating the receiver using the GUI (Graphical User Interface 36 8: Selecting the speaker system 39 9: Calibrating the appropriate speaker settings automatically (Auto Calibration 39 Playback Selecting a component - Sony STRDG920 | Operating Instructions - Page 5
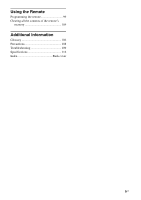
Using the Remote Programming the remote 99 Clearing all the contents of the remote's memory 104 Additional Information Glossary 104 Precautions 108 Troubleshooting 109 Specifications 114 Index Back cover 5US - Sony STRDG920 | Operating Instructions - Page 6
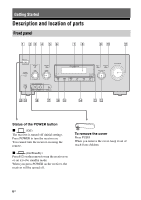
IN/PORTABLE AV IN VIDEO L AUDIO R AUTO CAL MIC MULTI CHANNEL DECODING DISPLAY INPUT MODE INPUT SELECTOR MEMORY/ ENTER DIMMER 2CH/ A.DIRECT A.F.D. MOVIE MUSIC MASTER VOLUME w; ql qk qj qh qg qf qd qs Status of the POWER button x (Off) The receiver is turned off (initial setting - Sony STRDG920 | Operating Instructions - Page 7
F Remote sensor Receives signals from remote commander. G MULTI Lights up when multi CHANNEL channel audio station or enter the selection when selecting the settings (page 97). Q AUTO CAL MIC jack (page 40). R VIDEO 2 IN/ PORTABLE AV IN jacks Connects to a portable audio/video component - Sony STRDG920 | Operating Instructions - Page 8
MULTI CHANNEL INPUT SURROUND BACK R L SURROUND R L R FRONT B L FRONT A R L SPEAKERS CENTER 75 6 5 4 A DIGITAL INPUT/OUTPUT section OPTICAL IN Connects to a DVD jacks player, etc. The COAXIAL jack COAXIAL IN provides a better jacks quality sound (page 20, 27, 29). HDMI IN - Sony STRDG920 | Operating Instructions - Page 9
the receiver and to control the Sony audio/video components that the remote is assigned to operate. You can also program the remote to control non-Sony audio/video components. For details, see "Programming the remote" (page 99). RM-AAP023 wh wg wf wd ws wa ?/1 THEATER RM SET UP AV ?/1 SYSTEM - Sony STRDG920 | Operating Instructions - Page 10
"Control for HDMI" is set to "OFF" (page 75). C AMP Press to enable the receiver operation (page 89). D TV Press to light up the button. It changes the remote key function to activate the buttons with yellow printing. It also activate the DISPLAY (U), OPTIONS TOOLS (K), HOME/MENU (L), RETURN - Sony STRDG920 | Operating Instructions - Page 11
channel numbers of the Digital CATV terminal. Press to select a sound field (page 96). A.F.D. MOVIE MUSIC G SLEEP Press to activate the Sleep Timer function and the duration which the receiver . To display the menus of Sony TV, press TV (D) and then press HOME/ MENU. Press to skip tracks - Sony STRDG920 | Operating Instructions - Page 12
to select preset TV channels. Press to - select preset stations. - select preset channels of the VCR, satellite Press to display the menu or MENU on-screen guide of the DVD player, Blu-ray disc player, PSX exit the menu while the menu or on-screen guide of the VCD player, LD player, DVD player, - Sony STRDG920 | Operating Instructions - Page 13
from the speakers connected to this receiver automatically. Note This button will only function if your TV is compatible with Theater Mode. For details, refer to the operating instructions supplied with the TV. Z RM SET UP Press to set up the remote. * The number 5, PRESET + and N buttons have - Sony STRDG920 | Operating Instructions - Page 14
receiver allows you to use a 7.1 channel system (7 speakers and one subwoofer). Enjoying a 5.1/7.1 channel system To fully enjoy theater-like multi channel additional surround back speaker (6.1 channel system) or two surround back speakers (7.1 channel system). Example of a 7.1 channel speaker system - Sony STRDG920 | Operating Instructions - Page 15
Getting Started Tips • When you connect a 7.1 channel speaker system, the angle A should be the same. • When you connect a 6.1 channel speaker system, place the surround back speaker behind the listening position. • Since the subwoofer does not emit highly directional signals, you can place it - Sony STRDG920 | Operating Instructions - Page 16
(mains lead). H E G F D A B NNA AM SURROUND BACK R L HDMI BD IN DVD IN VIDEO 1 IN COMPONENT VIDEO MONITOR COMPO 3 COMPO L L L AUDIO OUT CENTER R R R FRONT SURROUND SUR BACK SUBWOOFER VIDEO 1 SUBWOOFER MULTI CHANNEL INPUT SURROUND R L R FRONT B L FRONT A R L - Sony STRDG920 | Operating Instructions - Page 17
select the front speakers you want to use with the SPEAKERS (OFF/A/B/A+B) button on the receiver (page 39). b)If you connect only one surround back speaker, connect it to the SPEAKERS SURROUND BACK L terminals. c)When you connect a subwoofer with an auto standby function, turn off the function when - Sony STRDG920 | Operating Instructions - Page 18
R FRONT SURROUND SUR BACK SUBWOOFER VIDEO 1 SUBWOOFER MULTI CHANNEL INPUT SURROUND BACK R L SURROUND R L R FRONT B L FRONT A R L SPEAKERS A Optical digital cord (not supplied) B Audio cord (not supplied) C HDMI cable (not supplied) We recommend that you use a Sony HDMI cable. D Video - Sony STRDG920 | Operating Instructions - Page 19
connected to the receiver if you connect the audio output jack of the TV to the TV IN jacks of the receiver. In this configuration, set the sound output jack CD With digital audio 20 player, CD player output With multi channel 22 audio output With analog audio 23 output only MD deck, Tape - Sony STRDG920 | Operating Instructions - Page 20
VIDEO 1 IN SAT IN XM SAT IN HDMI BD IN DVD IN VIDEO 1 IN COMPONENT back a Super Audio CD disc on a Super Audio CD player, the sound is output only if you make the connection to MULTI CHANNEL INPUT or SA-CD/CD IN jacks (analog input jack) on the receiver. Refer to the operating instructions - Sony STRDG920 | Operating Instructions - Page 21
connector straight in. • As the connector of the DIGITAL MEDIA PORT adapter is fragile, be sure to handle with care when placing or moving the receiver. • To disconnect the DIGITAL MEDIA PORT adapter, squeeze the sides of the connector, since the connector is locked in place. If you want to connect - Sony STRDG920 | Operating Instructions - Page 22
INPUT jacks of this receiver to enjoy multi channel sound. Alternatively, the multi channel input jacks can be used to connect an external multi channel decoder. DVD player, Super Audio CD player, etc. A B TV OPTICAL IN ANTENNA FM AM OPTICAL VIDEO 1 IN SAT IN XM SAT IN HDMI BD IN DVD IN - Sony STRDG920 | Operating Instructions - Page 23
OPTICAL IN ANTENNA FM AM OPTICAL VIDEO 1 IN SAT IN XM SAT IN HDMI BD IN DVD IN VIDEO 1 IN COMPONENT VIDEO MONITOR COMPO 3 COMPO 2 AUDIO OUT CENTER R R R FRONT SURROUND SUR BACK SUBWOOFER VIDEO 1 SUBWOOFER MULTI CHANNEL INPUT SURROUND BACK R L SURROUND R L R FRONT B L - Sony STRDG920 | Operating Instructions - Page 24
This section describes how to connect your video components to this receiver. Before you begin, refer to "Component to be connected" Component to be connected Page TV 18 With HDMI jack 25 DVD player 27 Blu-ray disc player 28 Satellite tuner, Set-top box 29 DVD recorder, VCR 30 - Sony STRDG920 | Operating Instructions - Page 25
HDMI ver1.3. • This receiver supports the Control for HDMI function (page 72). Satellite tuner, Set- BACK SUBWOOFER VIDEO 1 SUBWOOFER MULTI CHANNEL INPUT SURROUND BACK R L SURROUND R L R FRONT B L FRONT A R L SPEAKERS A HDMI cable (not supplied) We recommend that you use a Sony HDMI - Sony STRDG920 | Operating Instructions - Page 26
may need certain settings be made before you can enjoy multi channel Linear PCM. Refer to the operating instructions of the playback component. • Not every HDMI component supports all functions that are defined by the specified HDMI version. For example, components that support HDMI, ver. 1.3a, may - Sony STRDG920 | Operating Instructions - Page 27
channel digital audio from the DVD player, set the digital audio output setting on the DVD player. Refer to the operating instructions VIDEO 1 IN SAT IN XM SAT IN HDMI BD IN DVD IN VIDEO 1 IN COMPONENT VIDEO SURROUND SUR BACK SUBWOOFER VIDEO 1 SUBWOOFER MULTI CHANNEL INPUT SURROUND BACK R L - Sony STRDG920 | Operating Instructions - Page 28
channel digital audio from the Bluray disc player, set the digital audio output setting on the Blu-ray disc player. Refer to the operating instructions OUT CENTER R R R FRONT SURROUND SUR BACK SUBWOOFER VIDEO 1 SUBWOOFER MULTI CHANNEL INPUT SURROUND BACK R L SURROUND R L R FRONT B - Sony STRDG920 | Operating Instructions - Page 29
components. Audio signals Satellite tuner, Set-top box Video signals Notes • AM OPTICAL VIDEO 1 IN SAT IN XM SAT IN HDMI BD IN DVD IN VIDEO 1 IN COMPONENT VIDEO MONITOR R R R FRONT SURROUND SUR BACK SUBWOOFER VIDEO 1 SUBWOOFER MULTI CHANNEL INPUT SURROUND BACK R L SURROUND R L - Sony STRDG920 | Operating Instructions - Page 30
setting of the VIDEO 1 input button on the remote so IN SAT IN XM SAT IN HDMI BD IN DVD IN VIDEO 1 IN BACK SUBWOOFER VIDEO 1 SUBWOOFER MULTI CHANNEL INPUT SURROUND BACK R L SURROUND R L R FRONT B L FRONT A R L SPEAKERS VIDEO 2 IN/PORTABLE AV IN VIDEO To the VIDEO 2 IN/PORTABLE AV - Sony STRDG920 | Operating Instructions - Page 31
and component video signals. • Component video signals can be output as HDMI video signals. In the video input/output conversion table of the receiver Refer to "In the video input/output conversion table classified by the menu settings" (page 33) on the conversion function of images. Input Signals - Sony STRDG920 | Operating Instructions - Page 32
image may be output. • HDMI video signals cannot be converted to component video signals and video signals. • When you play back a VCR with an image . To display Closed Caption Set "Resolution" to "DIRECT" in the Video settings menu when receiving a signal that supports Closed Captions. Use the - Sony STRDG920 | Operating Instructions - Page 33
based on the settings menu. Video signals with copyright protection are output as 480p. Notes • Video signals are not output from the COMPONENT VIDEO MONITOR OUT jacks when the TV, etc., is connected to the HDMI OUT jack. • If you select a resolution that the connected TV does not support in the - Sony STRDG920 | Operating Instructions - Page 34
OPTICAL VIDEO 1 IN SAT IN XM SAT IN HDMI BD IN DVD IN VIDEO 1 IN COMPONENT VIDEO BACK SUBWOOFER VIDEO 1 SUBWOOFER MULTI CHANNEL INPUT SURROUND BACK R L SURROUND R L R FRONT B L FRONT A R L SPEAKERS * The shape of the connector varies depending on the area code of this receiver - Sony STRDG920 | Operating Instructions - Page 35
used to return settings you have made to their factory defaults. Be sure to use the buttons on the receiver for this operation. 1,2 ON/STANDBY POWER SPEAKERS (OFF/A/B/A+B) TONE MODE TONE TUNING MODE TUNING PHONES VIDEO 2 IN/PORTABLE AV IN VIDEO L AUDIO R AUTO CAL MIC MULTI CHANNEL DECODING - Sony STRDG920 | Operating Instructions - Page 36
remote codes again (page 99). Tip Under normal conditions, the batteries should last for about 3 months. When the remote no longer operates the receiver, replace all the batteries with new ones. 36US < 7: Operating the receiver using the GUI (Graphical User screen ?/1 THEATER RM SET UP AV ?/1 - Sony STRDG920 | Operating Instructions - Page 37
receiver. Auto Calibration You can use the Auto Calibration settings menu to adjust the speakers automatically. For details, see "9: Calibrating the appropriate speaker settings automatically (Auto Calibration)" (page 39). Speaker You can use the Speaker settings menu to adjust the speakers manually - Sony STRDG920 | Operating Instructions - Page 38
MODE DISPLAY GUI MODE 1 2-9 RETURN/ EXIT O O RETURN/ EXIT HOME MENU OPTIONS TOOLS - CATEGORY + .< > MENU < 1 Press GUI MODE Press V/v repeatedly to select the setting you want. 9 Press to enter the setting. 10Repeat steps 2 to 9 to make other settings. To return to the previous screen - Sony STRDG920 | Operating Instructions - Page 39
a sampling frequency of more than 96 kHz are being received. The DCAC is designed to obtain proper sound balance in your room. However, you can adjust the speaker levels and balance manually according to your preference. For details, see "Making settings with the Test Tone menu" (page 59). 39US - Sony STRDG920 | Operating Instructions - Page 40
set to off. ON/STANDBY POWER SPEAKERS (OFF/A/B/A+B) TONE MODE TONE TUNING MODE TUNING PHONES VIDEO 2 IN/PORTABLE AV IN VIDEO L AUDIO R AUTO CAL MIC MULTI CHANNEL microphone remains at the same height as your ears. On setting up the active subwoofer • When a subwoofer is connected, turn on - Sony STRDG920 | Operating Instructions - Page 41
The measurement starts in five seconds. O RETURN/ EXIT HOME MENU OPTIONS TOOLS MENU 1 Press GUI MODE. " screen. 2 Press V/v repeatedly to select "Settings", then press or b. The Settings menu list appears on the TV screen. 3 /A/B/A+B) on the receiver. - Change the volume level. - Connect the - Sony STRDG920 | Operating Instructions - Page 42
is because of the speakers' specifications. In this case, you can continue to use the receiver. 3 Select "Save" in step 2 to save the measurement result. 4 Press V/v from each speaker flat. Sets the frequency characteristics to a set that matches that of the Sony listening room standard. Adjusts - Sony STRDG920 | Operating Instructions - Page 43
warning code Error Code 31 The SPEAKERS (OFF/A/B/A+B) is set to off. Set it to others and perform the Auto Calibration again. Error Code 32 is quiet enough to allow proper measurement. Warning 42 The volume of the receiver is out of range. Try to perform the measurement when the environment is - Sony STRDG920 | Operating Instructions - Page 44
Error Code 31, 32, 33 1 problems even if you continue to use the receiver with that value. To set Auto Calibration items more precisely On the Auto Calibration settings NIGHT RESOLUTION MODE SLEEP MODE DISPLAY GUI MODE O RETURN/ EXIT HOME MENU OPTIONS TOOLS - CATEGORY + .< > < TUNING - - Sony STRDG920 | Operating Instructions - Page 45
, etc., connected to the PHONO jack MULTI IN Component connected to the MULTI CHANNEL INPUT jack DMPORT Portable audio, etc., connected to the DIGITAL MEDIA PORT adapter connected to the receiver XM XM Mini-Tuner and Home Dock connected to the jack 2 Turn on the component and start playback - Sony STRDG920 | Operating Instructions - Page 46
AV IN VIDEO L AUDIO R AUTO CAL MIC MULTI CHANNEL DECODING DISPLAY INPUT MODE INPUT SELECTOR MEMORY/ ENTER DIMMER 2CH/ A.DIRECT A.F.D. MOVIE MUSIC MASTER VOLUME 5 3 Notes • The operation is described for a Sony Super Audio CD player. • Refer to the operating instructions supplied - Sony STRDG920 | Operating Instructions - Page 47
MODE TUNING PHONES VIDEO 2 IN/PORTABLE AV IN VIDEO L AUDIO R AUTO CAL MIC MULTI CHANNEL DECODING DISPLAY INPUT MODE INPUT SELECTOR MEMORY/ ENTER DIMMER 2CH/ A.DIRECT A.F.D. MOVIE MUSIC MASTER VOLUME 6 3 Notes • Refer to the operating instructions supplied with the TV and DVD player - Sony STRDG920 | Operating Instructions - Page 48
Settings menu. For details on adjusting the parameters, see "7: Operating the receiver using the GUI (Graphical User Interface)" (page 36). Audio settings plasma monitor or a projector. • This parameter is not valid when - multi channel input is selected. - "Analog Direct" is being used. x Dual Mono - Sony STRDG920 | Operating Instructions - Page 49
audio input) Lets you set the audio output for HDMI from the playback component connected to the receiver via a HDMI connection. • AMP The HDMI audio signals from the playback component is only output to the speakers connected to the receiver. Multi channel sound can be played back as it is. Note - Sony STRDG920 | Operating Instructions - Page 50
of the subwoofer to 0 dB or +10 dB when PCM signals are input via an HDMI connection. You can set the level for each HDMI input independently. • AUTO The subwoofer level is automatically set to 0 dB or +10 dB depending on the sampling frequency. • +10 dB • 0 dB Enjoying Surround Sound Enjoying - Sony STRDG920 | Operating Instructions - Page 51
" as a sound field in "Sound Field Setup" parameter. To adjust the effect level 1 adjust the effect level, then press /B/b. Higher settings apply more surround effect. You can adjust the channel stereo sources using the front left/right speakers and a subwoofer, select "A.F.D. Auto". This receiver - Sony STRDG920 | Operating Instructions - Page 52
Master Audioa)b) Multi channel Linear PCMa) Connection of the playback component and Maximum number the receiver of channels COAXIAL/OPTICAL HDMI 5.1ch a a the operating instructions of the playback component. b)Signals with a sampling frequency of more than 96 kHz are played back at 96 - Sony STRDG920 | Operating Instructions - Page 53
on the Speaker Pattern setting, some Enhanced Surround Mode parameters may not be available. Notes • This function does not work in the following cases. - The multi channel input is selected. - DTS-HD signals with a sampling frequency of more than 48 kHz are being received. - Dolby TrueHD signals - Sony STRDG920 | Operating Instructions - Page 54
receiver's preprogrammed sound fields. They bring the exciting and powerful sound of movie theaters and concert halls into your home of the Sony Pictures Entertainment "Kim Novak Theater" cinema production channel input is selected. Outputs the front analog signals from the MULTI CHANNEL - Sony STRDG920 | Operating Instructions - Page 55
of more than 48 kHz are being received. - The multi channel PCM signals are received via a HDMI IN jack with a sampling frequency more than 48 kHz. • When one of the sound fields for music is selected, no sound is output from the subwoofer if all the speakers are set to "LARGE" on the Speaker - Sony STRDG920 | Operating Instructions - Page 56
adjust the speaker levels after the Auto Calibration is completed. Making settings with the Manual Setup menu 2CH/ A.DIRECT A.F.D. MOVIE MUSIC INPUT NIGHT RESOLUTION MODE SLEEP MODE DISPLAY GUI MODE 1 2-8 O RETURN/ EXIT HOME MENU OPTIONS TOOLS MENU 1 Press GUI MODE. "GUI MODE" appears on - Sony STRDG920 | Operating Instructions - Page 57
the setting. Manual Setup menu parameters x Level (Level of speaker) You can adjust each speaker's level (center, surround left/right, surround back left multi channel surround sound, select "SMALL" to activate the bass redirection circuitry and output the bass frequencies of each channel from the - Sony STRDG920 | Operating Instructions - Page 58
equalizer to boost the bass levels. • The surround back speakers will be set to the same setting as that of the surround speakers. • When the front speakers are set to "SMALL", the center, surround, and surround back speakers are also automatically set to "SMALL". • If you do not use the subwoofer - Sony STRDG920 | Operating Instructions - Page 59
HOME MENU OPTIONS TOOLS MENU 1 Press GUI MODE. "GUI MODE" appears on the display and the GUI menu appears on the TV screen. Press MENU if the GUI menu does not appear on the TV screen. 2 Press V/v repeatedly to select "Settings", then press or b. The Settings VOLUME on the receiver. • The problem - Sony STRDG920 | Operating Instructions - Page 60
test tone sequentially from adjacent speakers. Some items may not be displayed, depending on the setting of the speaker pattern. x Phase Audio • OFF • FL/FR, FL/CNT, /FL, FL/SR Lets you output front 2 channel source sound (instead of the test tone) sequentially from adjacent speakers. Some items may - Sony STRDG920 | Operating Instructions - Page 61
while the receiver is receiving signals with a sampling frequency of more than 96 kHz, the signals will always be played back at 96 kHz. CLEAR/>10 XM 2CH/ A.DIRECT A.F.D. MOVIE MUSIC INPUT NIGHT RESOLUTION MODE SLEEP MODE DISPLAY GUI MODE 1 2-5 O RETURN/ EXIT HOME MENU OPTIONS TOOLS - Sony STRDG920 | Operating Instructions - Page 62
2 Press V/v repeatedly to select "Settings", then press or b. The Settings menu list appears on the TV screen. 3 the receiver (page 34). Tip The tuning scale for direct tuning differs depending on the area code as shown in the following table. For details on area codes, see page 3. Area code U, - Sony STRDG920 | Operating Instructions - Page 63
receiver stops scanning whenever a station is received. In case of poor FM stereo reception 1 Press OPTIONS. 2 Press V/v to select "FM Mode", then press or b. 3 Press V/v to select "MONO", then press . ?/1 THEATER RM SET UP AV 4 1 2,3,5 O RETURN/ EXIT HOME MENU OPTIONS TOOLS MENU 1 Press GUI - Sony STRDG920 | Operating Instructions - Page 64
tune in the stations you often listen to. 2, 5-7 2CH/ A.DIRECT A.F.D. MOVIE MUSIC INPUT NIGHT RESOLUTION MODE SLEEP MODE DISPLAY GUI MODE O RETURN/ EXIT HOME MENU OPTIONS TOOLS 1 4 MENU 1 Press GUI MODE. "GUI MODE" appears on the display and the GUI menu appears on the TV screen. Press - Sony STRDG920 | Operating Instructions - Page 65
XM Listener Care at 1-877-GETXMSR (1-877-438-9677). XM Ready® Legal XM monthly service subscription sold separately. XM Mini-Tuner and Home Dock required (each sold separately) to receive XM service. It is prohibited to copy, decompile, disassemble, reverse engineer, hack, manipulate or otherwise - Sony STRDG920 | Operating Instructions - Page 66
Activate your XM Satellite Radio service in Canada online at https://activate.xmradio.ca or call 1-877-GET-XMSR (1-877-438-9677). You will need a major credit card. XM will send a signal from the satellites to activate the full channel lineup. Activation receiver, connect the XM Mini-Tuner and Home - Sony STRDG920 | Operating Instructions - Page 67
INPUT NIGHT RESOLUTION MODE SLEEP MODE DISPLAY GUI MODE 1 2,3 O RETURN/ EXIT HOME MENU OPTIONS TOOLS 3 MENU 1 Press GUI MODE. "GUI MODE" appears on the parameter, aim your antenna to where the best reception will be received. For details on the parameter, see "Signal strength" below. - Sony STRDG920 | Operating Instructions - Page 68
ID using the display on the receiver. Selecting a channel by Category Mode You can select a channel from one category or all the categories. 2CH/ A.DIRECT A.F.D. MOVIE MUSIC INPUT NIGHT RESOLUTION MODE SLEEP MODE DISPLAY GUI MODE 1 2-4 O RETURN/ EXIT HOME - Sony STRDG920 | Operating Instructions - Page 69
not be the one in the category you want. This is because one channel may belong to more than one category. Selecting a channel by inputting the channel number directly 5 2, 4,6 ?/1 THEATER RM SET UP AV ?/1 SYSTEM STANDBY SHIFT TV AMP 1 VIDEO 1 2 VIDEO 2 4 5 DVD SAT 7 8 MD/ TAPE SA - Sony STRDG920 | Operating Instructions - Page 70
6 Press V/v repeatedly to select the preset channel you want, then press . Preset channels from 1 to 30 are available, and a default channel is preset for all the preset channels when you purchase the receiver. The selected channel is registered as the preset channel you selected in step 3. 7 Repeat - Sony STRDG920 | Operating Instructions - Page 71
Consult the latest channel guide at www.xmradio.com (US [CH UNAVL] available. The channel may residents) or www.xmradio.ca (Canadian residents) for the have been reassigned to a current list of channels. For a new radio or a radio that has different channel number. This not received XM's signal - Sony STRDG920 | Operating Instructions - Page 72
as explained below. By connecting Sony components that are compatible with the Control for HDMI function with an HDMI cable (not supplied), operation is simplified as follows: • One-Touch Play: When you play back a component such as a DVD/Blu-ray disc player, the receiver and the TV are turned on - Sony STRDG920 | Operating Instructions - Page 73
R R R FRONT SURROUND SUR BACK SUBWOOFER VIDEO 1 SUBWOOFER MULTI CHANNEL INPUT SURROUND BACK R L SURROUND R L R FRONT B L FRONT A R L SPEAKERS Control for HDMI B C A Audio signals TV, etc. A HDMI cable (not supplied) We recommend that you use a Sony HDMI cable. B Optical digital - Sony STRDG920 | Operating Instructions - Page 74
the TV. If your TV does not support the Control for HDMI-Easy Setting function, do the following procedures. For details on setting the TV and connected components, refer to the operating instructions of the respective components. 1 Make sure that the receiver is connected to the TV and components - Sony STRDG920 | Operating Instructions - Page 75
to select "ON", then press . Control for HDMI function is activated. Watching a DVD (One-Touch Play) You can enjoy sound and image from the components connected to the receiver via HDMI connections by a simple operation. Play back a connected component. The receiver and the TV are turned on - Sony STRDG920 | Operating Instructions - Page 76
the TV off by using the POWER button on the TV's remote, the receiver and the connected components turn off automatically. You can also use the receiver's remote to turn off the TV. ?/1 THEATER RM SET UP AV ?/1 SYSTEM STANDBY SHIFT TV AMP 1 VIDEO 1 2 VIDEO 2 4 5 DVD SAT 7 8 MD/ TAPE - Sony STRDG920 | Operating Instructions - Page 77
receiver allows you to convert the resolution of analog video input signals. Press RESOLUTION repeatedly. Each time you press the button, the resolution of the output signals will be changed. You can also use "Resolution" in the Video settings jack" (page 20). Sony offers the following DIGITAL MEDIA - Sony STRDG920 | Operating Instructions - Page 78
list of tracks will be displayed on the GUI screen of the receiver. You can select a track you want and play back it on each GUI screen. • Adapter GUI This mode is " is not displayed, see the operating instructions supplied with the connected component for details on operating that component. 78US - Sony STRDG920 | Operating Instructions - Page 79
using the GUI menu of the receiver 1 Make sure that "System list displayed on the GUI screen and play back it. iPod Playlists > Playlist > Track GUI menu, refer to the operating instructions supplied with the adapter you are using setting of "List Mode". TDM-NC1 Other Operations continued 79US - Sony STRDG920 | Operating Instructions - Page 80
the DIGITAL MEDIA PORT adapter using the following buttons on the remote of the receiver. To Do the following Play Press N. Pause Press X. To found. Connecting* Connecting to the server. Configuring* The network is setting up. Warning* Check the display of the DIGITAL MEDIA PORT adapter. - Sony STRDG920 | Operating Instructions - Page 81
can also use the INPUT SELECTOR on the receiver. 2 Press INPUT MODE repeatedly to select the more than one digital connection, HDMI audio signals have priority over set the audio input mode. • When "Analog Direct" is being used, or the multi channel input is selected, audio input is automatically set - Sony STRDG920 | Operating Instructions - Page 82
component video jack of the DVD player to the COMPONENT VIDEO COMPO 1 IN jack of this receiver when you want to input the video signals from the DVD player. Assign video and/or using V/v/B/b. 6 Press RETURN/EXIT O to enter the setting. 3 Press V/v to select the input name you want to assign. 82US - Sony STRDG920 | Operating Instructions - Page 83
a a a a a a a a a - a a a a - - - - a a - a a a - a a - - a a a - Notes • You cannot assign optical signals from an input source to the optical input jacks on the receiver, and you cannot assign coaxial signals from the input source to the coaxial input jacks on the - Sony STRDG920 | Operating Instructions - Page 84
Changing the display You can check the sound field, etc., by changing the information on the display. Press DISPLAY repeatedly. Each time you press DISPLAY, the display will change cyclically as follows. Input name you selected* t Original input name t Sound field currently applied t Volume t Stream - Sony STRDG920 | Operating Instructions - Page 85
lights up, the receiver creates a subwoofer signal based on the LFE signal in the disc being played back or the low frequency components of the front channels. Lights up when the disc being played back contains an LFE (Low Frequency Effect) channel and the LFE channel signal is actually being - Sony STRDG920 | Operating Instructions - Page 86
selected. Lights up when a memory function, such as Preset Memory, etc., is activated. Lights up when XM Mini-Tuner and Home Dock are connected and "XM" is selected. "; PL" lights up when the receiver applies Dolby Pro Logic processing to 2 channel signals in order to output the center and surround - Sony STRDG920 | Operating Instructions - Page 87
channels being played back. The boxes around the letters vary to show how the receiver downmixes the source sound (based on the speaker settings 00 t OFF When Sleep Timer is activated, "SLEEP" lights up in the display. Tip To check the remaining time before the receiver turns off, press SLEEP. The - Sony STRDG920 | Operating Instructions - Page 88
receiver. See the operating instructions supplied with your MD deck or tape deck. 1 Press the input button of the playback component. You can also use INPUT SELECTOR on the receiver the MULTI CHANNEL INPUT jacks on the receiver. 2 Prepare CHANNEL INPUT jacks are not output. • - Sony STRDG920 | Operating Instructions - Page 89
connecting to the TV You can operate this receiver using the display even if you do not use a GUI when a TV is not connected. Press GUI MODE repeatedly to select "GUI OFF". When "GUI MODE" is displayed in the display, the menu is set to display on the TV screen using a GUI - Sony STRDG920 | Operating Instructions - Page 90
] (0.5 dB step) Surround back right speaker level SBR -20.0 dB to SBR +10.0 dB [SBR LEVEL] (0.5 dB step) Subwoofer level [SW LEVEL] SW -20.0 dB to SW +10.0 dB (0.5 dB step) Dynamic range compressor [D. RANGE] COMP. MAX, COMP. STD, COMP. AUTO, COMP. OFF Initial setting FULL FLAT POS 1 OFF - Sony STRDG920 | Operating Instructions - Page 91
Menu [Display] Speaker settings [] Parameters [Display] Settings Initial setting Speaker pattern [SP PATTERN] SR 1.0 m to SR SR 9'10" (3 m) [SR DIST.] 10.0 m) (1 inch (0.01 m) step) Surround back speaker distance SB 3'3" to SB 32'9" (SB 1.0 m to SB 9'10" (3 m) [SB DIST.] SB 10.0 - Sony STRDG920 | Operating Instructions - Page 92
>] Audio settings [] Front speakers bass level [FRT BASS] Front speakers treble level [FRT TREBLE] Center speaker bass level [CNT BASS] Center speaker treble level [CNT TREBLE] Surround speakers bass level [SUR BASS] Surround speakers treble level [SUR TREBLE] FM station receiving mode [FM - Sony STRDG920 | Operating Instructions - Page 93
for HDMI [SW LEVEL] SW AUTO, SW +10 dB, SW 0 dB SW 0 dB System settings Naming inputs [] [NAME IN] Brightness of the display [DIMMER] 100% DOWN, 60% DOWN, 0% DOWN 0% DOWN a)This parameter is only available if the XM Mini-Tuner and Home Dock is connected to the XM jack on the receiver - Sony STRDG920 | Operating Instructions - Page 94
on the Auto Calibration, see "9: Calibrating the appropriate speaker settings automatically (Auto Calibration)" (page 39). Refer to "Before you perform Auto Calibration" (page 40) before performing the Auto Calibration. To operate on the receiver 1 Press GUI MODE repeatedly to select "GUI OFF - Sony STRDG920 | Operating Instructions - Page 95
Sets the frequency characteristics to a set that matches that of the Sony receiver. xxx* :- - - No speakers are connected. * xxx represent a speaker channel. FL Front Left FR Front Right CNT Center SL Surround Left SR Surround Right SB Surround Back SBL Surround Back Left SBR Surround Back - Sony STRDG920 | Operating Instructions - Page 96
"Tuner Operations" (page 62). Tuning radio stations 1 Press TUNER repeatedly to select the FM or AM band. You can also use INPUT SELECTOR on the receiver. 2 Press TUNING + or TUNING -. Press TUNING + to scan from low to high frequencies, press TUNING - to scan from high to low frequencies. The - Sony STRDG920 | Operating Instructions - Page 97
service, refer to "Listening to the XM Radio" (page 65) in "Tuner Operations". Aiming the XM Antenna You can use "XM ANT AIM" in the Tuner settings menu to help you aim the antenna for optimal signal reception. 1 Press XM to select "XM RADIO". You can also use INPUT SELECTOR on the receiver - Sony STRDG920 | Operating Instructions - Page 98
"XM RADIO". You can also use INPUT SELECTOR on the receiver. 2 Press CATEGORY MODE repeatedly to select "ONE CAT". • ALL CAT: You can select a channel from all the categories. The initial setting is "ALL CAT", • ONE CAT: You can select a channel from one category. "CAT" is lights up on the display - Sony STRDG920 | Operating Instructions - Page 99
+/- to select the preset channels you want. Using the Remote Programming the remote You can customize the remote to match the components connected to your receiver. You can even program the remote to control nonSony components and also Sony components that the remote is normally unable to control - Sony STRDG920 | Operating Instructions - Page 100
press the new input button you want. • For the numeric codes, only the last three numbers entered are valid. To cancel programming Press RM SET UP during any step. The RM SET UP indicator flashes 5 times in quick succession. The remote automatically exits the programming mode. To activate the input - Sony STRDG920 | Operating Instructions - Page 101
, 743, 744, 745 717, 720, 746 748, 749 751, 752 747, 756 754 * If an AIWA VCR does not work even though you enter the code for AIWA, enter the code for Sony instead. continued 101US Using the Remote - Sony STRDG920 | Operating Instructions - Page 102
424 405 416 415, 423 419 417 406, 408, 425 407 409, 410 414 416, 422 404, 421 418, 420 To control a DVD recorder Maker SONY Code(s) 401, 402, 403 To control a TV Maker SONY AIWA AKAI AOC CENTURION CORONADO CURTIS-MATHES DAYTRON DAEWOO FISHER FUNAI FUJITSU GOLDSTAR/LG GRUNDIG HITACHI ITT/NOKIA - Sony STRDG920 | Operating Instructions - Page 103
a tuner Maker SONY Code(s) 002, 005 To control a Blu-ray disc player Maker SONY Code(s) 310, 311, 312 To control a PSX Maker SONY Code(s) 313, 314, 315 To control a DVD/VHS COMBO Maker SONY Code(s) 411 To control a DVD/HDD COMBO Maker SONY Code(s) 401, 402, 403 Using the Remote 103US - Sony STRDG920 | Operating Instructions - Page 104
?/1, then press AV ?/1. The RM SET UP indicator flashes 3 times. All the contents of the remote's memory (i.e., channels, and brings the surround sound experience of a theater with the latest facilities into your home more faithfully. The three jacks are color coded green, blue and red. x Composite - Sony STRDG920 | Operating Instructions - Page 105
bits when the receiver corresponds to Deep Color. Since the gradation of the depth of a color can be expressed more finely with more bits, continuous color changes can be more smoothly expressed. x Digital Cinema Sound (DCS) Unique sound reproduction technology for home theater developed by Sony, in - Sony STRDG920 | Operating Instructions - Page 106
Surround Digital audio encoding/decoding technology for theaters developed by DTS, Inc. It compresses audio less than Dolby Digital, delivering a higher quality sound reproduction. x DTS-ES Format for 6.1 channel playback with surround back information. There are two modes, "Discrete 6.1" which - Sony STRDG920 | Operating Instructions - Page 107
surround sound to the next level. This revolutionary new technology delivers the rich envelopment and discrete image surround presentations, and enables 7.1-channel support for gaming and movies. for the xvYCC standard proposed by Sony, and is a trademark of Sony. xvYCC is an international standard - Sony STRDG920 | Operating Instructions - Page 108
indicated on the nameplate on the back of the receiver. • The unit is not service shop. On heat buildup Although the receiver heats up during operation, this is not a malfunction. If you continuously use this receiver problems concerning your receiver, please consult your nearest Sony dealer. 108US - Sony STRDG920 | Operating Instructions - Page 109
of the following difficulties while using the receiver, use this troubleshooting guide to help you remedy the problem. Audio There is no sound, no both the receiver and the component. If both channels are output from the headphones, the front speaker may not be connected to the receiver correctly. - Sony STRDG920 | Operating Instructions - Page 110
TV set /surround back speakers. speakers are set to "LARGE multi channel sound receiver, make sure the setting receiver. • Check whether the input source of the software being played back corresponds to the multi channel format. • Check whether the setup on the playback component is set to multi channel - Sony STRDG920 | Operating Instructions - Page 111
The source image input to the HDMI jack on the receiver is not output from the TV. • Make sure that cables are correctly and securely connected to components. • Depending on the playback component, you may need to set up the component. Refer to the operating instructions supplied with each component - Sony STRDG920 | Operating Instructions - Page 112
via HDMI connection to the receiver. - Change the TV channel when you want to watch a TV broadcast. - Select the component or input you want to watch when you watch a program on the component connected to the TV. Refer to the operating instructions of the TV on this operation. The TV's remote - Sony STRDG920 | Operating Instructions - Page 113
the problem using the troubleshooting guide Clearing the receiver's memory may remedy the problem (page 35). However, note that all memorized settings will be reset to their factory settings and you will have to readjust all settings on the receiver. If the problem persist Consult your nearest Sony - Sony STRDG920 | Operating Instructions - Page 114
channel 1)Measured under the following conditions: Area code Power requirements U, CA 120 V AC, 60 Hz 2)Reference power output for front, center, surround and surround back speakers. Depending on the sound field settings any AM station, turn off the receiver. While holding down TUNING MODE, - Sony STRDG920 | Operating Instructions - Page 115
Supplied accessories Operating instructions (this manual) Quick Setup Guide (1) GUI Menu List (1) FM wire antenna (aerial) (1) AM loop antenna (aerial) (1) RM-AAP023 Remote commander (1) R6 (size-AA) batteries (2) Optimizer microphone (ECM-AC2) (1) For details on the area code of the component you - Sony STRDG920 | Operating Instructions - Page 116
Stereo 51 5.1 channel 14 7.1 channel 14 A Auto Calibration HDMI 72 I Initial setup 35 INPUT MODE 81 M MD deck connecting 23 Muting 45 N Naming 81 R Recording onto a MiniDisc or audio tape 88 onto a recording media 88 Remote commander 9 (1) Sony Corporation Printed in Malaysia S Satellite tuner/Set
-
 1
1 -
 2
2 -
 3
3 -
 4
4 -
 5
5 -
 6
6 -
 7
7 -
8
-
9
-
10
-
11
-
12
-
13
-
14
-
15
-
16
-
17
-
18
-
19
-
20
-
21
-
22
-
23
-
24
-
25
-
26
-
27
-
28
-
29
-
30
-
31
-
32
-
33
-
34
-
35
-
36
-
37
-
38
-
39
-
40
-
41
-
42
-
43
-
44
-
45
-
46
-
47
-
48
-
49
-
50
-
51
-
52
-
53
-
54
-
55
-
56
-
57
-
58
-
59
-
60
-
61
-
62
-
63
-
64
-
65
-
66
-
67
-
68
-
69
-
70
-
71
-
72
-
73
-
74
-
75
-
76
-
77
-
78
-
79
-
80
-
81
-
82
-
83
-
84
-
85
-
86
-
87
-
88
-
89
-
90
-
91
-
92
-
93
-
94
-
95
-
96
-
97
-
98
-
99
-
100
-
101
-
102
-
103
-
104
-
105
-
106
-
107
-
108
-
109
-
110
-
111
-
112
-
113
-
114
-
115
-
116
 |
 |
©2008 Sony Corporation
3-289-200-
11
(1)
Multi Channel AV
Receiver
Operating Instructions
STR-DG920