Sony STRDG920 Operating Instructions - Page 39
: Selecting the speaker system
 |
UPC - 027242729896
View all Sony STRDG920 manuals
Add to My Manuals
Save this manual to your list of manuals |
Page 39 highlights
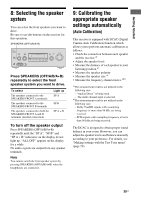
Getting Started 8: Selecting the speaker system You can select the front speakers you want to drive. Be sure to use the buttons on the receiver for this operation. SPEAKERS (OFF/A/B/A+B) ON/STANDBY POWER SPEAKERS (OFF/A/B/A+B) TONE MODE TONE TUNING MODE TUNING PHONES VIDEO 2 IN/PORTABLE AV IN VIDEO L AUDIO R AUTO CAL MIC MULTI CHANNEL DECODING DISPLAY INPUT MODE INPUT SELECTOR MEMORY/ ENTER DIMMER 2CH/ A.DIRECT A.F.D. MOVIE MUSIC MASTER VOLUME Press SPEAKERS (OFF/A/B/A+B) repeatedly to select the front speaker system you want to drive. To select The speakers connected to the SPEAKERS FRONT A terminals The speakers connected to the SPEAKERS FRONT B terminals The speakers connected to both the SPEAKERS FRONT A and B terminals (parallel connection) Light up SP A SP B SP A + B To turn off the speaker output Press SPEAKERS (OFF/A/B/A+B) repeatedly until the "SP A", "SP B" and "SP A + B" indicators on the display do not light up. "ALL OFF" appears on the display for a while. No audio signals are output from any speaker terminals. Note You cannot switch the front speaker system by pressing SPEAKERS (OFF/A/B/A+B) when the headphones are connected. 9: Calibrating the appropriate speaker settings automatically (Auto Calibration) This receiver is equipped with DCAC (Digital Cinema Auto Calibration) function which allows you to perform automatic calibration as follows: • Check the connection between each speaker and the receiver.a) • Adjust the speaker level. • Measure the distance of each speaker to your listening position.a) • Measure the speaker polarity. • Measure the speaker size.a) • Measure the frequency characteristics.a)b) a)The measurement result is not utilized in the following case. - "Analog Direct" is being used. - The multi channel input is selected. b)The measurement result is not utilized in the following case. - Dolby TrueHD signals with a sampling frequency of more than 96 kHz are being received. - PCM signals with a sampling frequency of more than 96 kHz are being received. The DCAC is designed to obtain proper sound balance in your room. However, you can adjust the speaker levels and balance manually according to your preference. For details, see "Making settings with the Test Tone menu" (page 59). 39US
-
 1
1 -
2
-
3
-
4
-
5
-
6
-
7
-
8
-
9
-
10
-
11
-
12
-
13
-
14
-
15
-
16
-
17
-
18
-
19
-
20
-
21
-
22
-
23
-
24
-
25
-
26
-
27
-
28
-
29
-
30
-
31
-
32
-
33
-
 34
34 -
 35
35 -
 36
36 -
 37
37 -
 38
38 -
 39
39 -
 40
40 -
 41
41 -
 42
42 -
 43
43 -
 44
44 -
45
-
46
-
47
-
48
-
49
-
50
-
51
-
52
-
53
-
54
-
55
-
56
-
57
-
58
-
59
-
60
-
61
-
62
-
63
-
64
-
65
-
66
-
67
-
68
-
69
-
70
-
71
-
72
-
73
-
74
-
75
-
76
-
77
-
78
-
79
-
80
-
81
-
82
-
83
-
84
-
85
-
86
-
87
-
88
-
89
-
90
-
91
-
92
-
93
-
94
-
95
-
96
-
97
-
98
-
99
-
100
-
101
-
102
-
103
-
104
-
105
-
106
-
107
-
108
-
109
-
110
-
111
-
112
-
113
-
114
-
115
-
116
 |
 |
