Sony STRDG920 Operating Instructions - Page 44
Playback, Selecting a component - problems
 |
UPC - 027242729896
View all Sony STRDG920 manuals
Add to My Manuals
Save this manual to your list of manuals |
Page 44 highlights
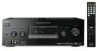
Error Code 31, 32, 33 1 When you press , "RETRY?" appears. 2 Press B/b to select "Yes", then press . 3 The measurement starts in five seconds. When "Warning" appears If a warning on the measurement result is present, detailed information is displayed. Press to return to step 1 of "Confirming/ saving the measurement results" (page 42). Tip Depending on the position of the subwoofer, the measurement results for polarity may vary. However, there will be no problems even if you continue to use the receiver with that value. To set Auto Calibration items more precisely On the Auto Calibration settings menu, then press . • Position You can register three patterns as Position 1, 2, and 3, depending on the listening position, listening environment, and measurement conditions. • Auto Calibration Type You can select this parameter only when you have performed the Auto Calibration and saved the measurement result. For details, see the table on page 42. • Name Input You can rename the position number. For details, refer to "Naming inputs" (page 81). Playback Selecting a component SHIFT TV AMP 1 2 3 VIDEO 1 VIDEO 2 BD 4 5 6 DVD SAT TV 7 8 9 1 MD/ TAPE SA-CD/ CD TUNER -/-- 0/10 ENT/MEM PHONO MULTI IN DMPORT CLEAR/>10 XM 2CH/ A.DIRECT A.F.D. MOVIE MUSIC INPUT NIGHT RESOLUTION MODE SLEEP MODE DISPLAY GUI MODE O RETURN/ EXIT HOME MENU OPTIONS TOOLS - CATEGORY + .< > < TUNING - CATEGORY MODE TUNING + m M DISC SKIP X D.TUNING x TV VOL TV CH MASTER VOL PRESET MUTING MUTING 3 BD/DVD TOP MENU MENU F1 F2 TV INPUT WIDE 1 Press one of the input buttons to select the component you want. You can also use INPUT SELECTOR on the receiver. 44US
-
 1
1 -
2
-
3
-
4
-
5
-
6
-
7
-
8
-
9
-
10
-
11
-
12
-
13
-
14
-
15
-
16
-
17
-
18
-
19
-
20
-
21
-
22
-
23
-
24
-
25
-
26
-
27
-
28
-
29
-
30
-
31
-
32
-
33
-
34
-
35
-
36
-
37
-
38
-
 39
39 -
 40
40 -
 41
41 -
 42
42 -
 43
43 -
 44
44 -
 45
45 -
 46
46 -
 47
47 -
 48
48 -
 49
49 -
50
-
51
-
52
-
53
-
54
-
55
-
56
-
57
-
58
-
59
-
60
-
61
-
62
-
63
-
64
-
65
-
66
-
67
-
68
-
69
-
70
-
71
-
72
-
73
-
74
-
75
-
76
-
77
-
78
-
79
-
80
-
81
-
82
-
83
-
84
-
85
-
86
-
87
-
88
-
89
-
90
-
91
-
92
-
93
-
94
-
95
-
96
-
97
-
98
-
99
-
100
-
101
-
102
-
103
-
104
-
105
-
106
-
107
-
108
-
109
-
110
-
111
-
112
-
113
-
114
-
115
-
116
 |
 |