Sony STRDG920 Operating Instructions - Page 36
: Operating the receiver using the GUI (Graphical User Interface), Graphical User Interface - home theater receiver
 |
UPC - 027242729896
View all Sony STRDG920 manuals
Add to My Manuals
Save this manual to your list of manuals |
Page 36 highlights
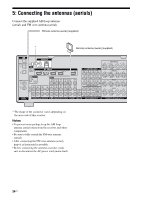
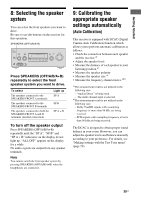
Inserting batteries into the remote Insert two R6 (size-AA) batteries in the RM-AAP023 remote commander. Observe the correct polarity when installing batteries. Notes • Do not leave the remote in an extremely hot or humid place. • Do not use a new battery with old ones. • Do not mix manganese batteries and other kinds of batteries. • Do not expose the remote sensor to direct sunlight or lighting apparatuses. Doing so may cause a malfunction. • If you do not intend to use the remote for an extended period of time, remove the batteries to avoid possible damage from battery leakage and corrosion. • When you replace the batteries, the programmed remote codes may be cleared. If this happens, program the remote codes again (page 99). Tip Under normal conditions, the batteries should last for about 3 months. When the remote no longer operates the receiver, replace all the batteries with new ones. 36US < 7: Operating the receiver using the GUI (Graphical User Interface) You can change the display mode of the receiver menu to the screen mode using the following procedures. In the screen mode, "GUI MODE" appears on the display of the receiver. By using the GUI menu, you can make various settings and adjustments. Refer to "Operating without connecting to the TV" (page 89) if you are not going to use a GUI menu. Note GUI menu does not appear on the TV screen when you have connected your TV to the MONITOR VIDEO OUT jack. Displaying the GUI menu on the TV screen ?/1 THEATER RM SET UP AV ?/1 SYSTEM STANDBY SHIFT TV AMP 1 VIDEO 1 2 VIDEO 2 4 5 DVD SAT 7 8 MD/ TAPE SA-CD/ CD -/-- 0/10 PHONO MULTI IN CLEAR/>10 XM 3 BD 6 TV 9 TUNER ENT/MEM DMPORT 2CH/ A.DIRECT A.F.D. MOVIE MUSIC INPUT NIGHT RESOLUTION MODE SLEEP MODE DISPLAY GUI MODE O RETURN/ EXIT HOME MENU OPTIONS TOOLS - CATEGORY + .< > 3 4 5 MENU
-
 1
1 -
2
-
3
-
4
-
5
-
6
-
7
-
8
-
9
-
10
-
11
-
12
-
13
-
14
-
15
-
16
-
17
-
18
-
19
-
20
-
21
-
22
-
23
-
24
-
25
-
26
-
27
-
28
-
29
-
30
-
 31
31 -
 32
32 -
 33
33 -
 34
34 -
 35
35 -
 36
36 -
 37
37 -
 38
38 -
 39
39 -
 40
40 -
 41
41 -
42
-
43
-
44
-
45
-
46
-
47
-
48
-
49
-
50
-
51
-
52
-
53
-
54
-
55
-
56
-
57
-
58
-
59
-
60
-
61
-
62
-
63
-
64
-
65
-
66
-
67
-
68
-
69
-
70
-
71
-
72
-
73
-
74
-
75
-
76
-
77
-
78
-
79
-
80
-
81
-
82
-
83
-
84
-
85
-
86
-
87
-
88
-
89
-
90
-
91
-
92
-
93
-
94
-
95
-
96
-
97
-
98
-
99
-
100
-
101
-
102
-
103
-
104
-
105
-
106
-
107
-
108
-
109
-
110
-
111
-
112
-
113
-
114
-
115
-
116
 |
 |
