TP-Link TL-WR1042ND User Guide - Page 55
TL-WR1042ND, Shared, Disable, Enable, Eject Disk, Rescan, Start, Open the disk
 |
View all TP-Link TL-WR1042ND manuals
Add to My Manuals
Save this manual to your list of manuals |
Page 55 highlights
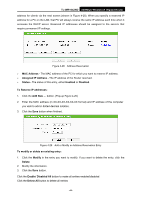
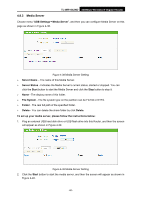
TL-WR1042ND 300Mbps Wireless N Gigabit Router ¾ Shared - Indicates the shared or non-shared status of the volume. When the volume is shared, you can click the Disable to stop sharing the volume; when volume is non-shared, you can click the Enable button to share the volume. ¾ View- Click "Open the disk" under this column, you can view the disk content. Click the Eject Disk button to safely remove the USB storage device that is connected to USB port. This takes the drive offline. A message (as shown in Figure 4-32) will appear on your web browser when it is safe to detach the USB disk. Figure 4-32 Safe Unplug Message Click the Rescan button to start a new scan. Follow the instructions below to set up your Router as a file server: 1. Plug an external USB hard disk drive or USB flash drive into this Router. 2. Click the Rescan button to find the USB drive that has been attached to the Router. The screen will appear as shown in Figure 4-33. Figure 4-33 Storage Sharing 3. Click the Start button to start the Storage Sharing service. 4. Click the Enable button in shared row to enable the disk to share. 5. Click the Disable button in shared row to disable the disk to share. 6. Click the Open the disk to visit the sharing disk. ) Note: 1. The Router can automatically locate new USB drive. -46-
-
 1
1 -
2
-
3
-
4
-
5
-
6
-
7
-
8
-
9
-
10
-
11
-
12
-
13
-
14
-
15
-
16
-
17
-
18
-
19
-
20
-
21
-
22
-
23
-
24
-
25
-
26
-
27
-
28
-
29
-
30
-
31
-
32
-
33
-
34
-
35
-
36
-
37
-
38
-
39
-
40
-
41
-
42
-
43
-
44
-
45
-
46
-
47
-
48
-
49
-
 50
50 -
 51
51 -
 52
52 -
 53
53 -
 54
54 -
 55
55 -
 56
56 -
 57
57 -
 58
58 -
 59
59 -
 60
60 -
61
-
62
-
63
-
64
-
65
-
66
-
67
-
68
-
69
-
70
-
71
-
72
-
73
-
74
-
75
-
76
-
77
-
78
-
79
-
80
-
81
-
82
-
83
-
84
-
85
-
86
-
87
-
88
-
89
-
90
-
91
-
92
-
93
-
94
-
95
-
96
-
97
-
98
-
99
-
100
-
101
-
102
-
103
-
104
-
105
-
106
-
107
-
108
-
109
-
110
-
111
-
112
-
113
-
114
-
115
-
116
-
117
-
118
-
119
-
120
 |
 |
