Toshiba 24SLV411U User Manual - Page 11
Introduction - manual
 |
View all Toshiba 24SLV411U manuals
Add to My Manuals
Save this manual to your list of manuals |
Page 11 highlights
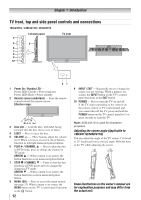
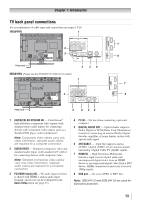
Chapter 1: Introduction Features of your new TV The following are just a few of the many exciting features of your new Toshiba widescreen, integrated HD, LCD TV / DVD combination: • Integrated digital tuning (8VSB ATSC and QAM) eliminates the need for a separate digital converter set-top box (in most cases). • 1366 x 768 output resolution. (19SLV411U, 32SLV411U) • 1920 x 1080 output resolution. (24SLV411U) • Two HDMI® digital, high-definition multimedia interfaces 1080p input support ( page 17). • One set of ColorStream® HD high-resolution component video inputs ( page 16). • Digital Audio Out optical audio connection with Dolby® Digital optical output format ( page 40). • CableClear® digital picture Noise Reduction page 54). • PC IN (Analog RGB) computer terminal page 20). • REGZA-LINK® allows control of external devices from the TV remote via HDMI connection ( page 50). • Media Player allows you to view your JPEG files and listen to MP3 music. ( page 46). • ENERGY STAR® qualified. Overview of steps for installing, setting up, and using your new TV Follow these steps to set up your TV and begin using its many exciting features. 1 Carefully read the important safety, installation, care, and service information. Keep this manual for future reference. 2 Observe the following when choosing a location for the TV: • Read " Important notes about your LCD TV / DVD combination " ( page 9). • Place the TV on the floor or a sturdy, level, stable surface that can support the weight of the unit. Secure the TV to a wall, pillar, or other immovable structure ( page 4). • Place the TV in a location where light does not reflect on the screen. • Place the TV far enough from walls and other objects to allow proper ventilation. Inadequate ventilation may cause overheating, which will damage the TV. THIS TYPE OF DAMAGE IS NOT COVERED UNDER THE TOSHIBA WARRANTY. 3 Do not plug in any power cords until AFTER you have connected all cables and devices to your TV. 4 BEFORE connecting cables or devices to the TV, learn the functions of the TV's connections and controls ( pages 12-13). 5 Connect your other electronic device(s) to the TV ( pages 14-20). 6 Install the batteries in the remote control ( page 21). 7 See "Learning about the remote control page 22) for an overview of the buttons on the remote control. 8 AFTER connecting all cables and devices, plug in the power cords for your TV and other devices. Then press POWER on the TV control panel or remote control to turn on the TV. If the TV stops responding to the controls on the remote control or TV control panel and you cannot turn the TV off or on, please unplug the power cords for a few seconds then re-plug to try again. 9 See "Menu layout and navigation" for a quick overview of navigating the TV's menu system ( page 24). 10 Program channels into the TV's channel memory ( page 26). 11 For details on using the TV's features, see Chapters 6 and 7. 12 For details on disc playback, see Chapters 8 and 9. 13 For help, refer to the Troubleshooting Guide, Chapter 11. 14 For technical specifications and warranty information, see Chapter 12. 15 Enjoy your new TV! 11
-
 1
1 -
2
-
3
-
4
-
5
-
 6
6 -
 7
7 -
 8
8 -
 9
9 -
 10
10 -
 11
11 -
 12
12 -
 13
13 -
 14
14 -
 15
15 -
 16
16 -
17
-
18
-
19
-
20
-
21
-
22
-
23
-
24
-
25
-
26
-
27
-
28
-
29
-
30
-
31
-
32
-
33
-
34
-
35
-
36
-
37
-
38
-
39
-
40
-
41
-
42
-
43
-
44
-
45
-
46
-
47
-
48
-
49
-
50
-
51
-
52
-
53
-
54
-
55
-
56
-
57
-
58
-
59
-
60
-
61
-
62
-
63
-
64
-
65
-
66
-
67
-
68
-
69
-
70
-
71
-
72
-
73
-
74
-
75
-
76
-
77
-
78
-
79
-
80
-
81
-
82
-
83
-
84
 |
 |