Toshiba A105 S4064 Maintenance Manual - Page 177
Installing the HDD, the computer, holding the HDD pack by its sides.
 |
UPC - 032017706019
View all Toshiba A105 S4064 manuals
Add to My Manuals
Save this manual to your list of manuals |
Page 177 highlights
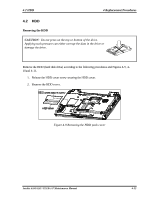
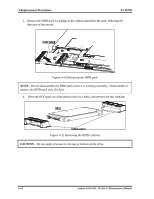
4.2 HDD 4 Replacement Procedures Installing the HDD Install the HDD according to the following procedures and Figures 4-9, 4-10 and 4-11. CAUTION: To avoid damage, always hold the HDD only by its sides. 1. Attach the HDD cushion to the HDD pack. CAUTION: To prevent the HDD bracket from being distorted when installing the HDD pack into the computer, do not press the center of the HDD pack. Always hold the HDD pack by its sides. 2. Install the HDD pack into the correct position in the computer. Connect the HDD pack to the computer, holding the HDD pack by its sides. 3. Insert the HDD pack. 4. Secure the HDD cover by tightening the HDD cover screw. Satellite A100/A105 / TECRA A7 Maintenance Manual 4-25
-
 1
1 -
2
-
3
-
4
-
5
-
6
-
7
-
8
-
9
-
10
-
11
-
12
-
13
-
14
-
15
-
16
-
17
-
18
-
19
-
20
-
21
-
22
-
23
-
24
-
25
-
26
-
27
-
28
-
29
-
30
-
31
-
32
-
33
-
34
-
35
-
36
-
37
-
38
-
39
-
40
-
41
-
42
-
43
-
44
-
45
-
46
-
47
-
48
-
49
-
50
-
51
-
52
-
53
-
54
-
55
-
56
-
57
-
58
-
59
-
60
-
61
-
62
-
63
-
64
-
65
-
66
-
67
-
68
-
69
-
70
-
71
-
72
-
73
-
74
-
75
-
76
-
77
-
78
-
79
-
80
-
81
-
82
-
83
-
84
-
85
-
86
-
87
-
88
-
89
-
90
-
91
-
92
-
93
-
94
-
95
-
96
-
97
-
98
-
99
-
100
-
101
-
102
-
103
-
104
-
105
-
106
-
107
-
108
-
109
-
110
-
111
-
112
-
113
-
114
-
115
-
116
-
117
-
118
-
119
-
120
-
121
-
122
-
123
-
124
-
125
-
126
-
127
-
128
-
129
-
130
-
131
-
132
-
133
-
134
-
135
-
136
-
137
-
138
-
139
-
140
-
141
-
142
-
143
-
144
-
145
-
146
-
147
-
148
-
149
-
150
-
151
-
152
-
153
-
154
-
155
-
156
-
157
-
158
-
159
-
160
-
161
-
162
-
163
-
164
-
165
-
166
-
167
-
168
-
169
-
170
-
171
-
 172
172 -
 173
173 -
 174
174 -
 175
175 -
 176
176 -
 177
177 -
 178
178 -
 179
179 -
 180
180 -
 181
181 -
 182
182 -
183
-
184
-
185
-
186
-
187
-
188
-
189
-
190
-
191
-
192
-
193
-
194
-
195
-
196
-
197
-
198
-
199
-
200
-
201
-
202
-
203
-
204
-
205
-
206
-
207
-
208
-
209
-
210
-
211
-
212
-
213
-
214
-
215
-
216
-
217
-
218
-
219
-
220
-
221
-
222
-
223
-
224
-
225
-
226
-
227
-
228
-
229
-
230
-
231
-
232
-
233
-
234
-
235
-
236
-
237
-
238
-
239
-
240
-
241
-
242
-
243
-
244
-
245
-
246
-
247
-
248
-
249
-
250
-
251
-
252
-
253
-
254
-
255
-
256
-
257
-
258
-
259
-
260
-
261
-
262
-
263
-
264
-
265
-
266
-
267
-
268
-
269
-
270
-
271
-
272
-
273
-
274
-
275
-
276
-
277
-
278
-
279
-
280
-
281
-
282
-
283
-
284
-
285
-
286
-
287
-
288
-
289
-
290
-
291
-
292
-
293
-
294
 |
 |
4.2 HDD
4 Replacement Procedures
Satellite A100/A105 / TECRA A7
Maintenance Manual
4-25
Installing the HDD
Install the HDD according to the following procedures and Figures 4-9, 4-10 and 4-11.
CAUTION
: To avoid damage, always hold the HDD only by its sides.
1.
Attach the HDD cushion to the HDD pack.
CAUTION
: To prevent the HDD bracket from being distorted when installing the HDD
pack into the computer, do not press the center of the HDD pack. Always hold the HDD
pack by its sides.
2.
Install the HDD pack into the correct position in the computer. Connect the HDD pack to
the computer, holding the HDD pack by its sides.
3.
Insert the HDD pack.
4.
Secure the HDD cover by tightening the HDD cover screw.