Toshiba Satellite C850 User Manual - Page 129
Hard Disk Drive, Optical Disc Drive, Problem, Procedure, Boot Priority
 |
View all Toshiba Satellite C850 manuals
Add to My Manuals
Save this manual to your list of manuals |
Page 129 highlights
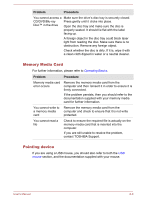
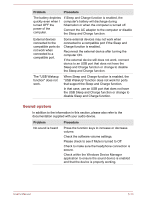
Problem Markings appear on the computer's display panel. Procedure These marks may have come from contact with the keyboard and Touch Pad while the display panel has been closed. You should try to remove the marks by gently wiping the display panel with a clean dry cloth or, if this fails, with a good quality LCD screen cleaner. In this latter instance you should always follow the instructions with the screen cleaner and always ensure you let the display panel dry properly before closing it. Hard Disk Drive Problem Procedure Computer does not boot from Hard Disk Drive Check to see whether there is a disc in the optical disc drive - if so remove it and try to start the computer again. If this has no effect, check the Boot Priority setting within the TOSHIBA System Settings please refer to the Boot Priority Options section for further information. Slow performance The files on the Hard Disk Drive may be fragmented - in this instance you should run the disk Defragmentation utility to check the condition of your files and the Hard Disk Drive. Please refer to the operating system's documentation or online Help File for further information on operating and using the Defragmentation utility. As a last resort you should reformat the Hard Disk Drive and then reload the operating system and all other files and data. If you are still unable to resolve the problem, contact TOSHIBA Support. Optical Disc Drive For further information, please refer to Operating Basics. User's Manual 6-8
-
 1
1 -
2
-
3
-
4
-
5
-
6
-
7
-
8
-
9
-
10
-
11
-
12
-
13
-
14
-
15
-
16
-
17
-
18
-
19
-
20
-
21
-
22
-
23
-
24
-
25
-
26
-
27
-
28
-
29
-
30
-
31
-
32
-
33
-
34
-
35
-
36
-
37
-
38
-
39
-
40
-
41
-
42
-
43
-
44
-
45
-
46
-
47
-
48
-
49
-
50
-
51
-
52
-
53
-
54
-
55
-
56
-
57
-
58
-
59
-
60
-
61
-
62
-
63
-
64
-
65
-
66
-
67
-
68
-
69
-
70
-
71
-
72
-
73
-
74
-
75
-
76
-
77
-
78
-
79
-
80
-
81
-
82
-
83
-
84
-
85
-
86
-
87
-
88
-
89
-
90
-
91
-
92
-
93
-
94
-
95
-
96
-
97
-
98
-
99
-
100
-
101
-
102
-
103
-
104
-
105
-
106
-
107
-
108
-
109
-
110
-
111
-
112
-
113
-
114
-
115
-
116
-
117
-
118
-
119
-
120
-
121
-
122
-
123
-
 124
124 -
 125
125 -
 126
126 -
 127
127 -
 128
128 -
 129
129 -
 130
130 -
 131
131 -
 132
132 -
 133
133 -
 134
134 -
135
-
136
-
137
-
138
-
139
-
140
-
141
-
142
-
143
 |
 |