Toshiba TX80 User Guide - Page 70
Taking a Picture
 |
View all Toshiba TX80 manuals
Add to My Manuals
Save this manual to your list of manuals |
Page 70 highlights
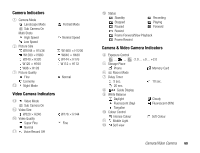
Taking a Picture There are two modes for taking pictures: Landscape mode and Portrait mode (page 68). You can also edit the pictures you take and set them for Contacts list entries. 1. In standby mode, press L or the side key (R). The monitor screen appears. You can adjust the exposure and zoom from the monitor screen. To adjust the exposure, press D to make the picture darker and press C to make the picture lighter. To adjust the zoom, press A or the side key (P) to zoom in and press B or the side key (Q) to zoom out. 2. Display the subject in the main display and press @ or the side key (R). The shutter sound is heard and the picture is saved automatically to the preset storage place. The preview screen appears. Monitor Screen Options You can perform the following operations if you press J (Options) from the monitor screen. ◆ Camera Mode: Allows you to switch between Landscape mode and Portrait mode (page 68). ◆ My Pictures: Allows you to see the pictures you took previously. ◆ Self-view: Allows you to take pictures of yourself using the sub camera. ◆ Night Mode: Use this mode when taking a picture of a night scene, etc. ◆ Multi Shots: Allows you to take up to nine pictures in succession at one of three different speeds. ◆ Add Frame: Allows you to add a frame to a picture. ◆ Save Image to: Allows you to set the storage place to which to automatically save pictures. ◆ Advanced: For details on advanced settings, see “Settings for Pictures & Videos” (page 74). Note • When taking pictures with the sub camera, the picture size is fixed to W240 × H320. • You can use Multi shots only when Portrait mode is set. During Multi shots, Night mode and zoom are unavailable. • Zoom is unavailable when picture size is set at W2048 × H1536 in Landscape mode. • When you take a picture in Landscape mode and in Portrait mode at W96 × H128 size, a frame cannot be set. 70 Camera/Video Camera
-
 1
1 -
2
-
3
-
4
-
5
-
6
-
7
-
8
-
9
-
10
-
11
-
12
-
13
-
14
-
15
-
16
-
17
-
18
-
19
-
20
-
21
-
22
-
23
-
24
-
25
-
26
-
27
-
28
-
29
-
30
-
31
-
32
-
33
-
34
-
35
-
36
-
37
-
38
-
39
-
40
-
41
-
42
-
43
-
44
-
45
-
46
-
47
-
48
-
49
-
50
-
51
-
52
-
53
-
54
-
55
-
56
-
57
-
58
-
59
-
60
-
61
-
62
-
63
-
64
-
 65
65 -
 66
66 -
 67
67 -
 68
68 -
 69
69 -
 70
70 -
 71
71 -
 72
72 -
 73
73 -
 74
74 -
 75
75 -
76
-
77
-
78
-
79
-
80
-
81
-
82
-
83
-
84
-
85
-
86
-
87
-
88
-
89
-
90
-
91
-
92
-
93
-
94
-
95
-
96
-
97
-
98
-
99
-
100
-
101
-
102
-
103
-
104
-
105
-
106
-
107
-
108
-
109
-
110
-
111
-
112
-
113
-
114
-
115
-
116
-
117
-
118
-
119
-
120
-
121
-
122
-
123
-
124
-
125
-
126
-
127
-
128
-
129
-
130
-
131
-
132
-
133
-
134
-
135
-
136
-
137
-
138
-
139
-
140
-
141
-
142
-
143
-
144
-
145
 |
 |
