Western Digital WDBLGT0080KBK User Manual - Page 55
Select USB flash drive, Refresh, check box
 |
View all Western Digital WDBLGT0080KBK manuals
Add to My Manuals
Save this manual to your list of manuals |
Page 55 highlights
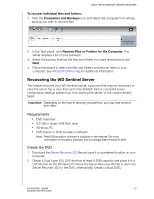
USING THE WD SENTINEL SERVER'S FEATURES 3. Insert the USB flash drive into the Windows PC USB port. The USB flash drive should appear in the Select USB flash drive drop-down list. 4. If the USB flash drive is not on the list, click Refresh and search for it. 5. After locating the USB flash drive, click the "I understand..." check box to indicate that you know the process will delete all files and folders on your USB flash drive. 6. Click Next to display the "Congratulations and Next Steps" page. 7. Follow the steps listed on this page: a. Shut down the WD Sentinel server. b. Insert the USB flash drive into one of the server's USB ports. c. Restart your server while pressing and holding the Recovery button on the back of the server. d. Continue to hold the Recovery button until the LCD displays "INITIALIZING OK. LOADING RECOVERY." Release the Recovery button. e. Allow the recovery process to complete. When it is done, the LCD displays "UNLOCK DRIVES SUCCESS." WD SENTINEL DX4000 51 ADMINISTRATOR'S GUIDE
-
 1
1 -
2
-
3
-
4
-
5
-
6
-
7
-
8
-
9
-
10
-
11
-
12
-
13
-
14
-
15
-
16
-
17
-
18
-
19
-
20
-
21
-
22
-
23
-
24
-
25
-
26
-
27
-
28
-
29
-
30
-
31
-
32
-
33
-
34
-
35
-
36
-
37
-
38
-
39
-
40
-
41
-
42
-
43
-
44
-
45
-
46
-
47
-
48
-
49
-
 50
50 -
 51
51 -
 52
52 -
 53
53 -
 54
54 -
 55
55 -
 56
56 -
 57
57 -
 58
58 -
 59
59 -
 60
60 -
61
-
62
-
63
-
64
-
65
-
66
-
67
-
68
-
69
-
70
-
71
-
72
-
73
-
74
-
75
-
76
 |
 |
