Xerox 7500DX System Administrator Guide (English Only) - Page 45
Configuring the Print Host Access List
 |
UPC - 095205706048
View all Xerox 7500DX manuals
Add to My Manuals
Save this manual to your list of manuals |
Page 45 highlights
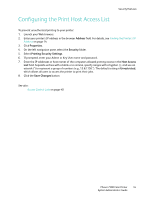
Configuring the Print Host Access List Security Features To prevent unauthorized printing to your printer: 1. Launch your Web browser. 2. Enter your printer's IP address in the browser Address field. For details, see Finding the Printer's IP Address on page 14. 3. Click Properties. 4. On the left navigation pane, select the Security folder. 5. Select Printing Security Settings. 6. If prompted, enter your Admin or Key User name and password. 7. Enter the IP addresses or host names of the computers allowed printing access in the Host Access List field. Separate entries with a blank or a comma, specify ranges with a hyphen (-), and use an asterisk (*) to represent a group of numbers (e.g., 13.62.156.*). The default setting is Unrestricted, which allows all users to access the printer to print their jobs. 8. Click the Save Changes button. See also: Access Control Lists on page 40 Phaser 7500 Color Printer 45 System Administrator Guide
-
 1
1 -
2
-
3
-
4
-
5
-
6
-
7
-
8
-
9
-
10
-
11
-
12
-
13
-
14
-
15
-
16
-
17
-
18
-
19
-
20
-
21
-
22
-
23
-
24
-
25
-
26
-
27
-
28
-
29
-
30
-
31
-
32
-
33
-
34
-
35
-
36
-
37
-
38
-
39
-
 40
40 -
 41
41 -
 42
42 -
 43
43 -
 44
44 -
 45
45 -
 46
46 -
 47
47 -
 48
48 -
 49
49 -
 50
50 -
51
-
52
-
53
-
54
-
55
-
56
-
57
-
58
-
59
-
60
-
61
-
62
-
63
-
64
-
65
-
66
-
67
-
68
-
69
-
70
-
71
-
72
-
73
-
74
-
75
-
76
-
77
-
78
-
79
-
80
-
81
-
82
-
83
-
84
-
85
-
86
-
87
-
88
-
89
-
90
-
91
-
92
-
93
-
94
-
95
-
96
-
97
-
98
-
99
-
100
-
101
-
102
-
103
-
104
-
105
-
106
-
107
-
108
-
109
-
110
-
111
-
112
-
113
-
114
-
115
-
116
 |
 |
