Yamaha 401 Owner's Manual - Page 127
Registering and Recalling Custom Panel Setups-Registration Memory
 |
View all Yamaha 401 manuals
Add to My Manuals
Save this manual to your list of manuals |
Page 127 highlights
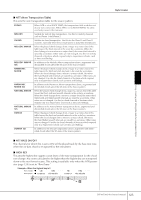
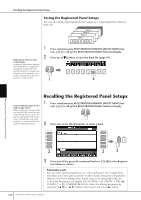
Registering and Recalling Custom Panel Setups-Registration Memory The Registration Memory function allows you to save (or "register") virtually all panel settings to a Registration Memory button, and then instantly recall your custom panel settings by pressing a single button. The registered settings for eight Registration Memory buttons should be saved as a single Bank (file). Registering and Saving Custom Panel Setups Registering Custom Panel Setups 1 Set up the panel controls (such as Voice, Style, effects, and so on) as desired. Refer to the separate Data List for a list of parameters that can be registered with the Registration Memory function. 2 Press the REGISTRATION MEMORY [MEMORY] button. The display for selecting the items to be registered appears. Only the items selected here will be registered. Registering and Recalling Custom Panel Setups 2 5 3 4 3 Press the [2π†]-[7π†] buttons to select items. To cancel the operation, press the [I] (CANCEL) button. 4 Enter or remove the checkmark in the box of the item to determine whether the item should be registered or not, by pressing the [8π†] button. When recalling registration setups, you can also select the items to be recalled or not, even if you selected all items when registering (page 129). 5 Press one of the REGISTRATION MEMORY [1]-[8] buttons to register your settings. About the lamp status: Off no data registered It is recommended that you select a button whose lamp is not lit in red or On (green)...data registered, but green. Buttons that are lit in red or green, already contain the panel setup data. Any panel setup previously registered to the selected REGISTRATION MEMORY button (lamp lights in green or red) will be erased and replaced not currently selected On (red)......data registered, and currently selected by the new settings. Deleting an unneeded panel setup 6 Register various panel setups to other buttons by repeating steps #1- See page 129. #5. Deleting all eight current panel setups To delete all the eight current panel setups, turn the [POWER] button ON while holding the B6 key (right-most B key on the key- board). CVP-405/403/401 Owner's Manual 127
-
 1
1 -
2
-
3
-
4
-
5
-
6
-
7
-
8
-
9
-
10
-
11
-
12
-
13
-
14
-
15
-
16
-
17
-
18
-
19
-
20
-
21
-
22
-
23
-
24
-
25
-
26
-
27
-
28
-
29
-
30
-
31
-
32
-
33
-
34
-
35
-
36
-
37
-
38
-
39
-
40
-
41
-
42
-
43
-
44
-
45
-
46
-
47
-
48
-
49
-
50
-
51
-
52
-
53
-
54
-
55
-
56
-
57
-
58
-
59
-
60
-
61
-
62
-
63
-
64
-
65
-
66
-
67
-
68
-
69
-
70
-
71
-
72
-
73
-
74
-
75
-
76
-
77
-
78
-
79
-
80
-
81
-
82
-
83
-
84
-
85
-
86
-
87
-
88
-
89
-
90
-
91
-
92
-
93
-
94
-
95
-
96
-
97
-
98
-
99
-
100
-
101
-
102
-
103
-
104
-
105
-
106
-
107
-
108
-
109
-
110
-
111
-
112
-
113
-
114
-
115
-
116
-
117
-
118
-
119
-
120
-
121
-
 122
122 -
 123
123 -
 124
124 -
 125
125 -
 126
126 -
 127
127 -
 128
128 -
 129
129 -
 130
130 -
 131
131 -
 132
132 -
133
-
134
-
135
-
136
-
137
-
138
-
139
-
140
-
141
-
142
-
143
-
144
-
145
-
146
-
147
-
148
-
149
-
150
-
151
-
152
-
153
-
154
-
155
-
156
-
157
-
158
-
159
-
160
-
161
-
162
-
163
-
164
-
165
-
166
-
167
-
168
-
169
-
170
-
171
-
172
-
173
-
174
-
175
-
176
-
177
-
178
-
179
-
180
-
181
-
182
-
183
-
184
-
185
-
186
-
187
-
188
-
189
-
190
-
191
-
192
-
193
-
194
-
195
-
196
-
197
-
198
-
199
-
200
-
201
-
202
-
203
-
204
-
205
-
206
-
207
-
208
-
209
-
210
-
211
-
212
-
213
-
214
-
215
-
216
-
217
-
218
-
219
-
220
-
221
-
222
-
223
-
224
-
225
-
226
 |
 |