Yamaha 401 Owner's Manual - Page 130
Calling Up Registration Memory Numbers in Order-Registration Sequence
 |
View all Yamaha 401 manuals
Add to My Manuals
Save this manual to your list of manuals |
Page 130 highlights
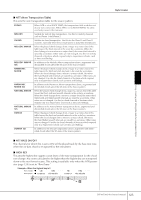
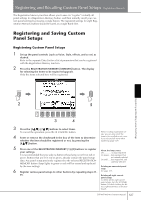
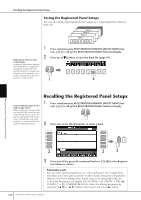
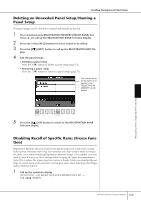
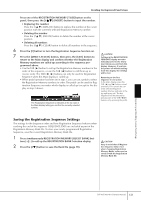
Recalling the Registered Panel Setups 2 Press the [2π†]-[7π†] buttons to select items. CAUTION Settings in the REGISTRATION 3 Enter checkmarks for the items to be "Frozen" (i.e., to remain FREEZE display are automati- unchanged), by pressing the [8π†] button. cally saved to the instrument 4 when you exit from this dis- play. However, if you turn the Press the [FREEZE] button on the panel to turn the Freeze function power off without exiting on. from this display, the settings will be lost. 5 Press the [EXIT] button to exit from the operation display. Calling Up Registration Memory Numbers in Order-Registration Sequence As convenient as the Registration Memory buttons are, there may be times during a performance when you want to quickly switch between settings-without having to take your hands from the keyboard. The convenient Registration Sequence function lets you call up the eight setups in any order you specify, by simply using the TAB [√][®] buttons or the pedal as you play. 1 Select the desired Registration Memory bank to program a sequence (page 128). 2 Call up the operation display. [FUNCTION] → [E] REGIST SEQUENCE/FREEZE/VOICE SET → TAB [√][®] REGISTRATION SEQUENCE Registering and Recalling Custom Panel Setups 3 If you intend to use a pedal to switch Registration Memory settings, specify here how the pedal will be used-to advance or to reverse through the sequence. Use the [C] button to select the pedal for advancing through the sequence. Use the [D] button to select the pedal for reversing through the sequence. 4 Use the [E] button to determine how Registration Sequence behaves when reaching the end of the sequence (SEQUENCE END). STOP Pressing the TAB [®] button or the "advance" pedal has no effect. The sequence is "stopped." TOP The sequence starts again at the beginning. NEXT BANK...........The sequence automatically moves to the beginning of the next Registration Memory Bank in the same folder. 5 Program the Sequence order. The numbers shown at the lower part of the display correspond to the REGISTRATION MEMORY [1]-[8] buttons on the panel. Program the Sequence order from left to right. 130 CVP-405/403/401 Owner's Manual
-
 1
1 -
2
-
3
-
4
-
5
-
6
-
7
-
8
-
9
-
10
-
11
-
12
-
13
-
14
-
15
-
16
-
17
-
18
-
19
-
20
-
21
-
22
-
23
-
24
-
25
-
26
-
27
-
28
-
29
-
30
-
31
-
32
-
33
-
34
-
35
-
36
-
37
-
38
-
39
-
40
-
41
-
42
-
43
-
44
-
45
-
46
-
47
-
48
-
49
-
50
-
51
-
52
-
53
-
54
-
55
-
56
-
57
-
58
-
59
-
60
-
61
-
62
-
63
-
64
-
65
-
66
-
67
-
68
-
69
-
70
-
71
-
72
-
73
-
74
-
75
-
76
-
77
-
78
-
79
-
80
-
81
-
82
-
83
-
84
-
85
-
86
-
87
-
88
-
89
-
90
-
91
-
92
-
93
-
94
-
95
-
96
-
97
-
98
-
99
-
100
-
101
-
102
-
103
-
104
-
105
-
106
-
107
-
108
-
109
-
110
-
111
-
112
-
113
-
114
-
115
-
116
-
117
-
118
-
119
-
120
-
121
-
122
-
123
-
124
-
 125
125 -
 126
126 -
 127
127 -
 128
128 -
 129
129 -
 130
130 -
 131
131 -
 132
132 -
 133
133 -
 134
134 -
 135
135 -
136
-
137
-
138
-
139
-
140
-
141
-
142
-
143
-
144
-
145
-
146
-
147
-
148
-
149
-
150
-
151
-
152
-
153
-
154
-
155
-
156
-
157
-
158
-
159
-
160
-
161
-
162
-
163
-
164
-
165
-
166
-
167
-
168
-
169
-
170
-
171
-
172
-
173
-
174
-
175
-
176
-
177
-
178
-
179
-
180
-
181
-
182
-
183
-
184
-
185
-
186
-
187
-
188
-
189
-
190
-
191
-
192
-
193
-
194
-
195
-
196
-
197
-
198
-
199
-
200
-
201
-
202
-
203
-
204
-
205
-
206
-
207
-
208
-
209
-
210
-
211
-
212
-
213
-
214
-
215
-
216
-
217
-
218
-
219
-
220
-
221
-
222
-
223
-
224
-
225
-
226
 |
 |
