Yamaha 401 Owner's Manual - Page 95
Use the [3, buttons to boost or cut each of the five
 |
View all Yamaha 401 manuals
Add to My Manuals
Save this manual to your list of manuals |
Page 95 highlights
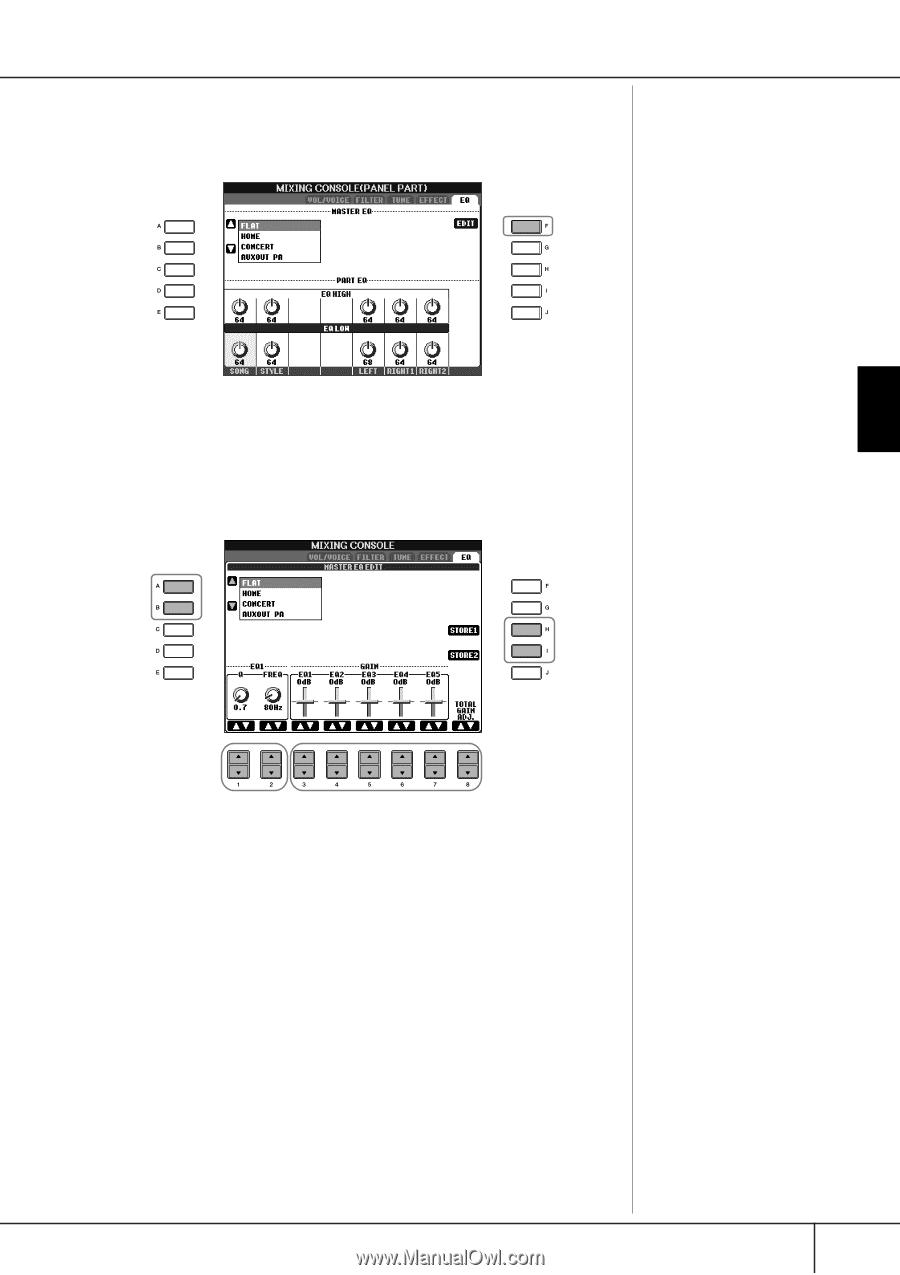
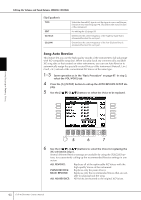
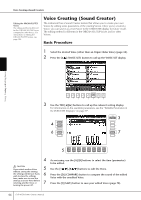
Editing the Volume and Tonal Balance (MIXING CONSOLE) ■ Editing and Saving the selected EQ 5 Press the [F] (EDIT) button to call up the MASTER EQ EDIT display. Using, Creating and Editing Voices 6 Use the [A]/[B] buttons to select a preset EQ type. 6 9 8 7 7 Use the [3π†]-[7π†] buttons to boost or cut each of the five bands. Use the [8π†] button to boost or cut all the five bands at the same time. 8 Adjust the Q (bandwidth) and the FREQ (center frequency) of the band selected in step 7. • Bandwidth (also called "Shape" or "Q") Use the [1π†]button. The higher the value of Q, the narrower the band width. • FREQ (center frequency) Use the [2π†]button. The available FREQ range is different for each band. 9 Press the [H] or [I] (STORE 1 or 2) button to save the edited EQ type (page 70). Up to two types of EQ can be created and saved. When recalling the saved EQ type, use the same procedure as in step 6. CVP-405/403/401 Owner's Manual 95
-
 1
1 -
2
-
3
-
4
-
5
-
6
-
7
-
8
-
9
-
10
-
11
-
12
-
13
-
14
-
15
-
16
-
17
-
18
-
19
-
20
-
21
-
22
-
23
-
24
-
25
-
26
-
27
-
28
-
29
-
30
-
31
-
32
-
33
-
34
-
35
-
36
-
37
-
38
-
39
-
40
-
41
-
42
-
43
-
44
-
45
-
46
-
47
-
48
-
49
-
50
-
51
-
52
-
53
-
54
-
55
-
56
-
57
-
58
-
59
-
60
-
61
-
62
-
63
-
64
-
65
-
66
-
67
-
68
-
69
-
70
-
71
-
72
-
73
-
74
-
75
-
76
-
77
-
78
-
79
-
80
-
81
-
82
-
83
-
84
-
85
-
86
-
87
-
88
-
89
-
 90
90 -
 91
91 -
 92
92 -
 93
93 -
 94
94 -
 95
95 -
 96
96 -
 97
97 -
 98
98 -
 99
99 -
 100
100 -
101
-
102
-
103
-
104
-
105
-
106
-
107
-
108
-
109
-
110
-
111
-
112
-
113
-
114
-
115
-
116
-
117
-
118
-
119
-
120
-
121
-
122
-
123
-
124
-
125
-
126
-
127
-
128
-
129
-
130
-
131
-
132
-
133
-
134
-
135
-
136
-
137
-
138
-
139
-
140
-
141
-
142
-
143
-
144
-
145
-
146
-
147
-
148
-
149
-
150
-
151
-
152
-
153
-
154
-
155
-
156
-
157
-
158
-
159
-
160
-
161
-
162
-
163
-
164
-
165
-
166
-
167
-
168
-
169
-
170
-
171
-
172
-
173
-
174
-
175
-
176
-
177
-
178
-
179
-
180
-
181
-
182
-
183
-
184
-
185
-
186
-
187
-
188
-
189
-
190
-
191
-
192
-
193
-
194
-
195
-
196
-
197
-
198
-
199
-
200
-
201
-
202
-
203
-
204
-
205
-
206
-
207
-
208
-
209
-
210
-
211
-
212
-
213
-
214
-
215
-
216
-
217
-
218
-
219
-
220
-
221
-
222
-
223
-
224
-
225
-
226
 |
 |