Yamaha 401 Owner's Manual - Page 61
USB AUDIO RECORDER display., Press the [USB] button.
 |
View all Yamaha 401 manuals
Add to My Manuals
Save this manual to your list of manuals |
Page 61 highlights
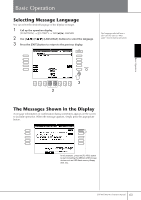
3 Press the [USB] button. 3 4 4 Press the [E] (USB AUDIO RECORDER) button to call up the recording display (USB AUDIO RECORDER display). 5 If necessary, press the [E] (PROPERTY) button to call up the Property display, then check the information of the USB storage device. Quick Guide 5 6, 7 8 The following information is indicated on the PROPERTY display. • DRIVE NAME Number of the USB storage device (USB 1, USB 2, etc.) • ALL SIZE Size of USB storage device • FREE AREA Available recording space on the USB storage device • POSSIBLE TIME Available time for recording Press the [F] (OK)/[EXIT] button to close the PROPERTY display. n The USB storage device of "USB1" is selected as the recording destination when multiple USB storage devices are connected. To check the number of the USB storage device (USB1 and USB2, etc.), press the [A]/[B]/[F] button on the display of step 4, and change the tab. Press the [EXIT] button to return to the previous display. 6 Start recording by pressing the [J] (REC) button, then start your performance. When recording begins, the "RECORDING" indication on the display changes to red (CVP-405), and the elapsed recording time is displayed. CAUTION Avoid frequently connecting/disconnecting the USB storage device, or turning the power on/off too often. Doing so may corrupt the USB storage device data or the recording data. 7 Stop recording by pressing the [J] (STOP) button. The file name is automatically named (and is always given a new, unique name), and a message indicating the file name is displayed. n The recording operation continues, even if you close the Recording display by pushing the [EXIT] button. To stop the recording, press the [J] (STOP) button on the Recording display. CVP-405/403/401 Owner's Manual 61
-
 1
1 -
2
-
3
-
4
-
5
-
6
-
7
-
8
-
9
-
10
-
11
-
12
-
13
-
14
-
15
-
16
-
17
-
18
-
19
-
20
-
21
-
22
-
23
-
24
-
25
-
26
-
27
-
28
-
29
-
30
-
31
-
32
-
33
-
34
-
35
-
36
-
37
-
38
-
39
-
40
-
41
-
42
-
43
-
44
-
45
-
46
-
47
-
48
-
49
-
50
-
51
-
52
-
53
-
54
-
55
-
 56
56 -
 57
57 -
 58
58 -
 59
59 -
 60
60 -
 61
61 -
 62
62 -
 63
63 -
 64
64 -
 65
65 -
 66
66 -
67
-
68
-
69
-
70
-
71
-
72
-
73
-
74
-
75
-
76
-
77
-
78
-
79
-
80
-
81
-
82
-
83
-
84
-
85
-
86
-
87
-
88
-
89
-
90
-
91
-
92
-
93
-
94
-
95
-
96
-
97
-
98
-
99
-
100
-
101
-
102
-
103
-
104
-
105
-
106
-
107
-
108
-
109
-
110
-
111
-
112
-
113
-
114
-
115
-
116
-
117
-
118
-
119
-
120
-
121
-
122
-
123
-
124
-
125
-
126
-
127
-
128
-
129
-
130
-
131
-
132
-
133
-
134
-
135
-
136
-
137
-
138
-
139
-
140
-
141
-
142
-
143
-
144
-
145
-
146
-
147
-
148
-
149
-
150
-
151
-
152
-
153
-
154
-
155
-
156
-
157
-
158
-
159
-
160
-
161
-
162
-
163
-
164
-
165
-
166
-
167
-
168
-
169
-
170
-
171
-
172
-
173
-
174
-
175
-
176
-
177
-
178
-
179
-
180
-
181
-
182
-
183
-
184
-
185
-
186
-
187
-
188
-
189
-
190
-
191
-
192
-
193
-
194
-
195
-
196
-
197
-
198
-
199
-
200
-
201
-
202
-
203
-
204
-
205
-
206
-
207
-
208
-
209
-
210
-
211
-
212
-
213
-
214
-
215
-
216
-
217
-
218
-
219
-
220
-
221
-
222
-
223
-
224
-
225
-
226
 |
 |
