Yamaha 401 Owner's Manual - Page 93
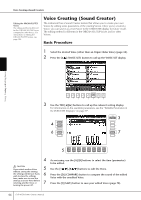
Press the [I] SAVE button to call up the display for saving your origi
 |
View all Yamaha 401 manuals
Add to My Manuals
Save this manual to your list of manuals |
Page 93 highlights
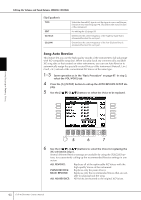
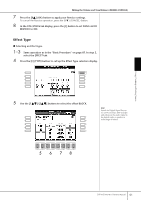
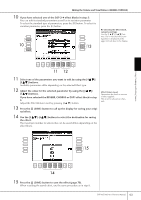
Editing the Volume and Tonal Balance (MIXING CONSOLE) 10 If you have selected one of the DSP 2-4 effect blocks in step 5: You can edit its standard parameters as well as its variation parameter. To select the standard type of parameters, press the [B] button. To select its variation parameter, press the [E] button. 10 13 Re-selecting the Effect block, category and type Use the [1π†]-[3π†] buttons. The re-selected effect configuration is displayed at the upper left side box in the display. Using, Creating and Editing Voices 11 12 11 Select one of the parameters you want to edit by using the [4π†]/ [5π†] buttons. Available parameters differ depending on the selected Effect type. 12 Adjust the value for the selected parameter by using the [6π†]/ [7π†] buttons. If you have selected the REVERB, CHORUS or DSP1 effect block in step 5: Adjust the Effect Return Level by pressing [8π†] button. 13 Press the [I] (SAVE) button to call up the display for saving your origi- nal effect. 14 Use the [3π†]-[6π†] buttons to select the destination for saving the effect. The maximum number for effects that can be saved differs depending on the effect block. Effect Return Level: Determines the level or amount of effect applied. This is set for all parts or channels. 15 14 15 Press the [I] (SAVE) button to save the effect (page 70). When recalling the saved effect, use the same procedure as in step 8. CVP-405/403/401 Owner's Manual 93
-
 1
1 -
2
-
3
-
4
-
5
-
6
-
7
-
8
-
9
-
10
-
11
-
12
-
13
-
14
-
15
-
16
-
17
-
18
-
19
-
20
-
21
-
22
-
23
-
24
-
25
-
26
-
27
-
28
-
29
-
30
-
31
-
32
-
33
-
34
-
35
-
36
-
37
-
38
-
39
-
40
-
41
-
42
-
43
-
44
-
45
-
46
-
47
-
48
-
49
-
50
-
51
-
52
-
53
-
54
-
55
-
56
-
57
-
58
-
59
-
60
-
61
-
62
-
63
-
64
-
65
-
66
-
67
-
68
-
69
-
70
-
71
-
72
-
73
-
74
-
75
-
76
-
77
-
78
-
79
-
80
-
81
-
82
-
83
-
84
-
85
-
86
-
87
-
 88
88 -
 89
89 -
 90
90 -
 91
91 -
 92
92 -
 93
93 -
 94
94 -
 95
95 -
 96
96 -
 97
97 -
 98
98 -
99
-
100
-
101
-
102
-
103
-
104
-
105
-
106
-
107
-
108
-
109
-
110
-
111
-
112
-
113
-
114
-
115
-
116
-
117
-
118
-
119
-
120
-
121
-
122
-
123
-
124
-
125
-
126
-
127
-
128
-
129
-
130
-
131
-
132
-
133
-
134
-
135
-
136
-
137
-
138
-
139
-
140
-
141
-
142
-
143
-
144
-
145
-
146
-
147
-
148
-
149
-
150
-
151
-
152
-
153
-
154
-
155
-
156
-
157
-
158
-
159
-
160
-
161
-
162
-
163
-
164
-
165
-
166
-
167
-
168
-
169
-
170
-
171
-
172
-
173
-
174
-
175
-
176
-
177
-
178
-
179
-
180
-
181
-
182
-
183
-
184
-
185
-
186
-
187
-
188
-
189
-
190
-
191
-
192
-
193
-
194
-
195
-
196
-
197
-
198
-
199
-
200
-
201
-
202
-
203
-
204
-
205
-
206
-
207
-
208
-
209
-
210
-
211
-
212
-
213
-
214
-
215
-
216
-
217
-
218
-
219
-
220
-
221
-
222
-
223
-
224
-
225
-
226
 |
 |
