Yamaha DJX-II Owner's Manual - Page 32
Part Selector
 |
View all Yamaha DJX-II manuals
Add to My Manuals
Save this manual to your list of manuals |
Page 32 highlights
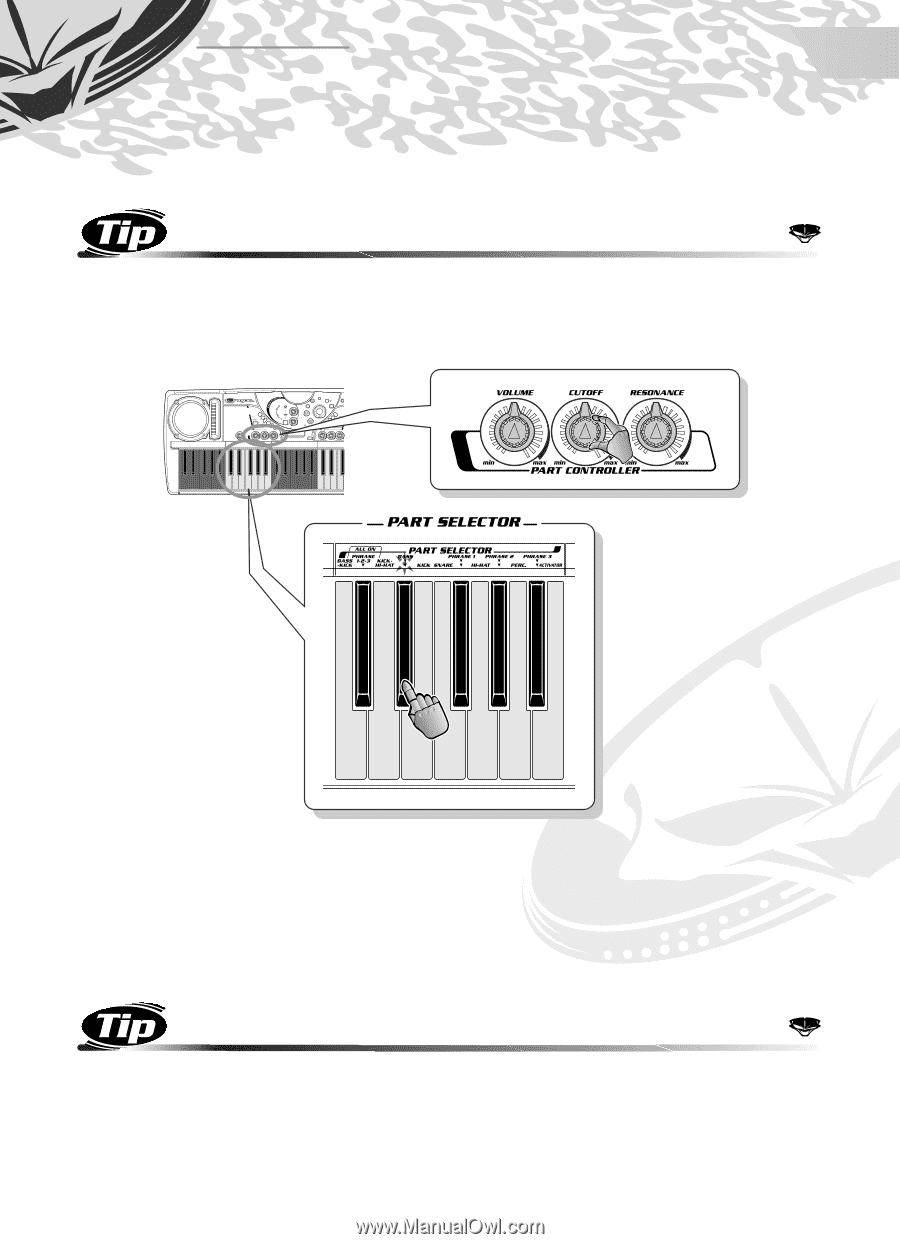
Chapter 7 Part Selector Now that you've learned about the Parts and had a chance to fool around with them, let's see what other magic you can work with them... 32 Grab a Part and tweak it! If you thought tweaking the effects (Tips 13 - 23 above) was a blast, wait till you start working on the Parts. This is where the fun really begins! Introducing the Part Selector and the Part Controller. By itself, the Part Selector doesn't make any sound. It simply lets you select the Part you're going to be tweaking with the Part Controller. w q For example, if you've selected BASS with the Part Selector keys, and turn the CUTOFF knob, only the Bass Part will be affected by changing the Cutoff. Likewise, if Hi-Hat is selected and you turn the VOLUME knob, only the Hi-Hat's volume will be changed. Notice that this function only works on one Part at a time. Select a Part, turn a knob - only that Part is affected. When you press one of the normal Part Selector keys (BASS, KICK, SNARE, etc.), that Part is enabled for control and the others are ignored. 33 Combination keys Did we say you could only control one Part at a time? Sorry! Actually, the Part Selector has three combination keys that let you call up several Parts at once for tweaking. For example, press the BASS+KICK key - then use the Part Controller knobs to tweak both the Bass and Kick Parts simultaneously. Naturally, the PHRASE1+2+3 and KICK+HI-HAT keys work in similar fashion for those combined Parts. 32
-
 1
1 -
2
-
3
-
4
-
5
-
6
-
7
-
8
-
9
-
10
-
11
-
12
-
13
-
14
-
15
-
16
-
17
-
18
-
19
-
20
-
21
-
22
-
23
-
24
-
25
-
26
-
 27
27 -
 28
28 -
 29
29 -
 30
30 -
 31
31 -
 32
32 -
 33
33 -
 34
34 -
 35
35 -
 36
36 -
 37
37 -
38
-
39
-
40
-
41
-
42
-
43
-
44
-
45
-
46
-
47
-
48
-
49
-
50
-
51
-
52
-
53
-
54
-
55
-
56
-
57
-
58
-
59
-
60
-
61
-
62
-
63
-
64
-
65
-
66
-
67
-
68
-
69
-
70
-
71
-
72
-
73
-
74
-
75
-
76
-
77
-
78
-
79
-
80
-
81
-
82
-
83
-
84
-
85
-
86
-
87
-
88
-
89
-
90
-
91
-
92
-
93
-
94
-
95
-
96
-
97
-
98
-
99
-
100
 |
 |