Yamaha DJX-II Owner's Manual - Page 44
Auto Pan, Ring Modulation, Flanger
 |
View all Yamaha DJX-II manuals
Add to My Manuals
Save this manual to your list of manuals |
Page 44 highlights
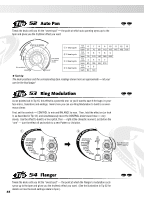
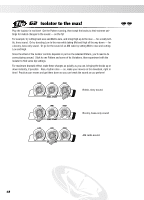
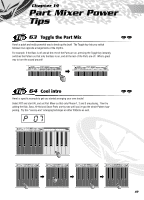
52 Auto Pan Tweak the knob until you hit the "sweet spot" - the point at which auto panning syncs up to the bpm and gives you the rhythmic effect you want. q w e r No modulation 8 9 10 11 1213 7 6 5 4 3 2 1 0 Fast speed for special effects. q 1 beat cycle w 2 beat cycle e 3 beat cycle r 4 beat cycle Knob position 6 bpm 55 Knob position 5 bpm 70 Knob position 4 bpm 60 Knob position 4 bpm 80 7 8 9 10 11 12 13 70 90 110 125 145 160 195 6789 110 140 180 200 567 105 165 210 5 140 N Tech tip: The knob positions and the corresponding bpm readings shown here are approximate - let your ears be the final judge! 53 Ring Modulation As we pointed out in Tip 16, this effect is a powerful one, so you'll want to save it for huge, in-yourface intros, transitions and endings. Here's how you can use Ring Modulation to build to an enormous climax: First, set the controls - CONTROL to min and BALANCE to max. Then, hold the effect on (or lock it, as described in Tip 13), and simultaneously move the CONTROL knob toward max - very slowly. Use the effect to build to a fever pitch, then - right at the climactic moment, just before the "one" - turn the effect off and switch to a new Pattern or Variation. q w Turn the knob VERY slowly! 54 Flanger Tweak the knob until you hit the "sweet spot" - the point at which the Flanger's modulation cycle syncs up to the bpm and gives you the rhythmic effect you want. (See the illustration in Tip 52 for details on how the knob settings relate to bpm.) 44
-
 1
1 -
2
-
3
-
4
-
5
-
6
-
7
-
8
-
9
-
10
-
11
-
12
-
13
-
14
-
15
-
16
-
17
-
18
-
19
-
20
-
21
-
22
-
23
-
24
-
25
-
26
-
27
-
28
-
29
-
30
-
31
-
32
-
33
-
34
-
35
-
36
-
37
-
38
-
 39
39 -
 40
40 -
 41
41 -
 42
42 -
 43
43 -
 44
44 -
 45
45 -
 46
46 -
 47
47 -
 48
48 -
 49
49 -
50
-
51
-
52
-
53
-
54
-
55
-
56
-
57
-
58
-
59
-
60
-
61
-
62
-
63
-
64
-
65
-
66
-
67
-
68
-
69
-
70
-
71
-
72
-
73
-
74
-
75
-
76
-
77
-
78
-
79
-
80
-
81
-
82
-
83
-
84
-
85
-
86
-
87
-
88
-
89
-
90
-
91
-
92
-
93
-
94
-
95
-
96
-
97
-
98
-
99
-
100
 |
 |
