Yamaha EZ-220 Owner's Manual - Page 9
Rear Panel, TURNER ON/OFF] button - portable keyboard
 |
View all Yamaha EZ-220 manuals
Add to My Manuals
Save this manual to your list of manuals |
Page 9 highlights
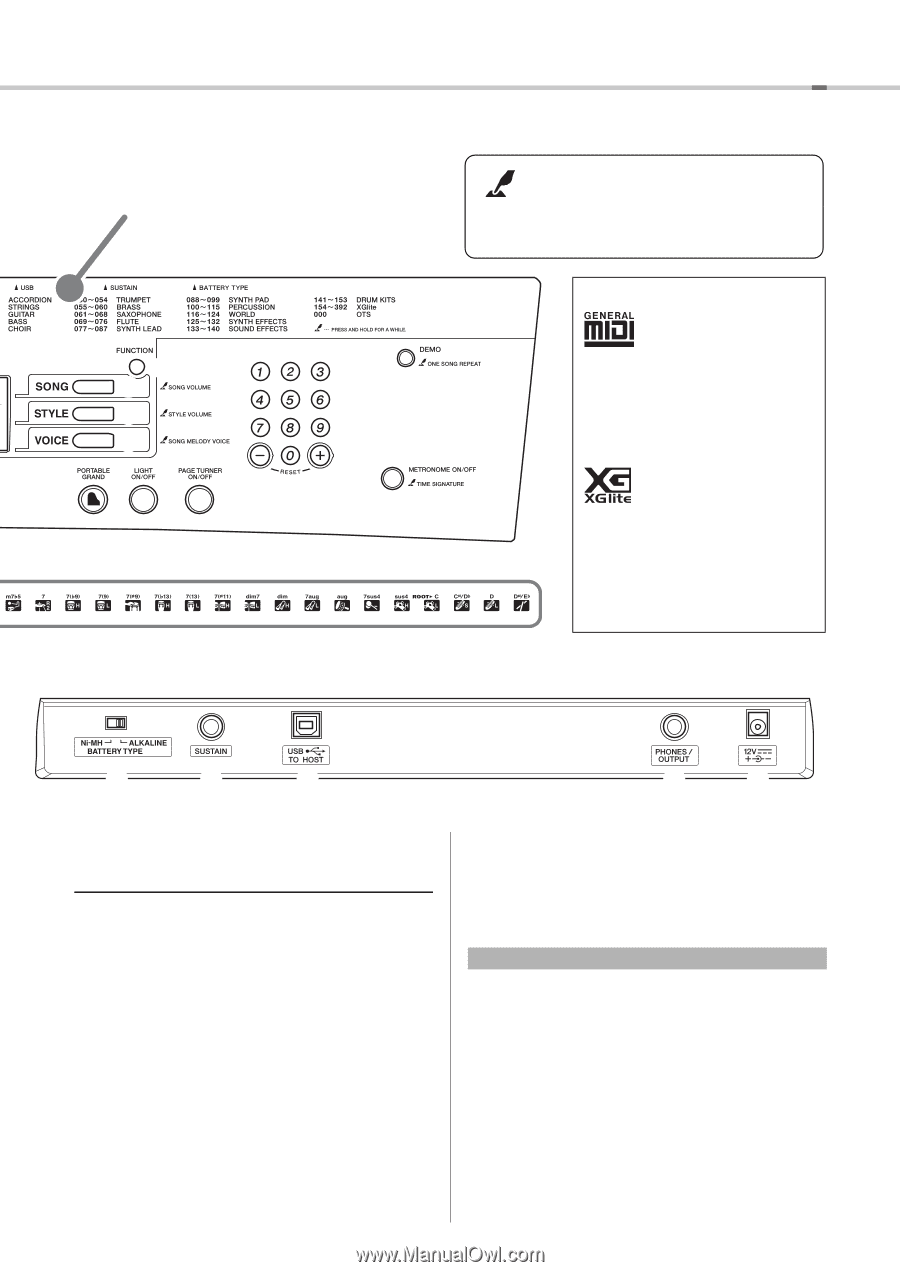
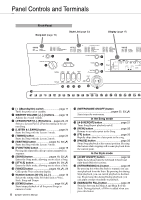
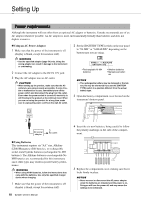
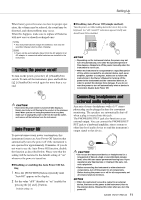
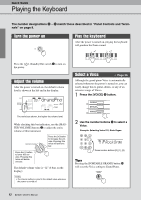
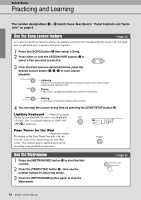
Panel Controls and Terminals Voice List (page 45) u i 1 o !1 !0 @0 @1 @2 Rear Panel !2 !3 The "PRESS AND HOLD FOR A WHILE" Symbol Buttons having this indication can be used to call up an alternate function when the relevant button is pressed and held. Hold down this button until the function is called up. Formats GM System Level 1 "GM System Level 1" is an addition to the MIDI standard which ensures that any GM-compatible music data can be accurately played by any GM compatible tone generator, regardless of manufacturer. The GM mark is affixed to all software and hardware products that support GM System Level. XGlite As its name implies, "XGlite" is a simplified version of Yamaha's high-quality XG tone generation format. Naturally, you can play back any XG song data using an XGlite tone generator. However, keep in mind that some songs may play back differently compared to the original data, due to the reduced set of control parameters and effects. @4 @5 @6 @7 @8 !7 [SYNC START] button pages 35, 36 Enables/disables the ability to start playback by simply playing the keyboard. !8 [TEMPO/TAP] button page 20 Calls up the Tempo display. With this status, use the Number buttons to set the tempo of the Song, Style and metronome. You can set the tempo also by tapping this button several times at the desired tempo. !9 [START/STOP] button pages 18, 35 Starts/stops Song or Style playback. @0 [PORTABLE GRAND] button page 26 Sets the entire keyboard to the appropriate settings for piano performance. @1 [LIGHT ON/OFF] button page 23 Turns on/off the Light Guide. When turned on, the keys you press or those specified by Song data light. @2 [PAGE TURNER ON/OFF] button ........page 42 Turns on/off the Page Turner function. When turned on, the notation score of the Preset Songs are shown on the iPad screen and the page turns automatically according to Song playback. @3 DRUM KIT icons page 27 Indicates drum instruments assigned to each key when the Standard Kit 1 is selected. Rear Panel @4 BATTERY TYPE switch page 10 For selecting battery type. @5 SUSTAIN jack page 27 For connecting an optional Footswitch. @6 USB TO HOST terminal page 40 For connecting a computer. @7 PHONES/OUTPUT jack page 11 For connecting headphones and external audio equipment. @8 DC IN 12V jack page 10 For connecting the power adaptor. EZ-220 Owner's Manual 9
-
 1
1 -
2
-
3
-
 4
4 -
 5
5 -
 6
6 -
 7
7 -
 8
8 -
 9
9 -
 10
10 -
 11
11 -
 12
12 -
 13
13 -
 14
14 -
15
-
16
-
17
-
18
-
19
-
20
-
21
-
22
-
23
-
24
-
25
-
26
-
27
-
28
-
29
-
30
-
31
-
32
-
33
-
34
-
35
-
36
-
37
-
38
-
39
-
40
-
41
-
42
-
43
-
44
-
45
-
46
-
47
-
48
-
49
-
50
-
51
-
52
-
53
-
54
-
55
-
56
-
57
-
58
-
59
-
60
 |
 |