Yamaha PSR-510 Owner's Manual - Page 61
Clock Mode, Start/Stop Mode
 |
View all Yamaha PSR-510 manuals
Add to My Manuals
Save this manual to your list of manuals |
Page 61 highlights
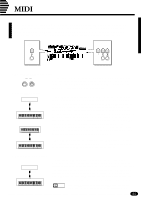
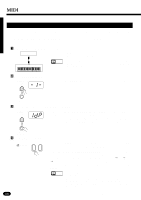
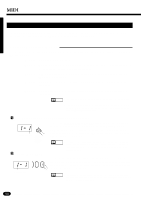
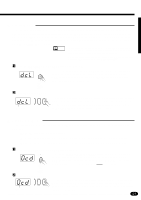
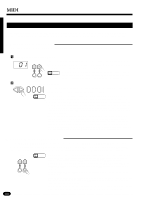
s Clock Mode Reception of an external MIDI clock signal can be enabled or disabled as required. When disabled, all of the PSR-510's time-based functions (Auto Accompaniment, SONG MEMORY, etc.) are controlled by its own internal clock, the speed of which is set by the PSR-510 [TEMPO] button. When MIDI clock reception is enabled, however, all timing is controlled by an external MIDI clock signal received via the PSR-510 MIDI IN terminal (the PSR-510 [TEMPO] setting has no effect). NOTES • If clock reception is enabled but no MIDI clock signal is received for more than 400 milliseconds, external clock reception is automatically disable and normal internal clock operation resumes. • If you attempt to change the tempo setting when MIDI clock reception is enabled, "EC" will appear on the MULTI DISPLAY. ZPress the [RECEIVE CH/CL/COM] Button & Select "cL RECEIVE CH/CL/ COM ....M...O..D...E.... 0 RX OFF 1 MULTI 2 REMOTE 3 CHORD 4 ROOT Press the [RECEIVE CH/CL/COM] button, then use the [+] and [-] buttons, the number buttons, the data dial, or the [RECEIVE CH/CL/ COM] button itself to select "cL" on the MULTI DISPLAY ("cL" is the next step above MIDI channel 16). XSelect the Desired Mode ... Clock mode +- 9 1__ Use the [+/-] button in the number-button row to select the desired clock mode. The disable and enable modes are selected alternately each time the [+/-] button is pressed, and the selected mode appears on the left digit of the MULTI DISPLAY ("d" for disable; "E" for enable). s Start/Stop Mode This function determines the effect of external MIDI start and stop signals. There are three start/stop modes, as follows: Mode "0" Start/stop reception disabled. Mode "1" MIDI start and stop commands start and stop the PSR-510 Auto Accompaniment feature. Mode "2" MIDI start and stop commands start and stop the PSR-510 SONG MEMORY feature. ZPress the [RECEIVE CH/CL/COM] Button & Select "cd RECEIVE CH/CL/ COM Press the [RECEIVE CH/CL/COM] button, then use the [+] and [-] buttons, the number buttons, the data dial, or the [RECEIVE CH/CL/ COM] button itself to select "cd" on the MULTI DISPLAY ("cd" is the ....M...O..D...E.... 0 RX OFF 1 MULTI 2 REMOTE 3 CHORD 4 ROOT next step above "cL" - or the next step below MIDI channel 1). XSelect the Desired Mode ... Mode number +- 9 1__ Use the [+/-] button in the number-button row to select the desired start mode. The start/stop modes are selected in sequence each time the [+/-] button is pressed, and the selected mode number appears on the left digit of the MULTI DISPLAY. 59
-
 1
1 -
2
-
3
-
4
-
5
-
6
-
7
-
8
-
9
-
10
-
11
-
12
-
13
-
14
-
15
-
16
-
17
-
18
-
19
-
20
-
21
-
22
-
23
-
24
-
25
-
26
-
27
-
28
-
29
-
30
-
31
-
32
-
33
-
34
-
35
-
36
-
37
-
38
-
39
-
40
-
41
-
42
-
43
-
44
-
45
-
46
-
47
-
48
-
49
-
50
-
51
-
52
-
53
-
54
-
55
-
 56
56 -
 57
57 -
 58
58 -
 59
59 -
 60
60 -
 61
61 -
 62
62 -
 63
63 -
 64
64 -
 65
65 -
 66
66 -
67
-
68
-
69
-
70
-
71
-
72
-
73
-
74
-
75
-
76
-
77
 |
 |
